
「プログラミングを勉強したい」
「ゲームをつくれるようになりたい」
・・・でも
「ムズかしそう」
「何から始めればいいか、わからない」
と悩んでいませんか?
このページでは、誰でも、わかるようにゲームつくり、プログラミングについて紹介します
今回は「Unity」というソフトを使い、超初心者でも大丈夫な、プログラミング体験をご案内します
プログラミングで、プレイヤーの操作でボールを動かします
次の目次の流れにそって説明します
・Unityとは何?どうすればプログラミングできるの?
・Unityをインストールしよう
Unityはゲームをつくるためのソフトです
次のゲームもUnityを使い、つくられました
Unityはゲームつくり以外にも多くのことができます
今回は、プログラミングを作り、体験します
Unityを始めるのはインストールする必要があります
Unityを始めるためには、公式サイトからダウンロードする必要があります
<Unity公式サイト>
https://unity.com/ja
インストールの方法を次のページで紹介しています
ぜひ、合わせてご覧ください
<UNITYのインストール方法と 初めての使い方を 紹介しているページ>
https://illust55.com/2018/
次は、ボールを動かすプログラミングについて紹介します
・ボールを動かすプログラムをつくろう
・プログラミングで動かすボールを用意しよう

Unityの新しいファイルを作ります
1.「プロジェクト」をクリックしてください
2.「新規作成」をクリックしてください

3D用のファイルをつくります
1.「3D」をクリックしてください
2.「プロジェクト名」、「保存先」を決めてください
3.「作成」をクリックしてください
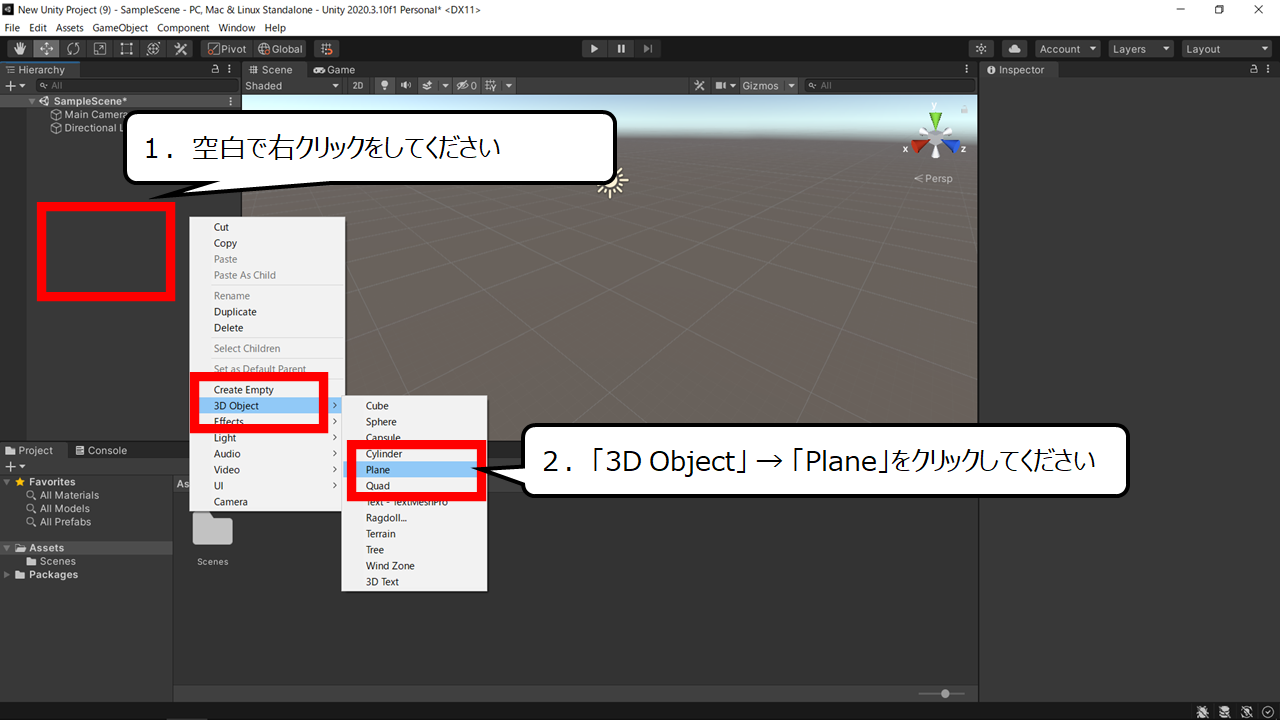
地面をつくります
1.空白で右クリックをしてください
2.「3D Object」 → 「Plane」をクリックしてください
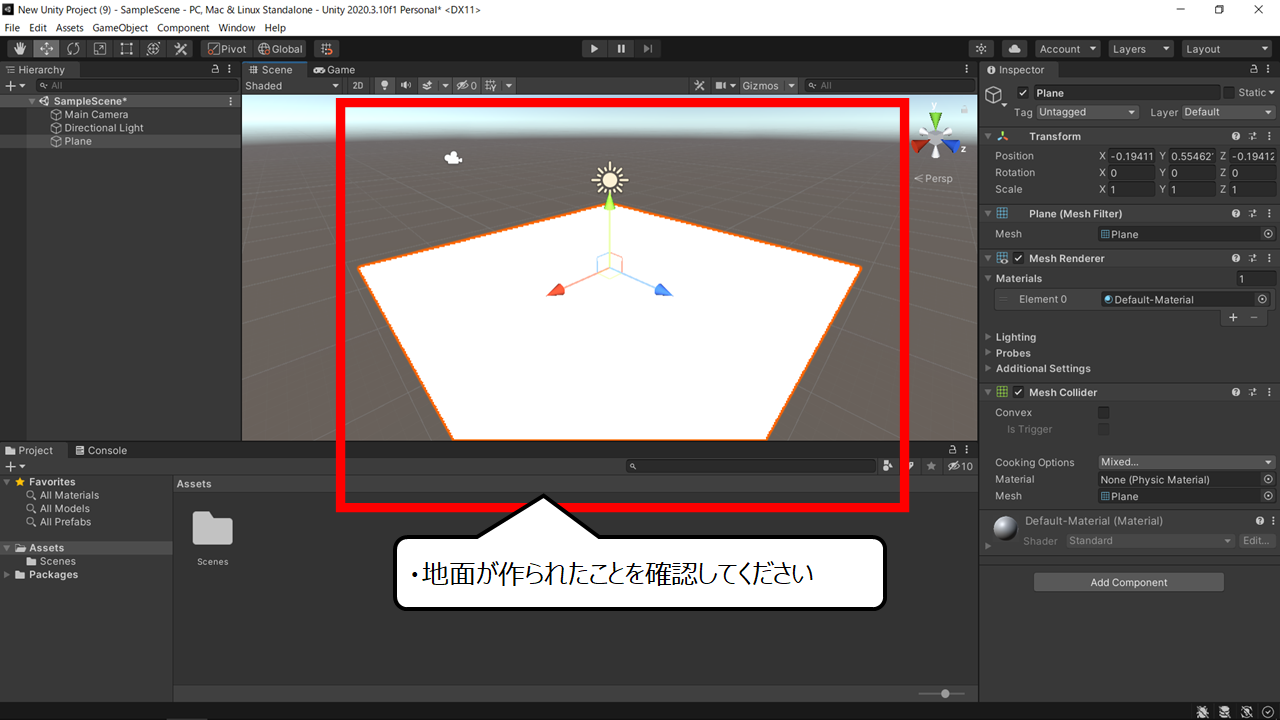
地面が画面に現れます
・地面が作られたことを確認してください
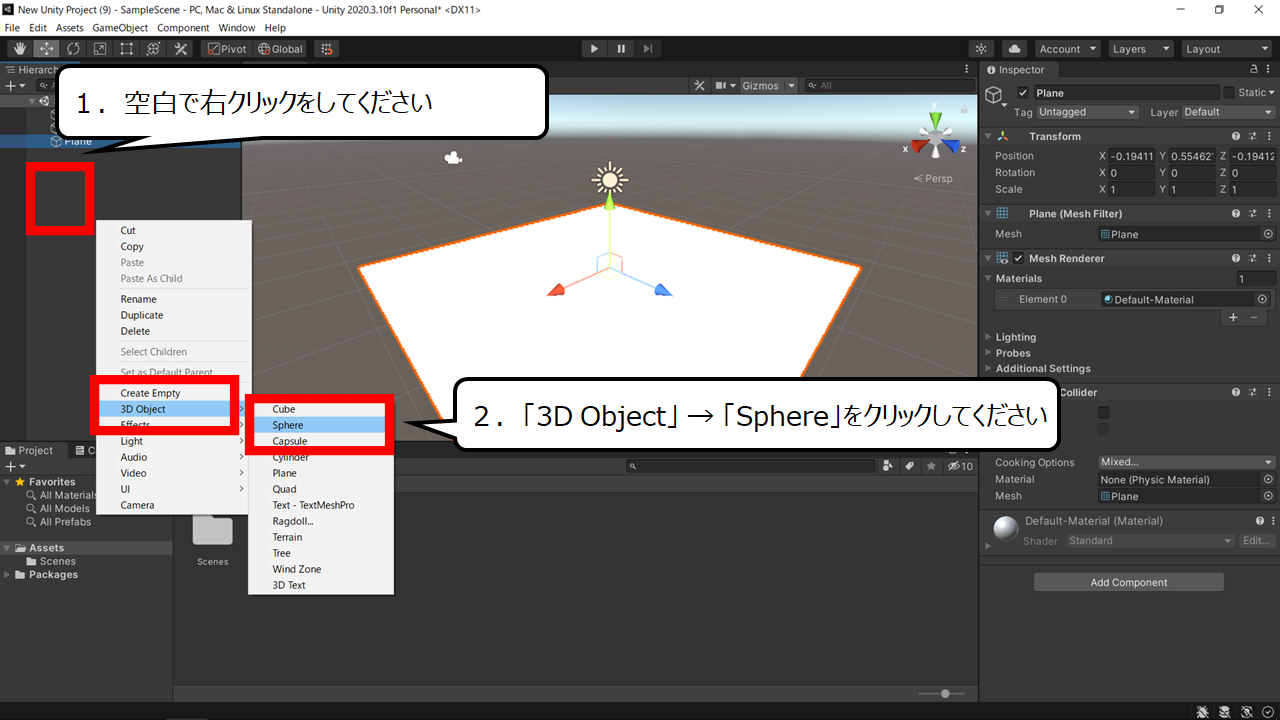
ボールをつくります
1.空白で右クリックをしてください
2.「3D Object」 → 「Sphere」をクリックしてください
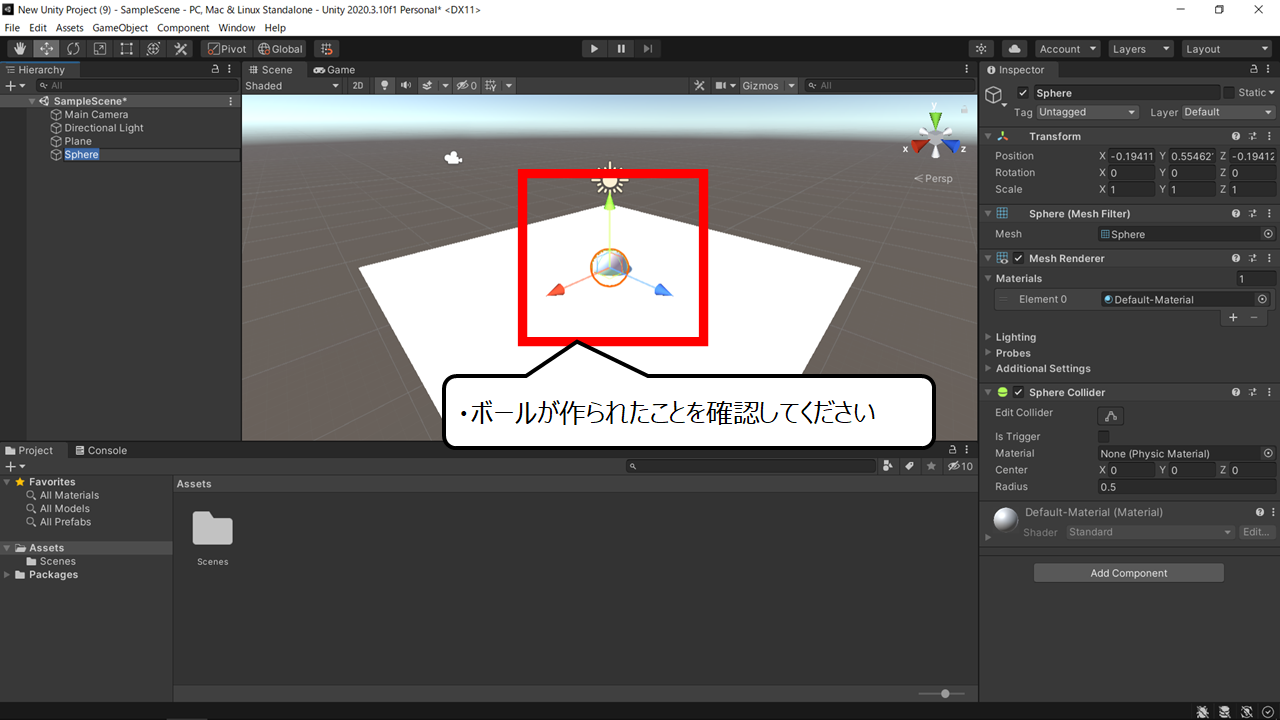
ボールが画面に現れました
・ボールが作られたことを確認してください
・テストプレイでボールが空中に止まることを確認しよう
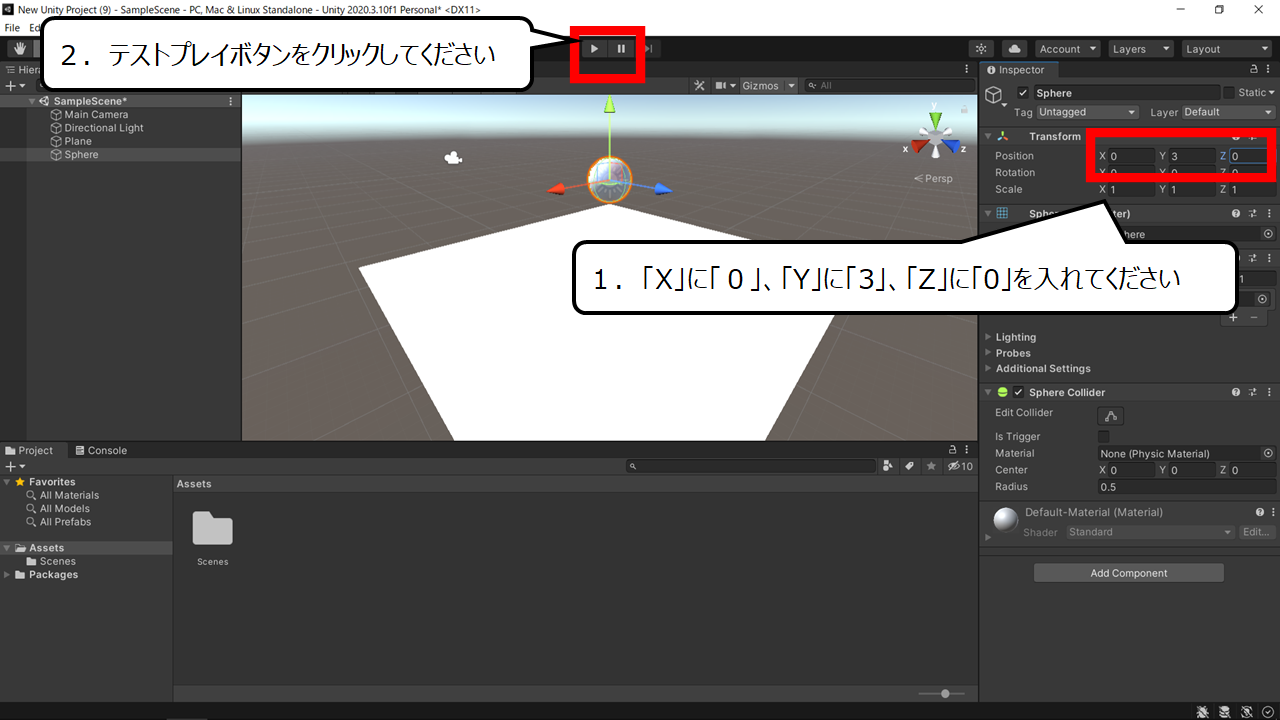
ボールの位置を動かし、テストプレイで確認します
1.「X」に「0」、「Y」に「3」、「Z」に「0」を入れてください
2.テストプレイボタンをクリックしてください
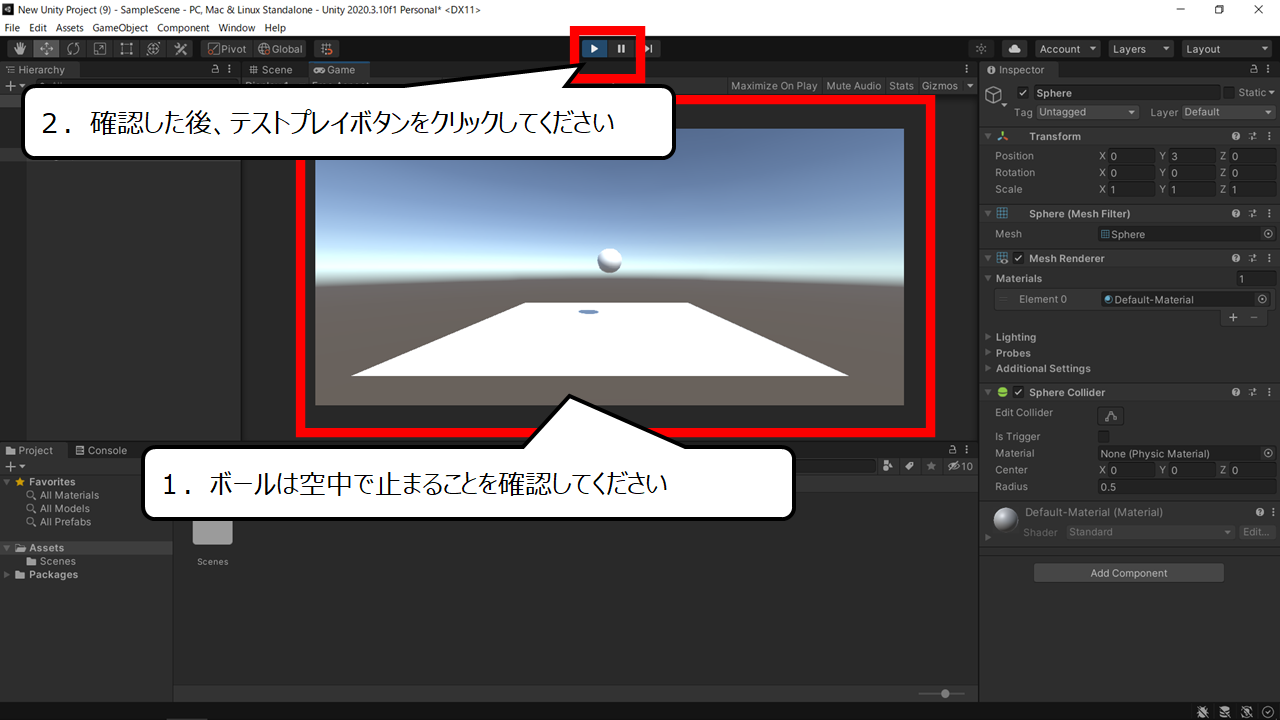
ボールは空中から動きません
1.ボールは空中で止まることを確認してください
2.確認した後、テストプレイボタンをクリックしてください
・ボールに重力を加えよう
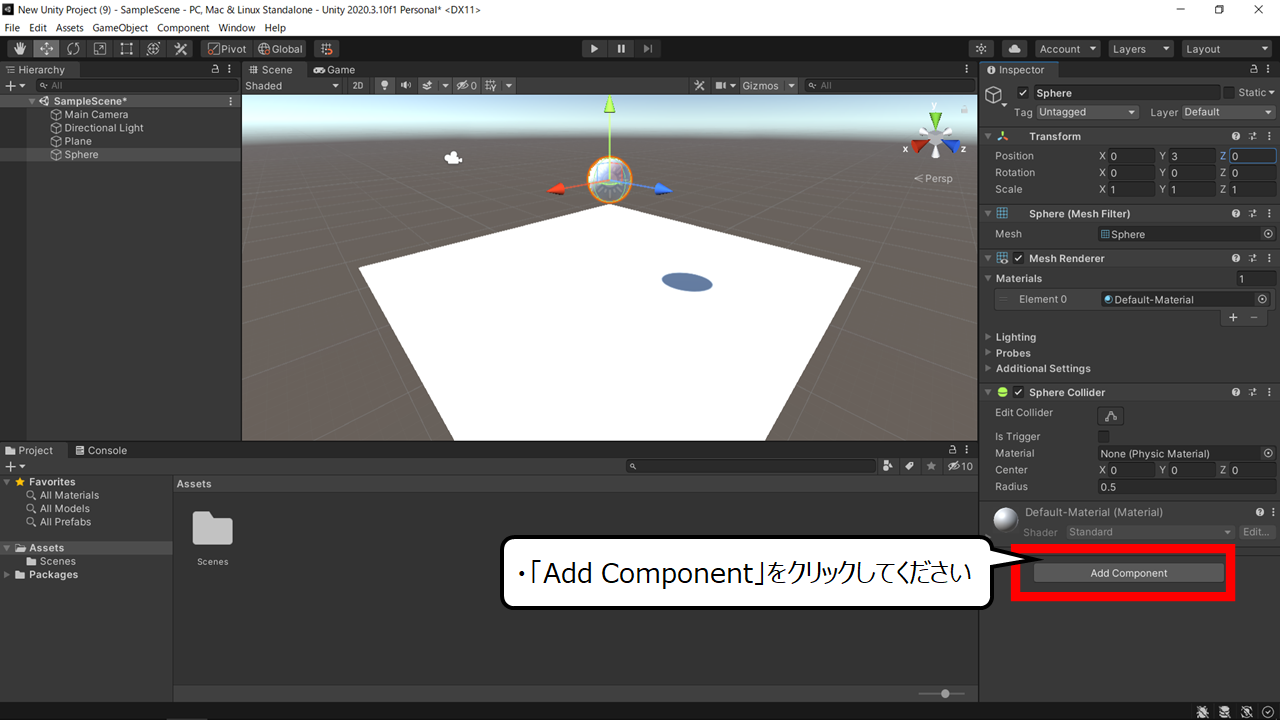
ボールに重力を加えます
・「Add Component」をクリックしてください
ボールに重力パーツを加えます
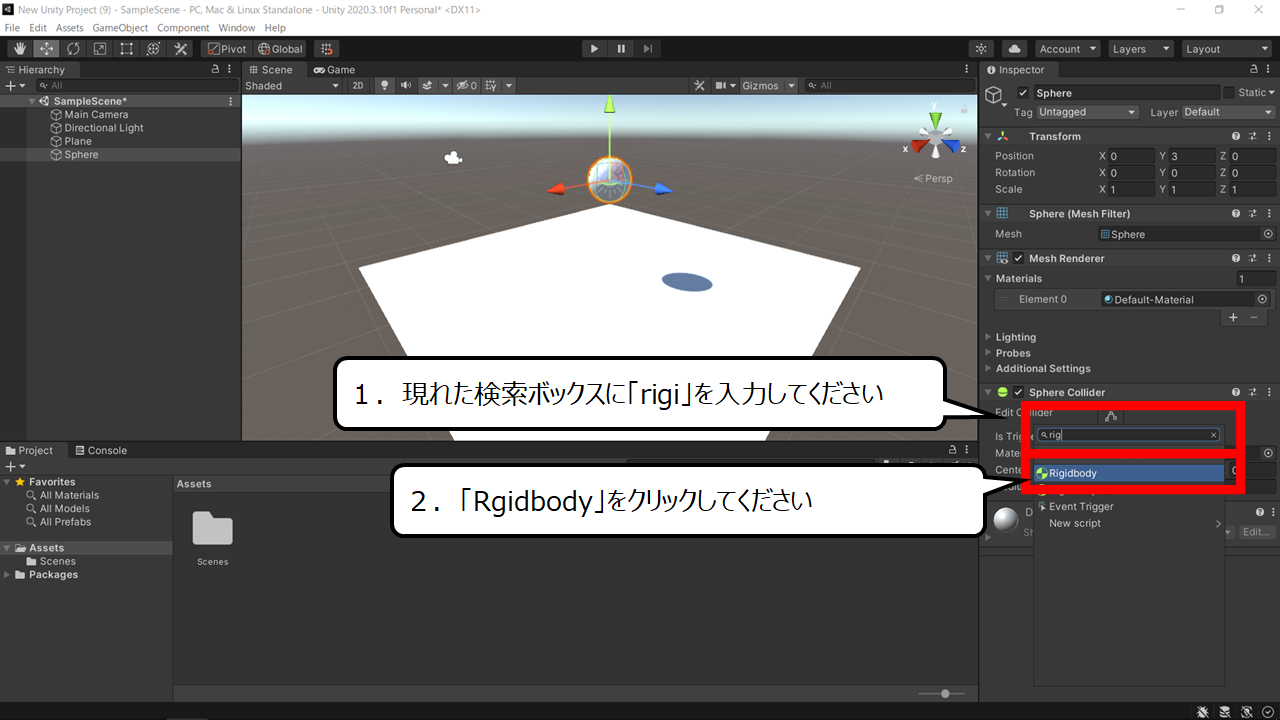
1.現れた検索ボックスに「rigi」を入力してください
2.「Rgidbody」をクリックしてください
テストプレイで確認します
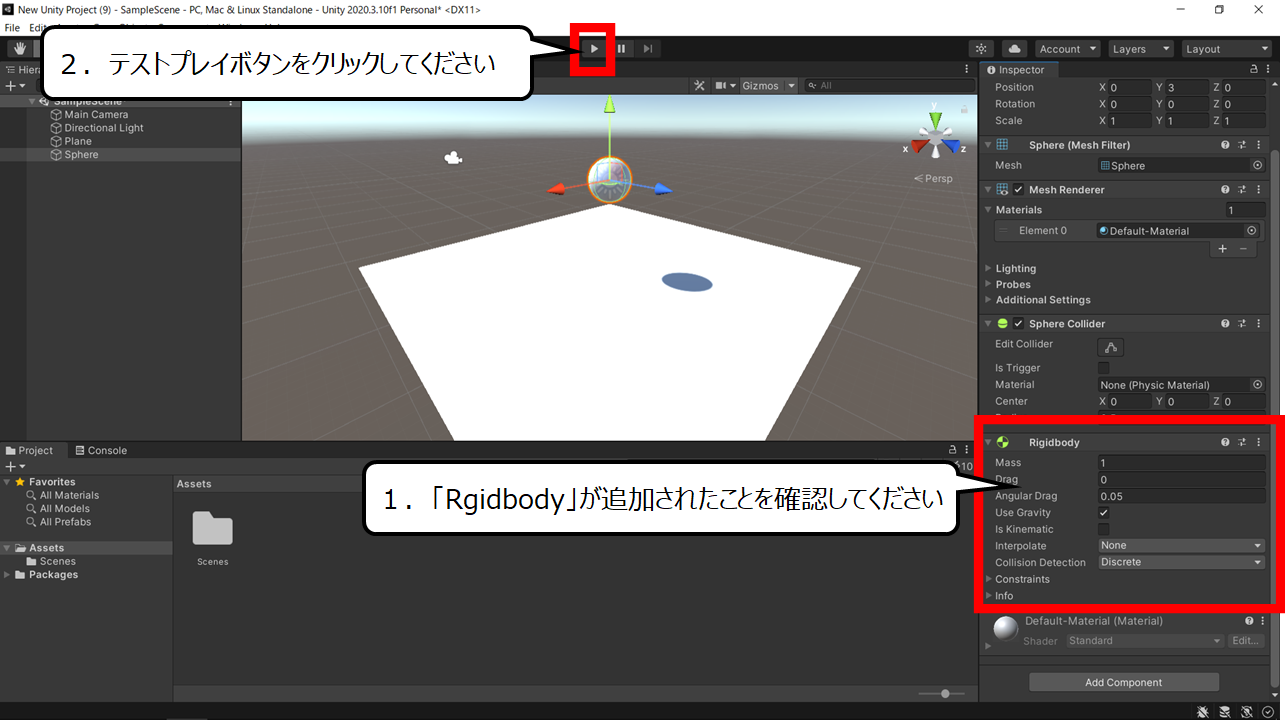
1.「Rgidbody」が追加されたことを確認してください
2.テストプレイボタンをクリックしてください
ボールに重力が加わりました
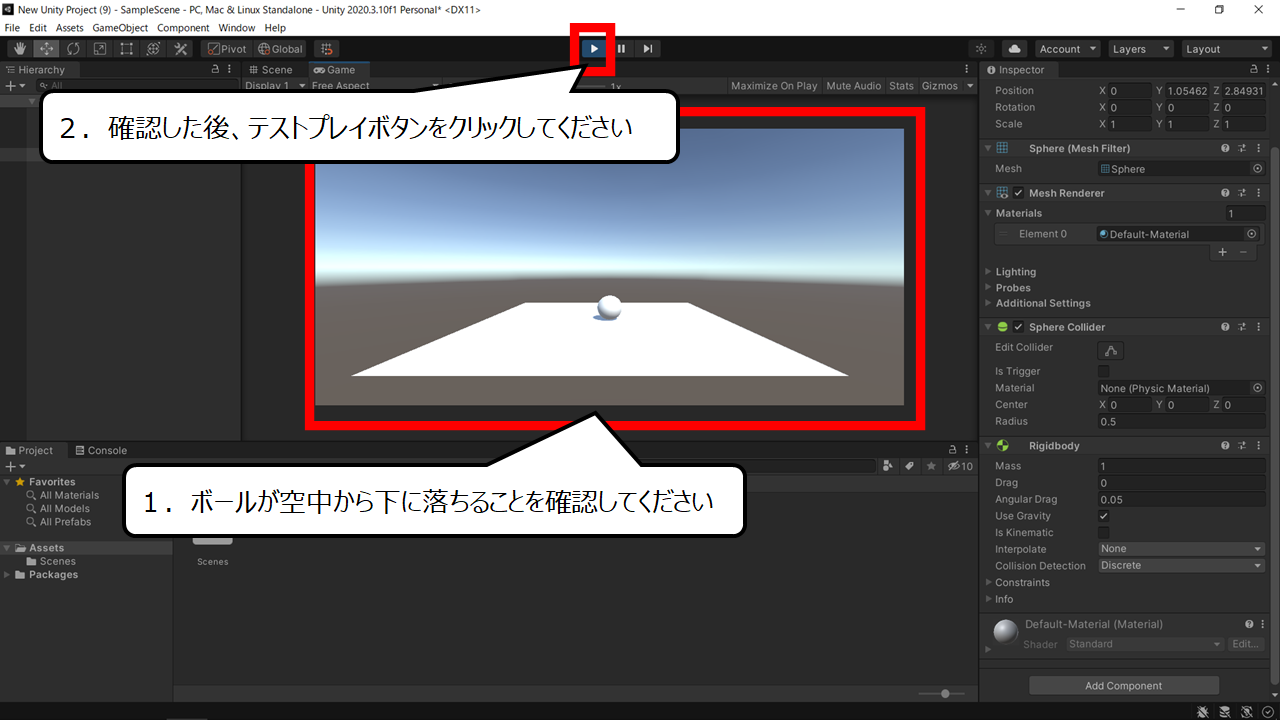
1.ボールが空中から下に落ちることを確認してください
2.確認した後、テストプレイボタンをクリックしてください
・3Dボールに加えるプログラムのファイルをつくろう
ボールにプログラムを加える準備をします
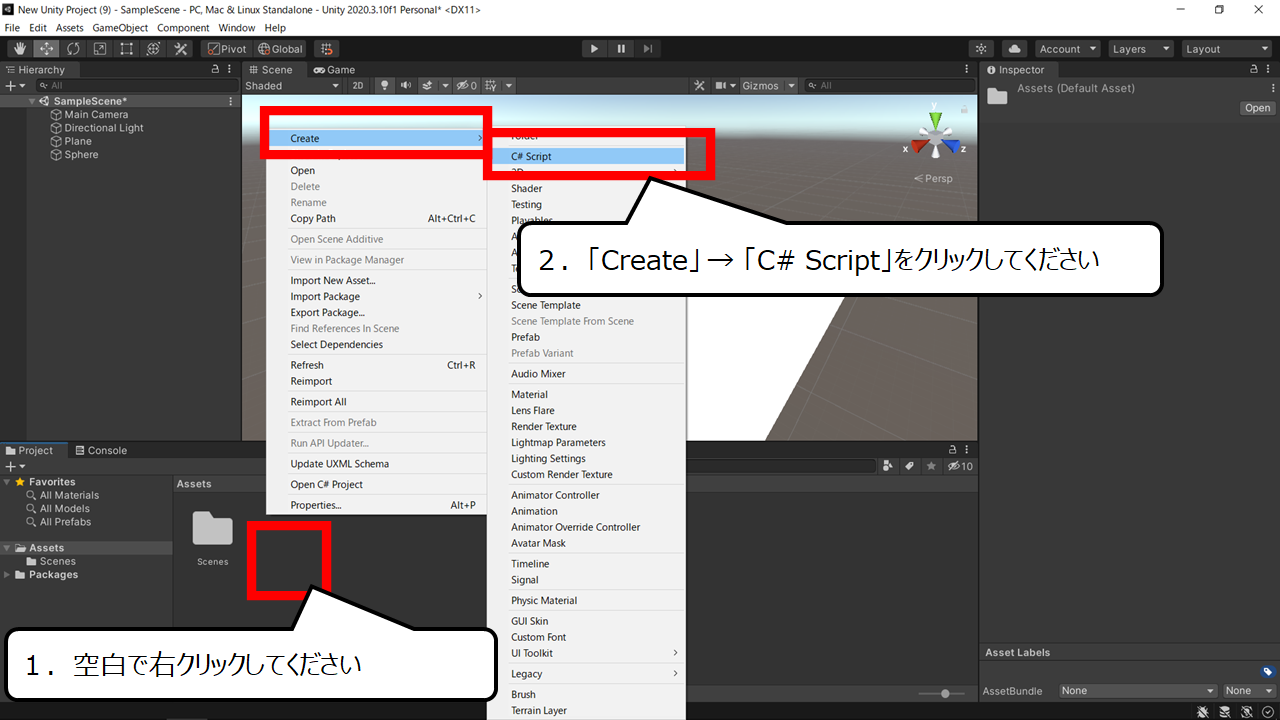
1.空白で右クリックしてください
2.「Create」 → 「C# Script」をクリックしてください
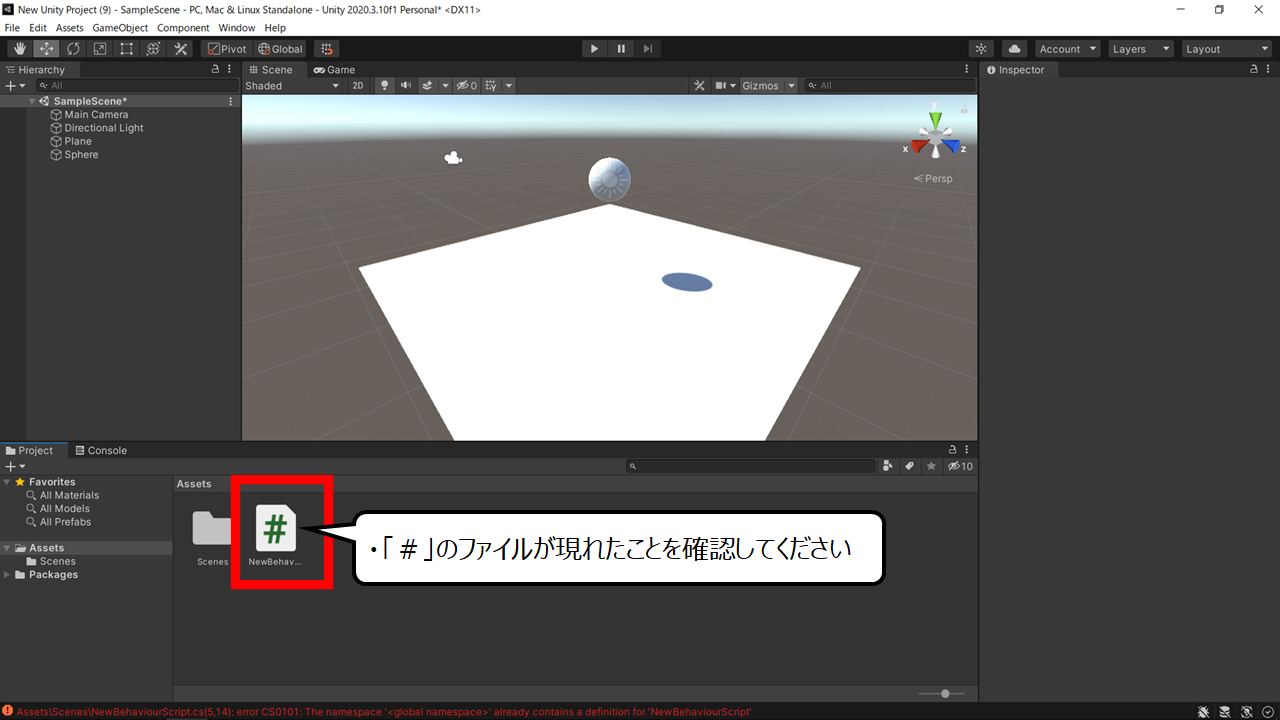
プログラミングするためのファイルが現れます
・「#」のファイルが現れたことを確認してください
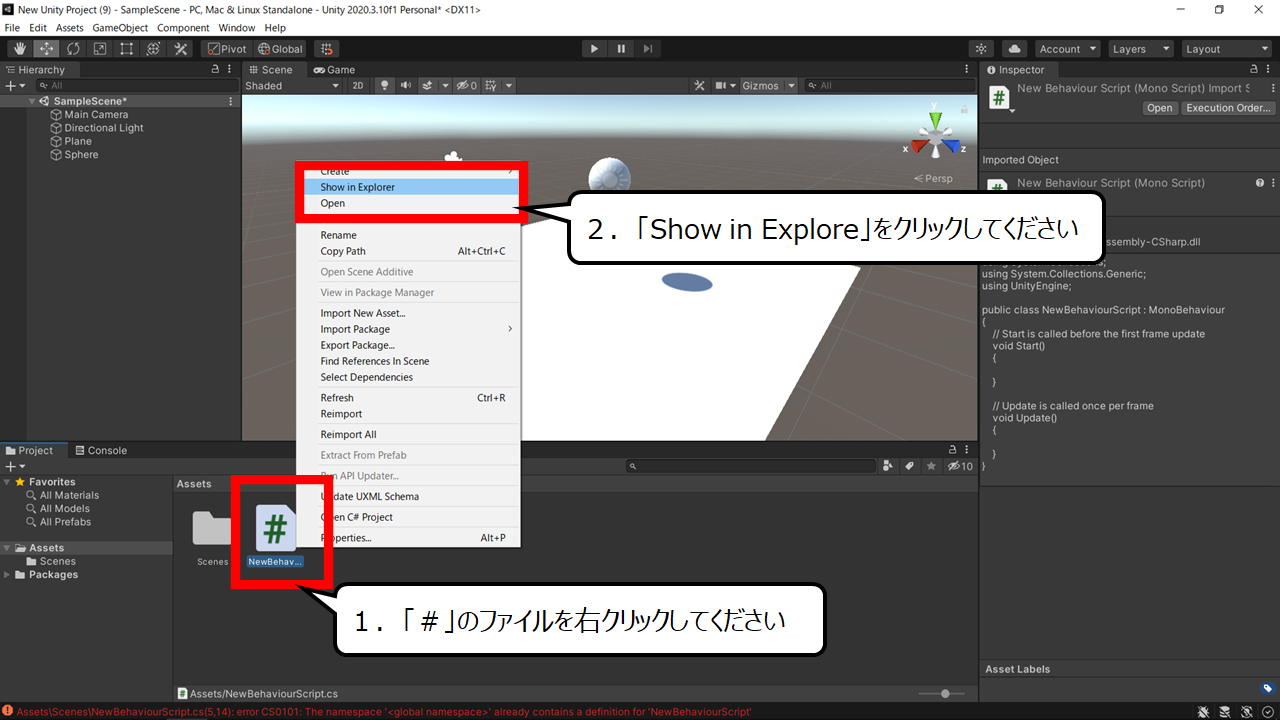
今回は、トラブルがないようにメモ帳を使います
1.「#」のファイルを右クリックしてください
2.「Show in Explore」をクリックしてください
・プログラミングしよう
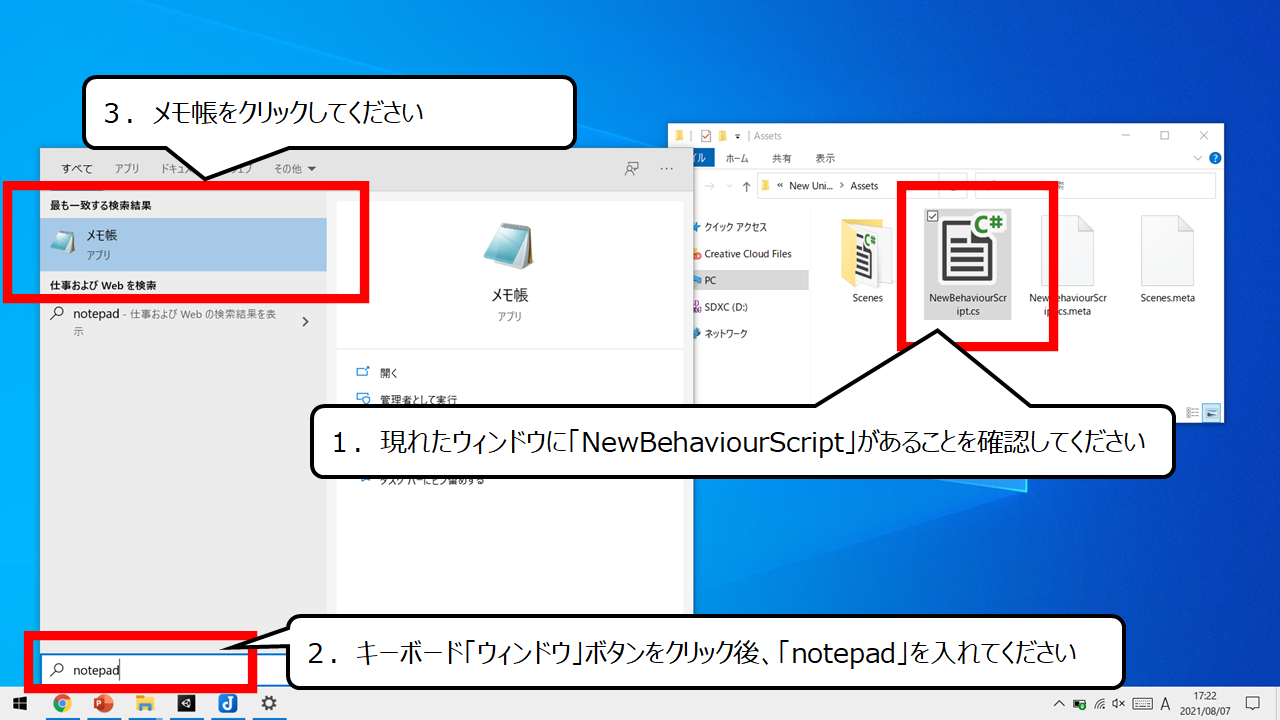
プログラムに使うファイルがあることを確認してください
1.現れたウィンドウに「NewBehaviourScript」があることを確認してください
2.キーボード「ウィンドウ」ボタンをクリック後、「notepad」を入れてください
3.メモ帳をクリックしてください
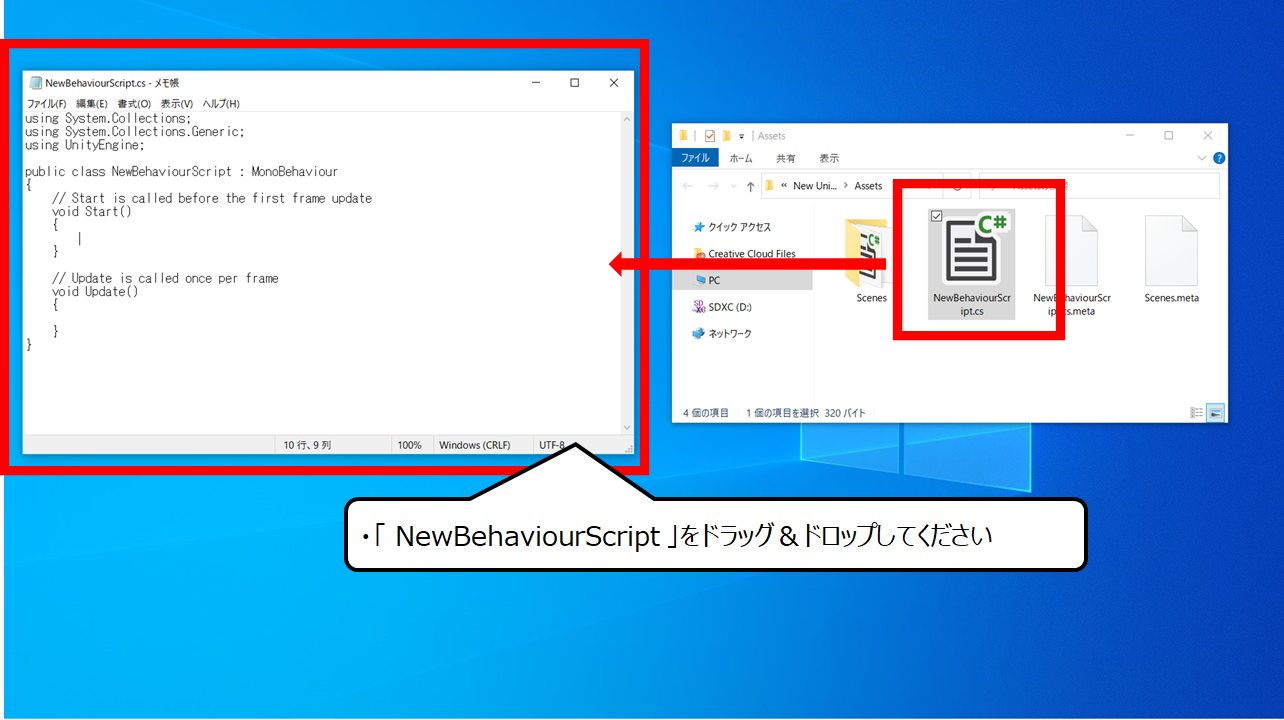
メモ帳でプログラムにつかうファイルを開きます
・「 NewBehaviourScript 」をドラッグ&ドロップしてください
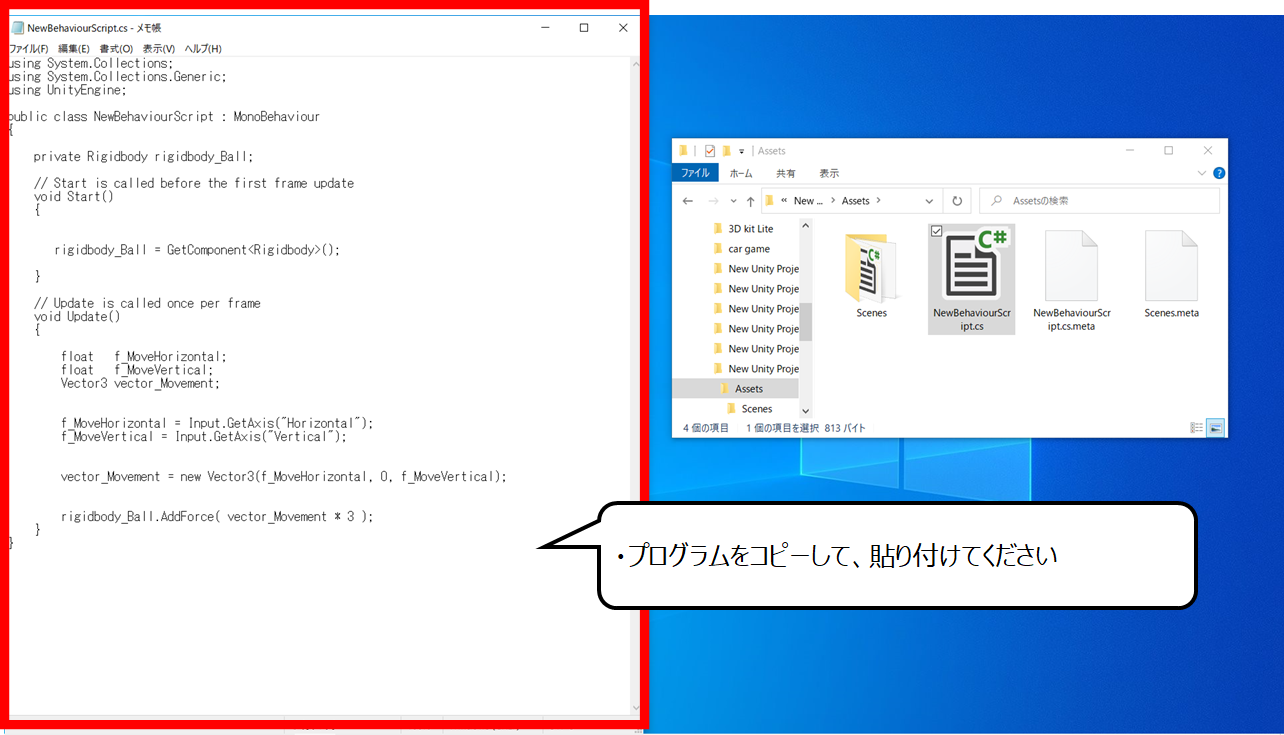
メモ帳にプログラムをコピー&ペーストしてください
・次のプログラムをコピーして、貼り付けてください
using System.Collections;
using System.Collections.Generic;
using UnityEngine;

public class NewBehaviourScript : MonoBehaviour
{

    private Rigidbody rigidbody_Ball;

    // Start is called before the first frame update
    void Start()
    {


       rigidbody_Ball = GetComponent<Rigidbody>();

    }

    // Update is called once per frame
    void Update()
    {

    	float 	f_MoveHorizontal;
    	float 	f_MoveVertical;
    	Vector3 vector_Movement;


        f_MoveHorizontal = Input.GetAxis("Horizontal");
        f_MoveVertical = Input.GetAxis("Vertical");


        vector_Movement = new Vector3(f_MoveHorizontal, 0, f_MoveVertical);


        rigidbody_Ball.AddForce( vector_Movement * 3 );
    }
}
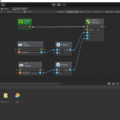
プログラムを説明した図になります
カンタンに参考にしてください
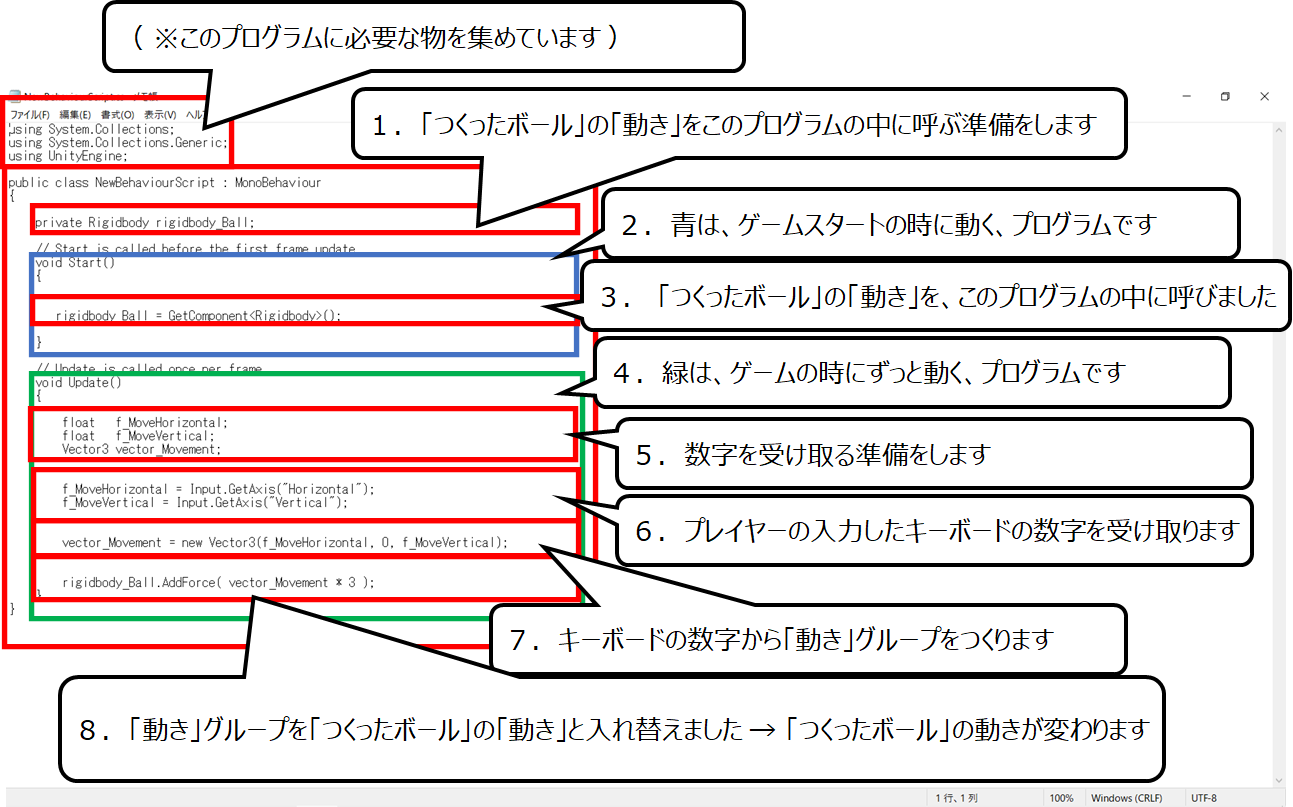
プログラムを全てわかる必要はありません
今回は、次のことを考えて、プログラムを読んでください
・上から順番にプログラムは動きます
・イコールの右を計算して左に答えを出します( ※ 算数や数学の逆です )
・答えを「文字」の中に入れて運ぶことができます(※数学の文字式と同じです)
ぼんやりとした全体のイメージを描いて頂くだけで、大丈夫です
・3Dボールにプログラミングしたファイルを加えよう
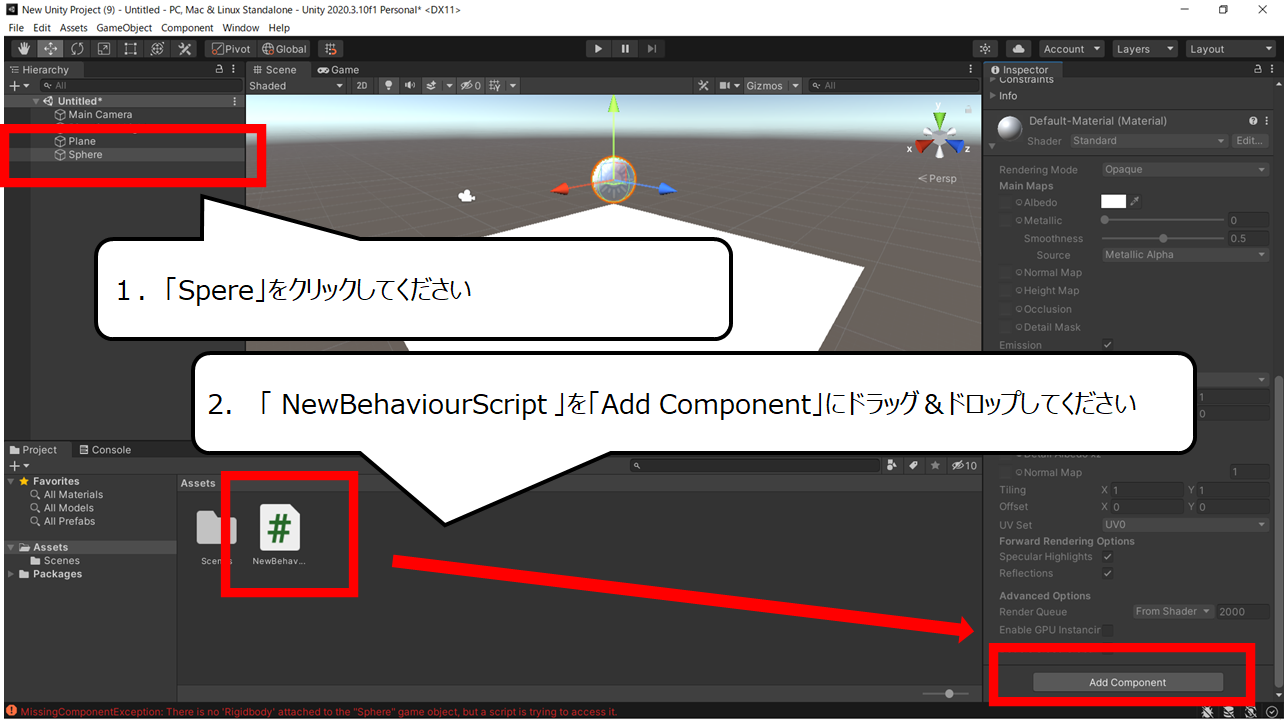
ボールにプログラミングしたファイルを加えます
1.「Spere」をクリックしてください
2. 「 NewBehaviourScript 」を「Add Component」にドラッグ&ドロップしてください
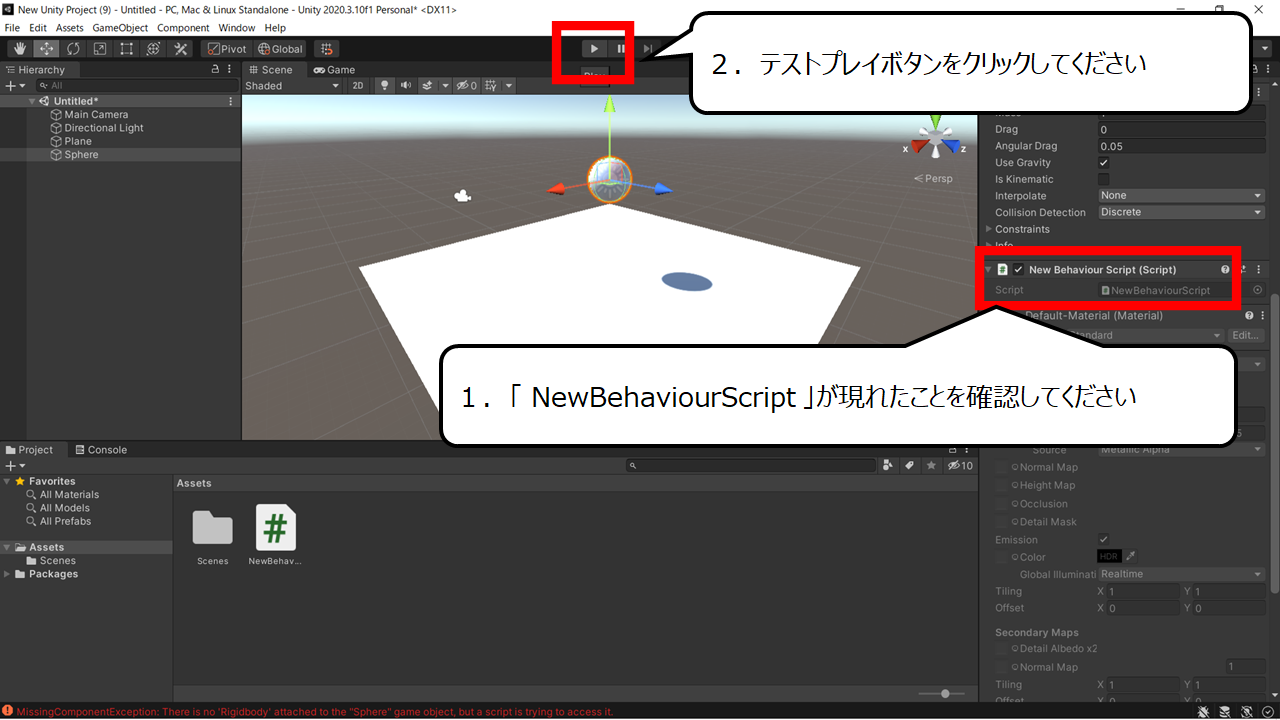
ボールにプログラミングしたファイルが加わったことを確認してください
1.「 NewBehaviourScript 」が現れたことを確認してください
2.テストプレイボタンをクリックしてください
・3Dボールが動くことを確認しよう

キーボードの操作で動くことを確認します
1.キーボード「矢印キー」で動くことを確認してください
2.確認した後、テストプレイボタンをクリックしてください
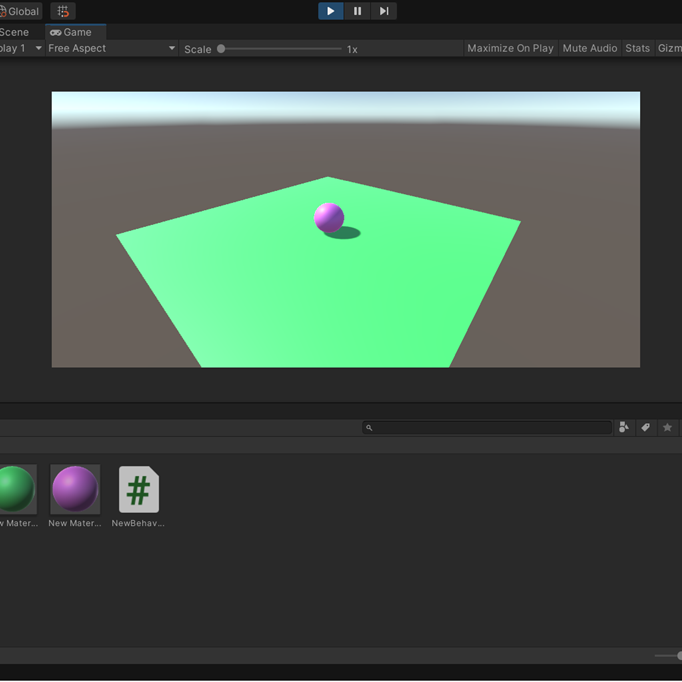
・ボールと地面に色をつけよう
・ボールに色をつけよう
色の部品パーツをつくります
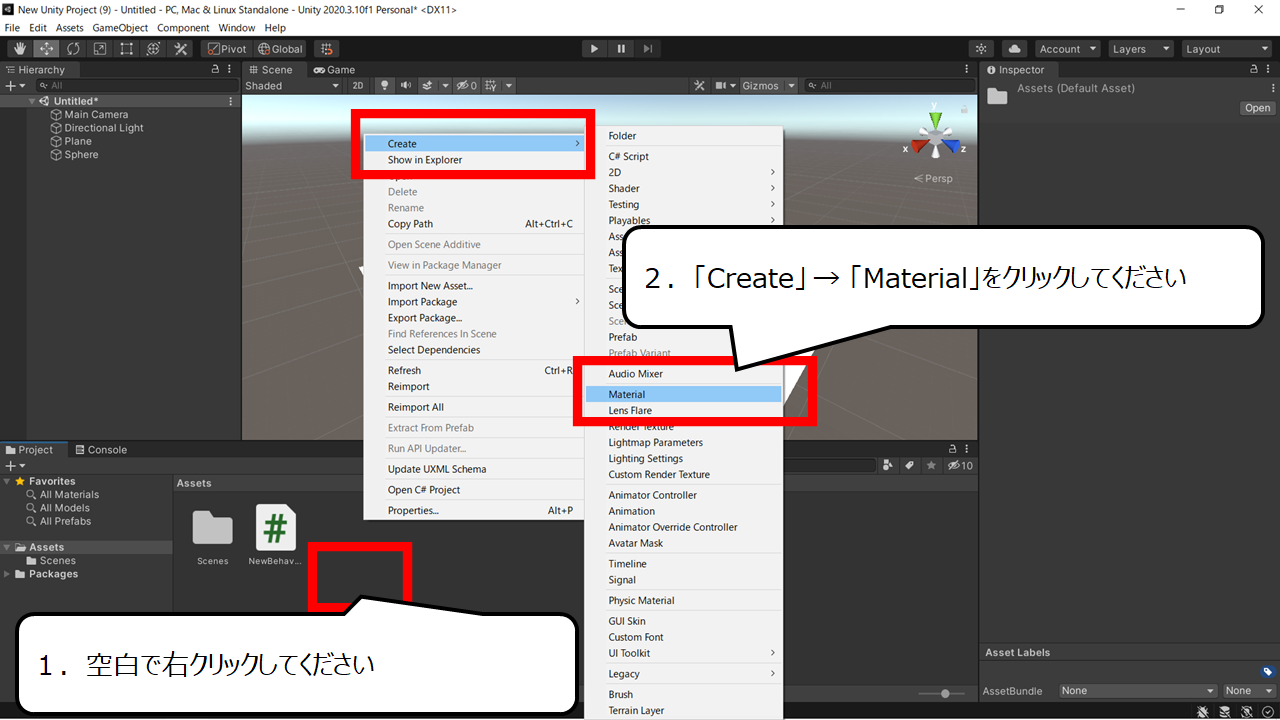
1.空白で右クリックしてください
2.「Create」 → 「Material」をクリックしてください
色の部品パーツの色を変えます
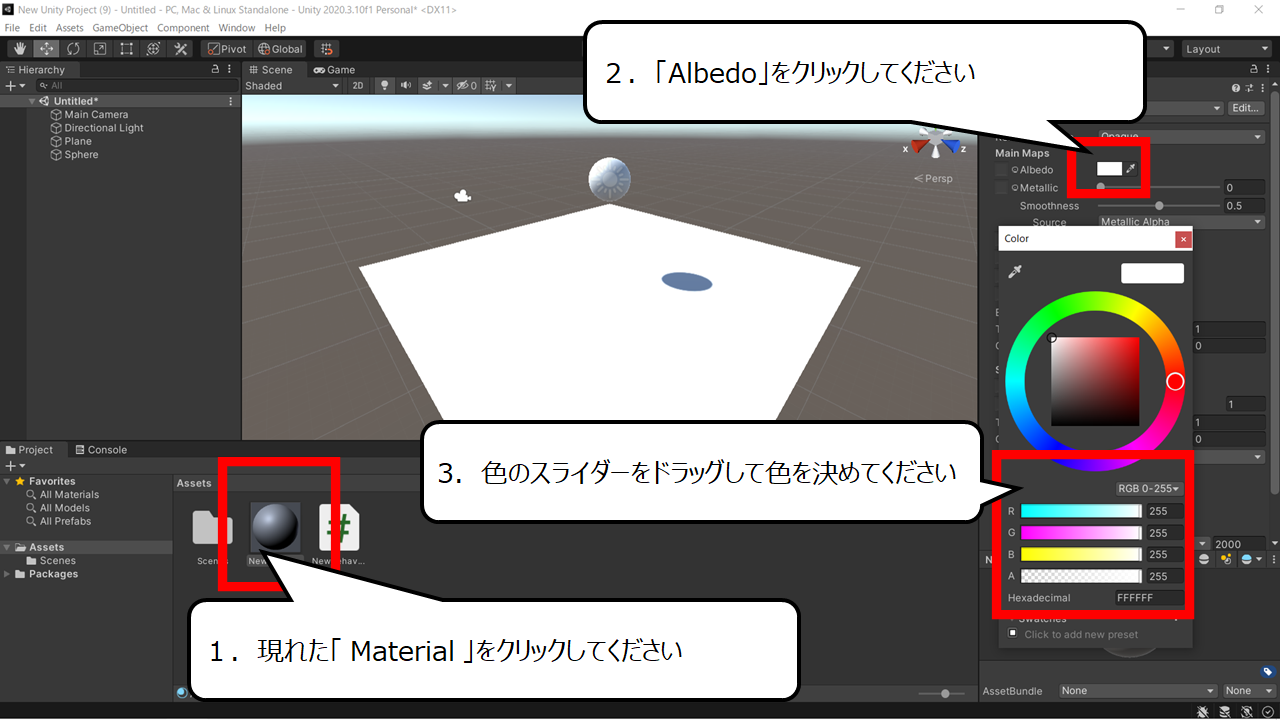
1.現れた「 Material 」をクリックしてください
2.「Albedo」をクリックしてください
3.色のスライダーをドラッグして色を決めてください
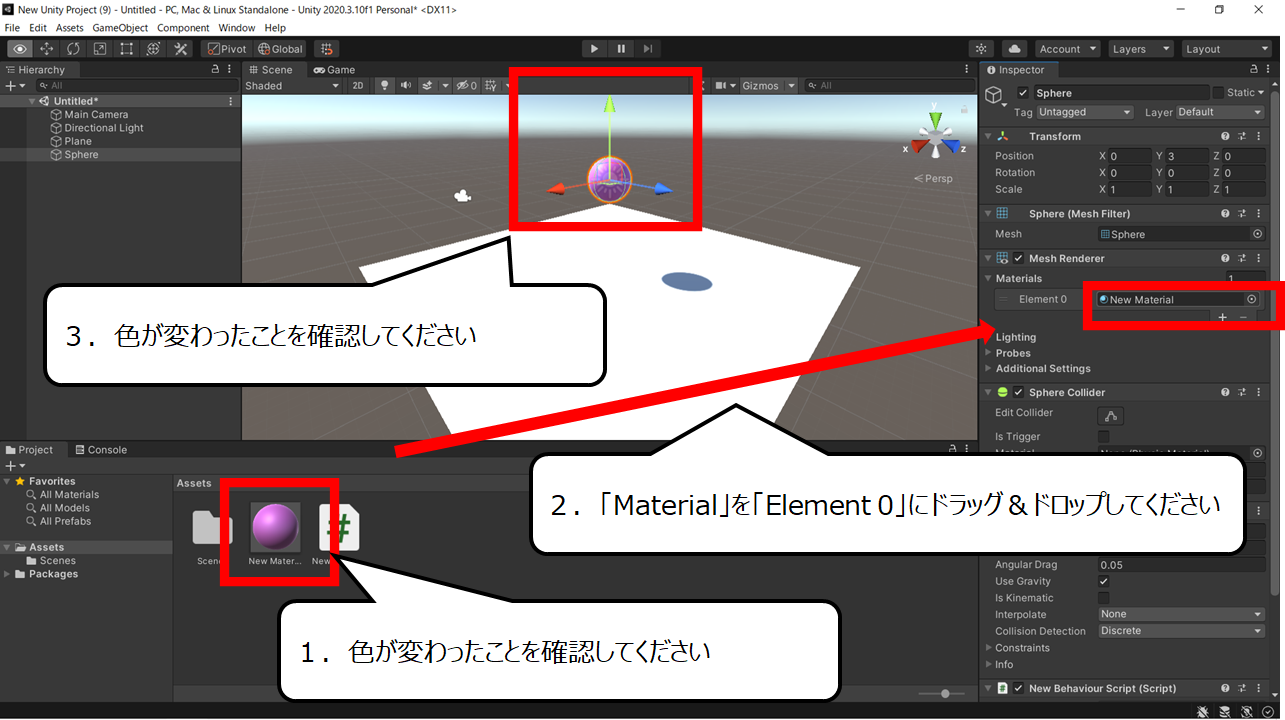
色の部品パーツを3Dボールに加えます
1.色が変わったことを確認してください
2.「Material」を「Element 0」にドラッグ&ドロップしてください
3.色が変わったことを確認してください
・地面の色も変えよう
色の部品パーツをつくります
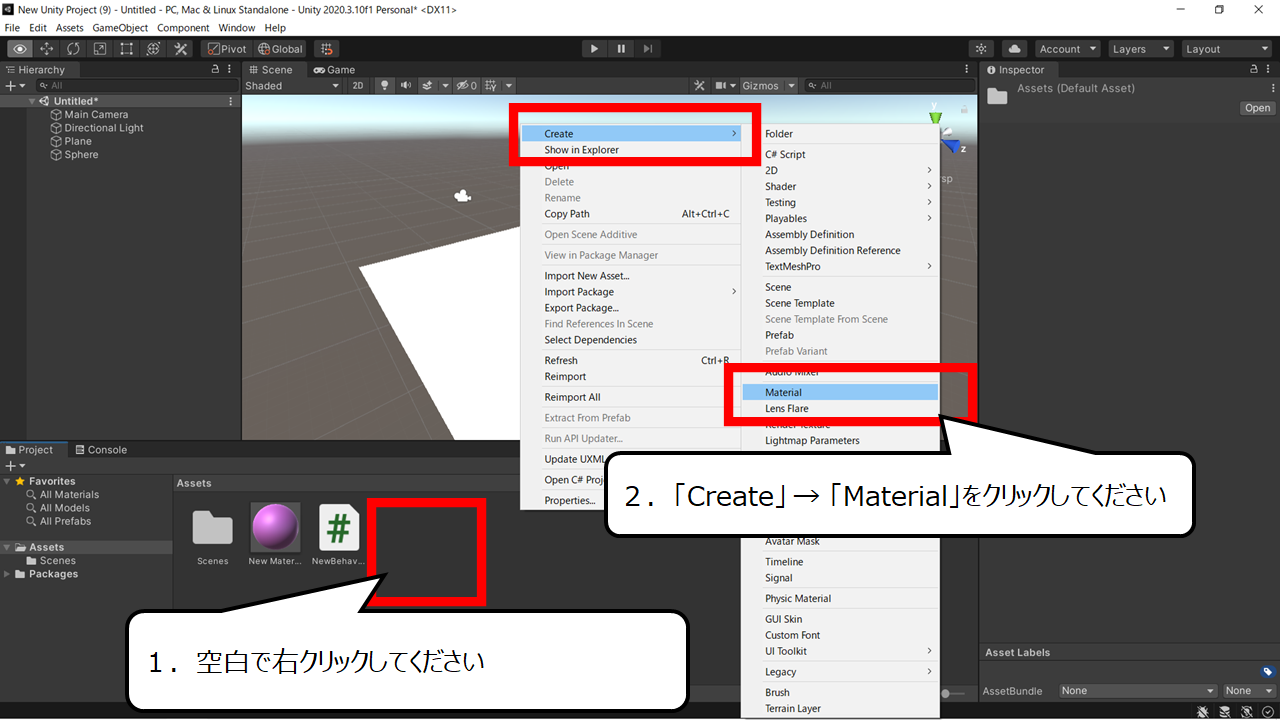
1.空白で右クリックしてください
2.「Create」 → 「Material」をクリックしてください
地面の3Dオブジェクトに色の部品を加えます
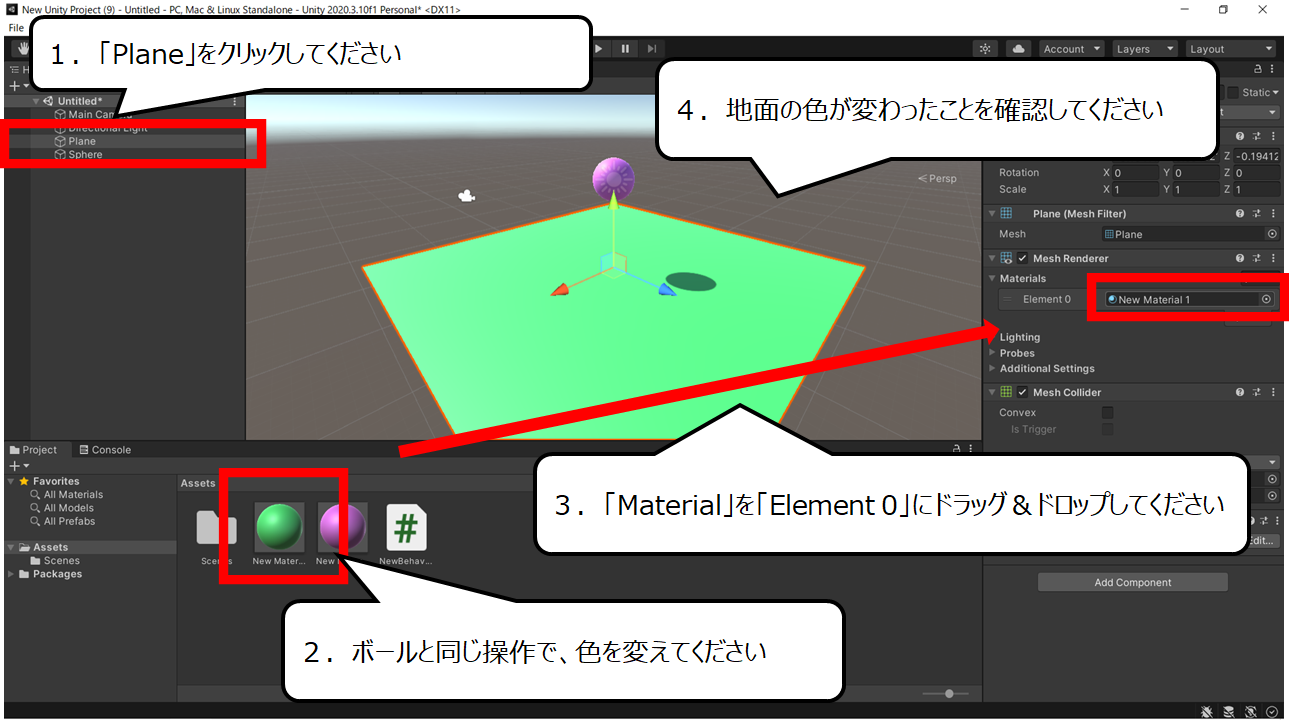
1.「Plane」をクリックしてください
2.ボールと同じ操作で、色を変えてください
3.「Material」を「Element 0」にドラッグ&ドロップしてください
4.地面の色が変わったことを確認してください
・カメラの位置をナナメ上にしよう
カメラの位置を調整します
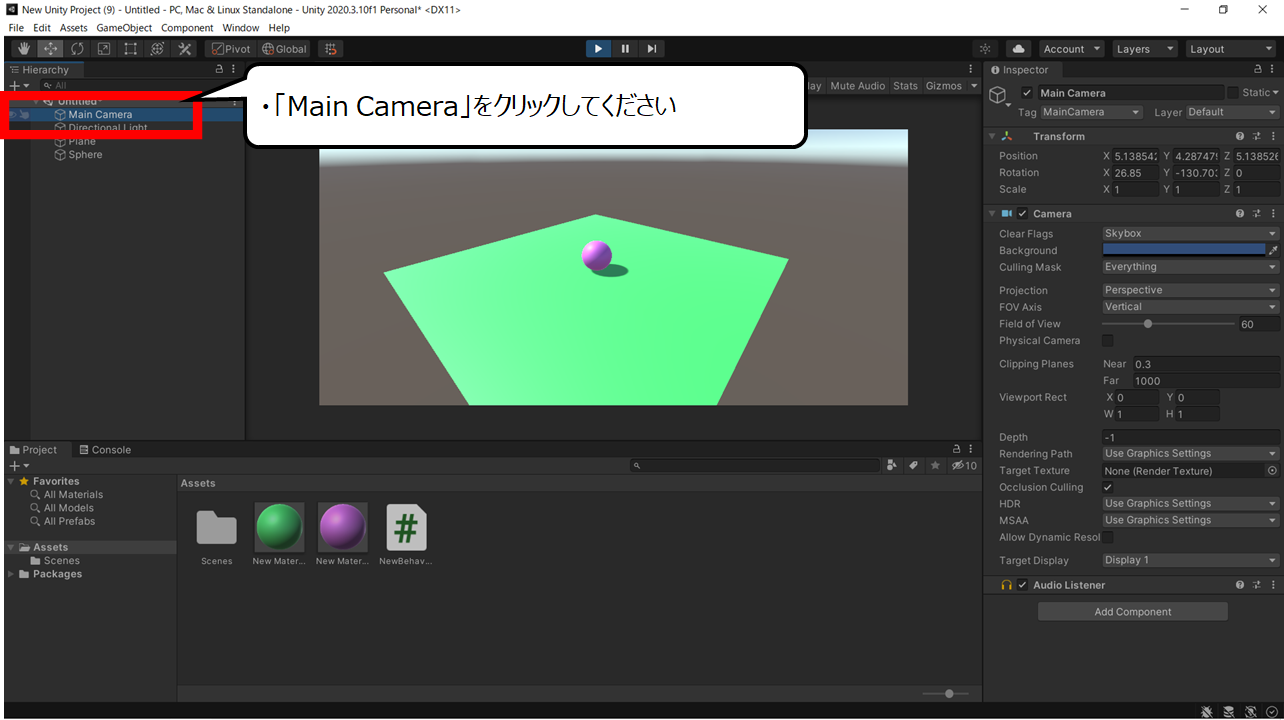
・「Main Camera」をクリックしてください
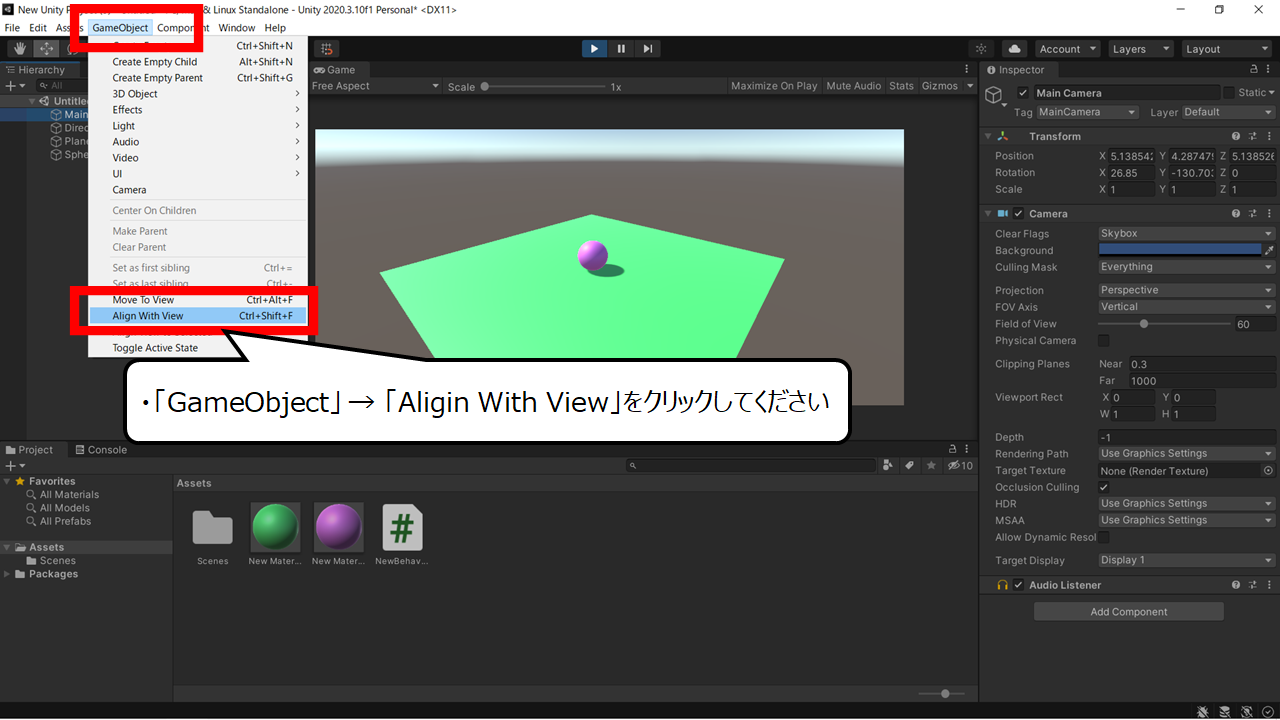
自分が見ている位置に動かします
・「GameObject」 → 「Aligin With View」をクリックしてください
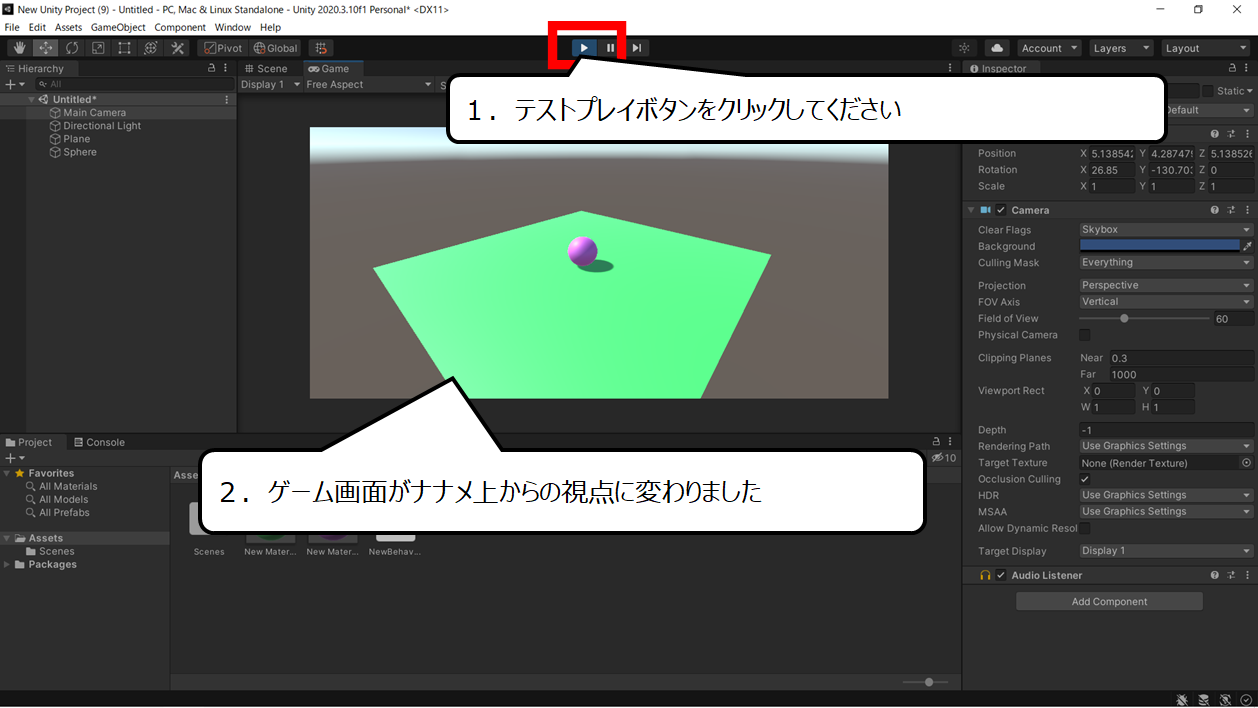
テストプレイで確認します
1.テストプレイボタンをクリックしてください
2.ゲーム画面がナナメ上からの視点に変わりました
・まとめ
今回は「Unity」を使った、プログラミングを学びました
プログラミングは言葉と同じです
くり返し話すことで、自然とわかります
ムリに覚える必要はありません
ここまで、ご覧いただき、ありがとうございました

コメント