
「スマホで動画編集をしたい」
「スマホでとった動画をSNSにカッコよくアップしたい」
けど
「どうすればいいか、わからない」
と悩んでいませんか?
このページでは、だれでも、できる方法で動画のつくり方を紹介しています
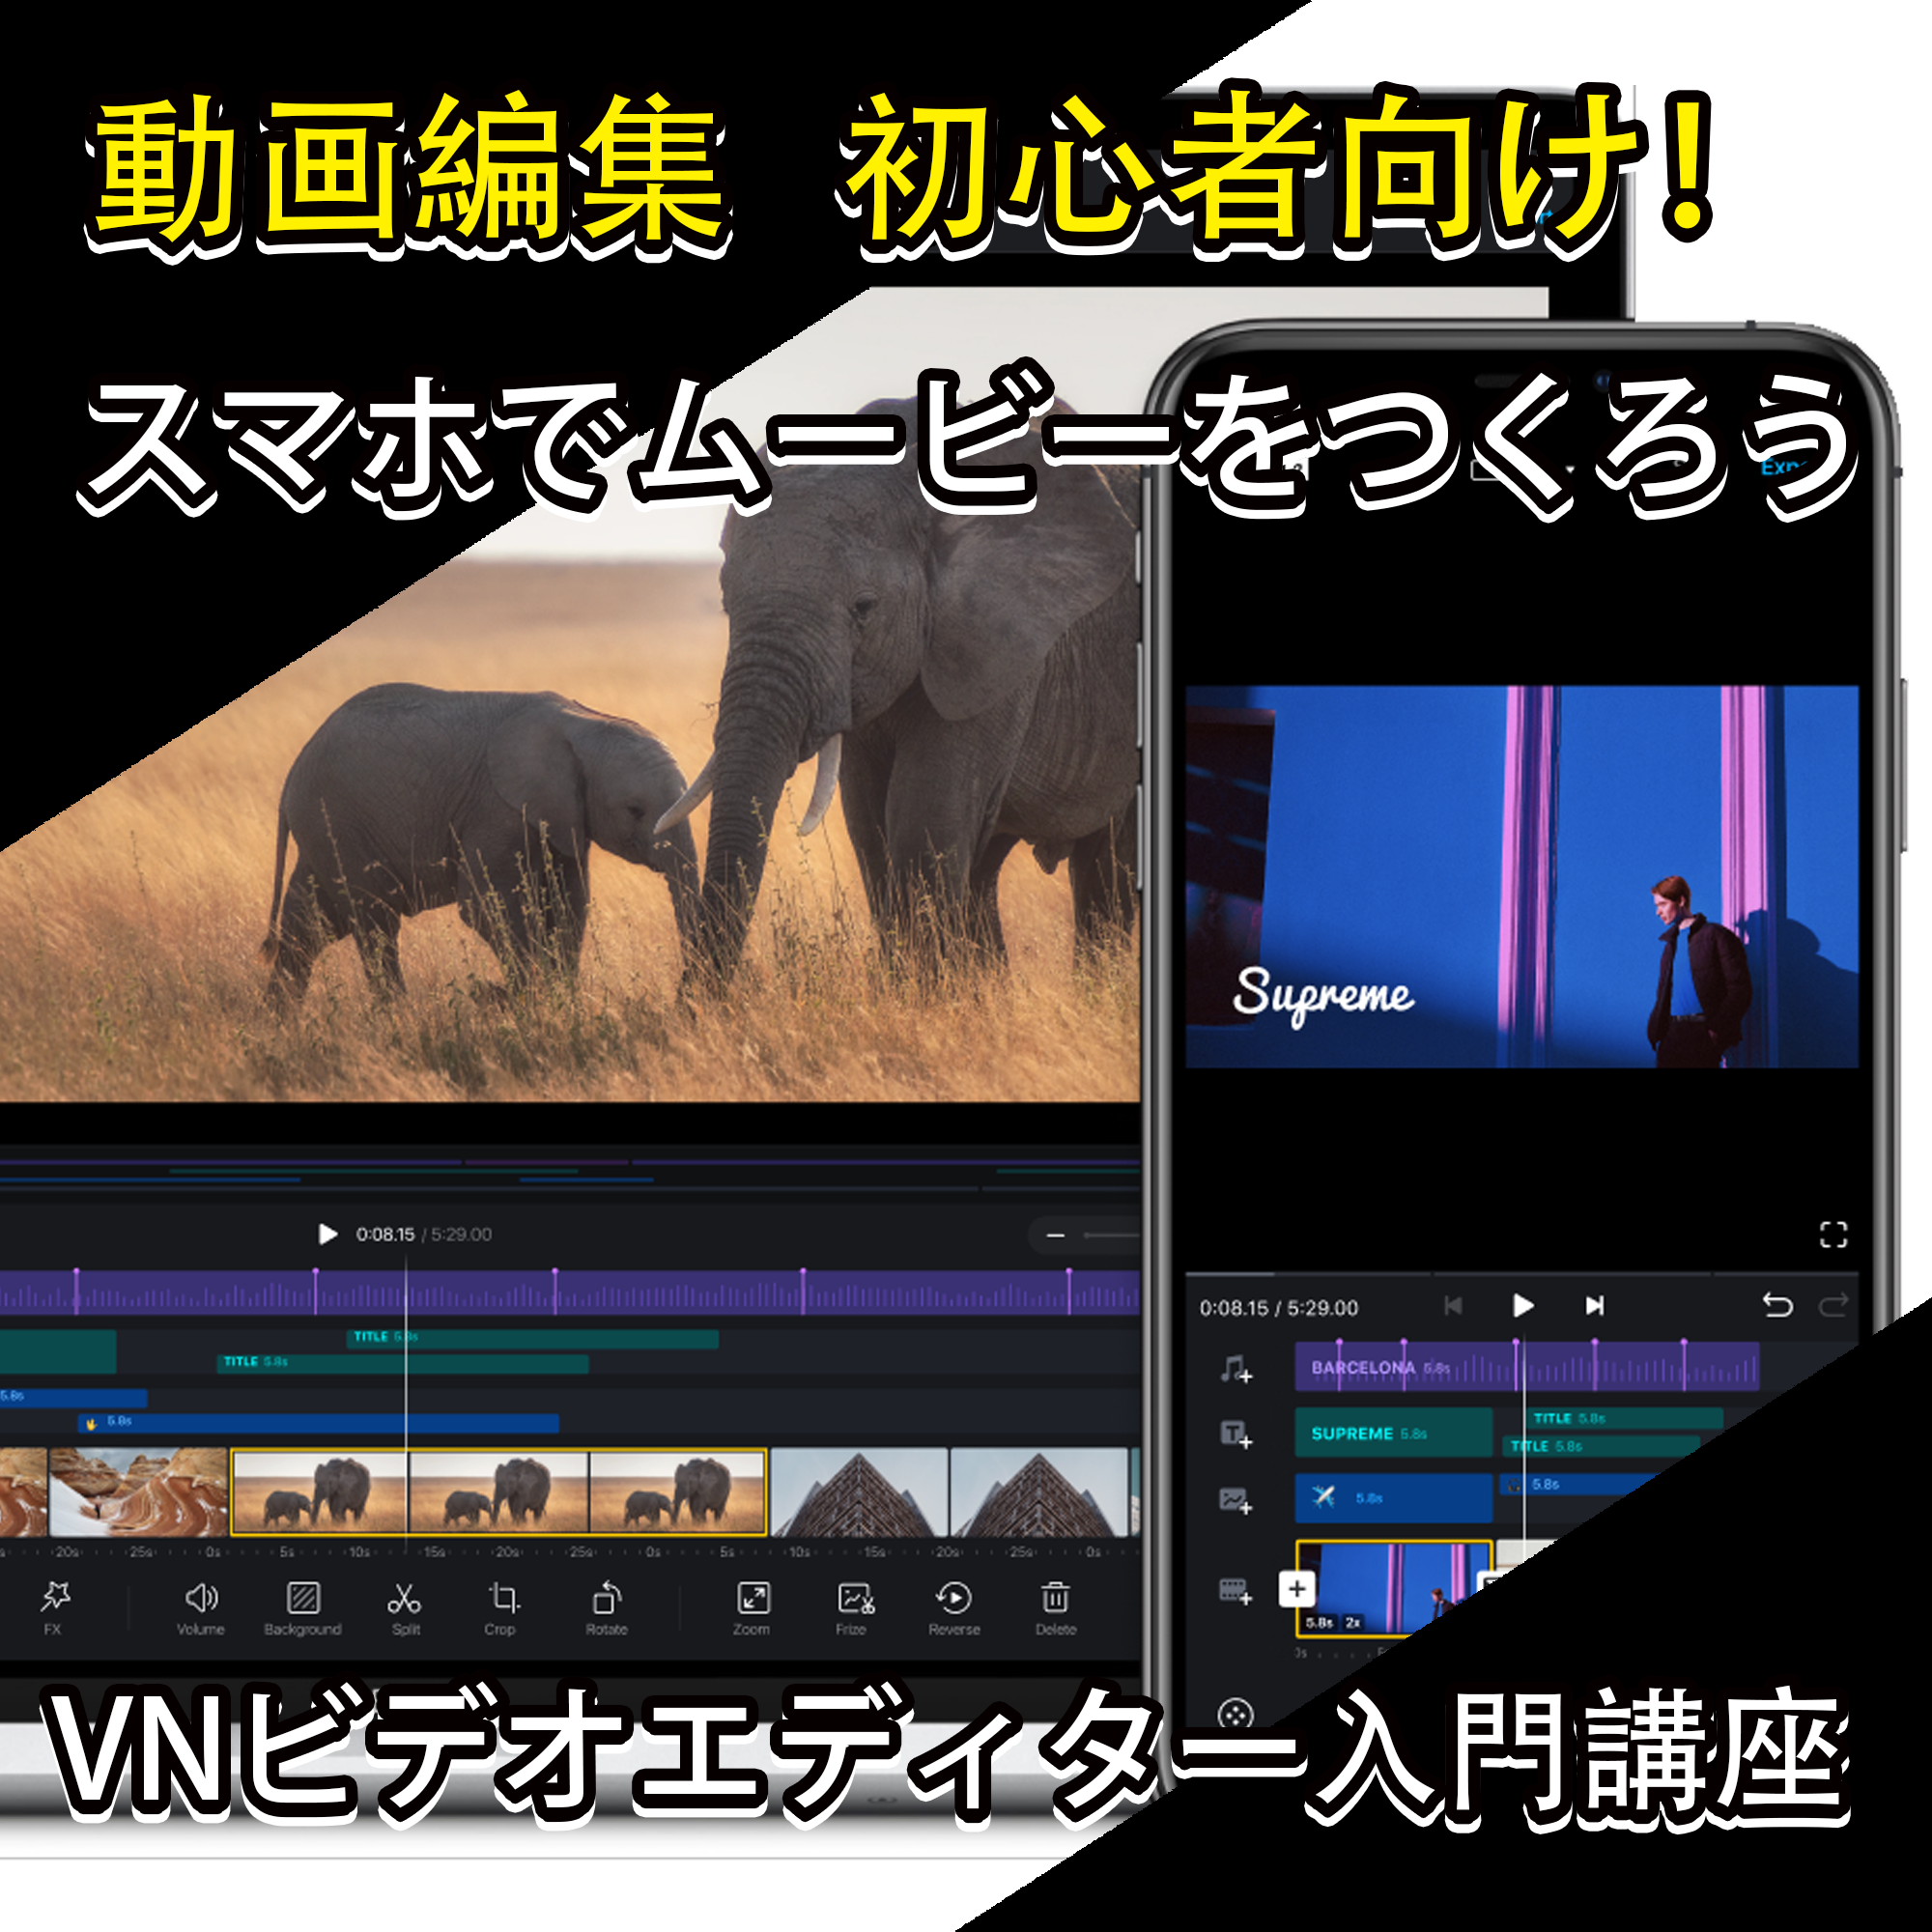
今回は、スマホでムービーのカッコいいつくり方、VN動画編集ソフトの使い方を紹介します
ぜひ、チャレンジしてください
次の目次の流れにそって紹介します
また、さらにくわしく、Youtubeで絵と映像のつくり方を紹介しています
・VNビデオエディターをはじめて聞いた方
・VNビデオエディターとは何?
、VNビデオエディターは無料でスマホのムービーを編集できるソフトです
「VN :Video Editor」は無料で動画編集ができる、スマホ用のソフトです
AndroidとiPhoneのどちらでも、使うことができます
「VN :Video Editor」の紹介ムービーです
・スマホでムービー編集のVNビデオエディターをつかおう
・はじめに無料のムービーを用意しよう
はじめは、ムービーつくりに使う音楽とムービーを用意します
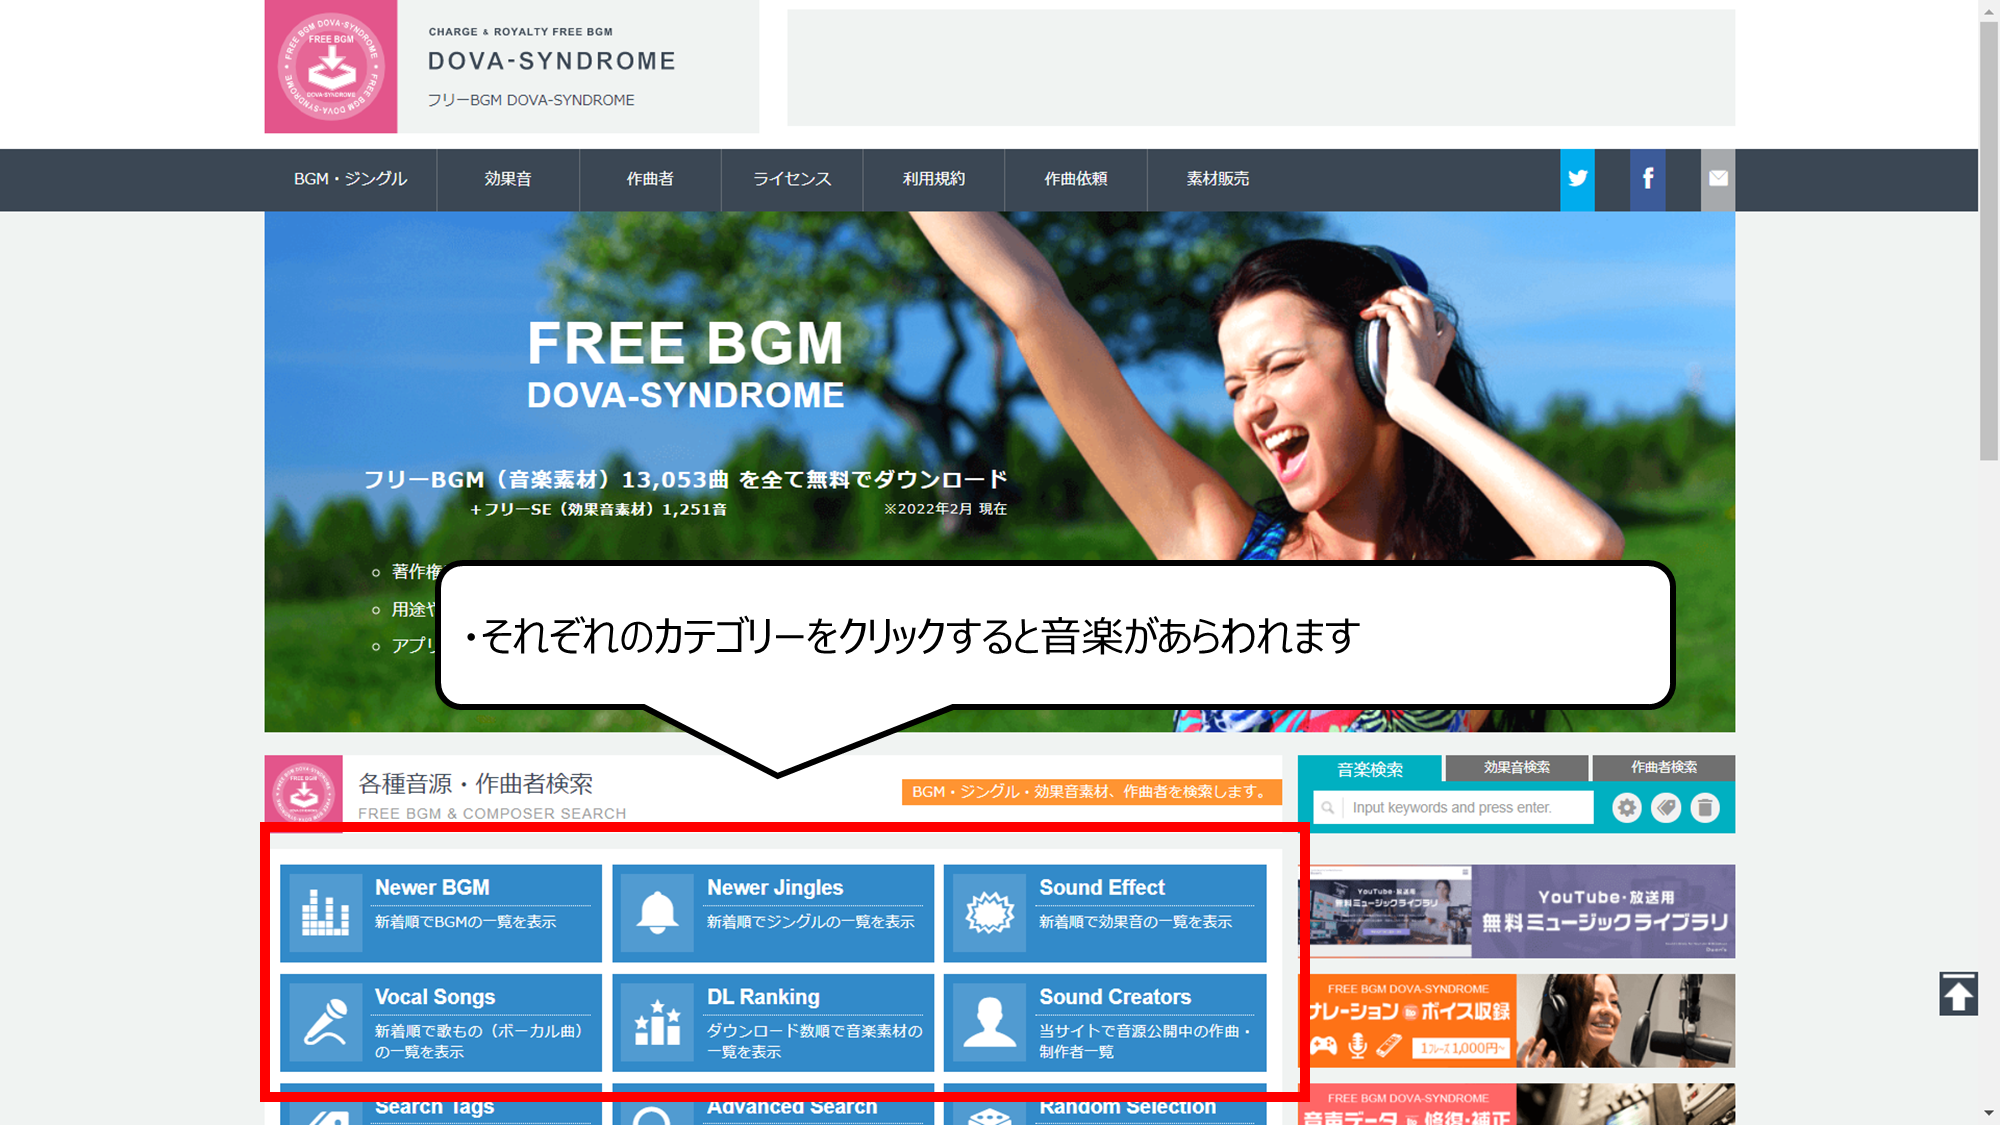
無料のミュージック公開サイトです
1.>> Dova-s.jpにアクセスしてください
2.それぞれのカテゴリーをクリックすると音楽があらわれます

無料のムービー公開サイトです
1.>> Pexels.comにアクセスしてください
2.検索ボックスにキーワードを入れるとムービーがあらわれます
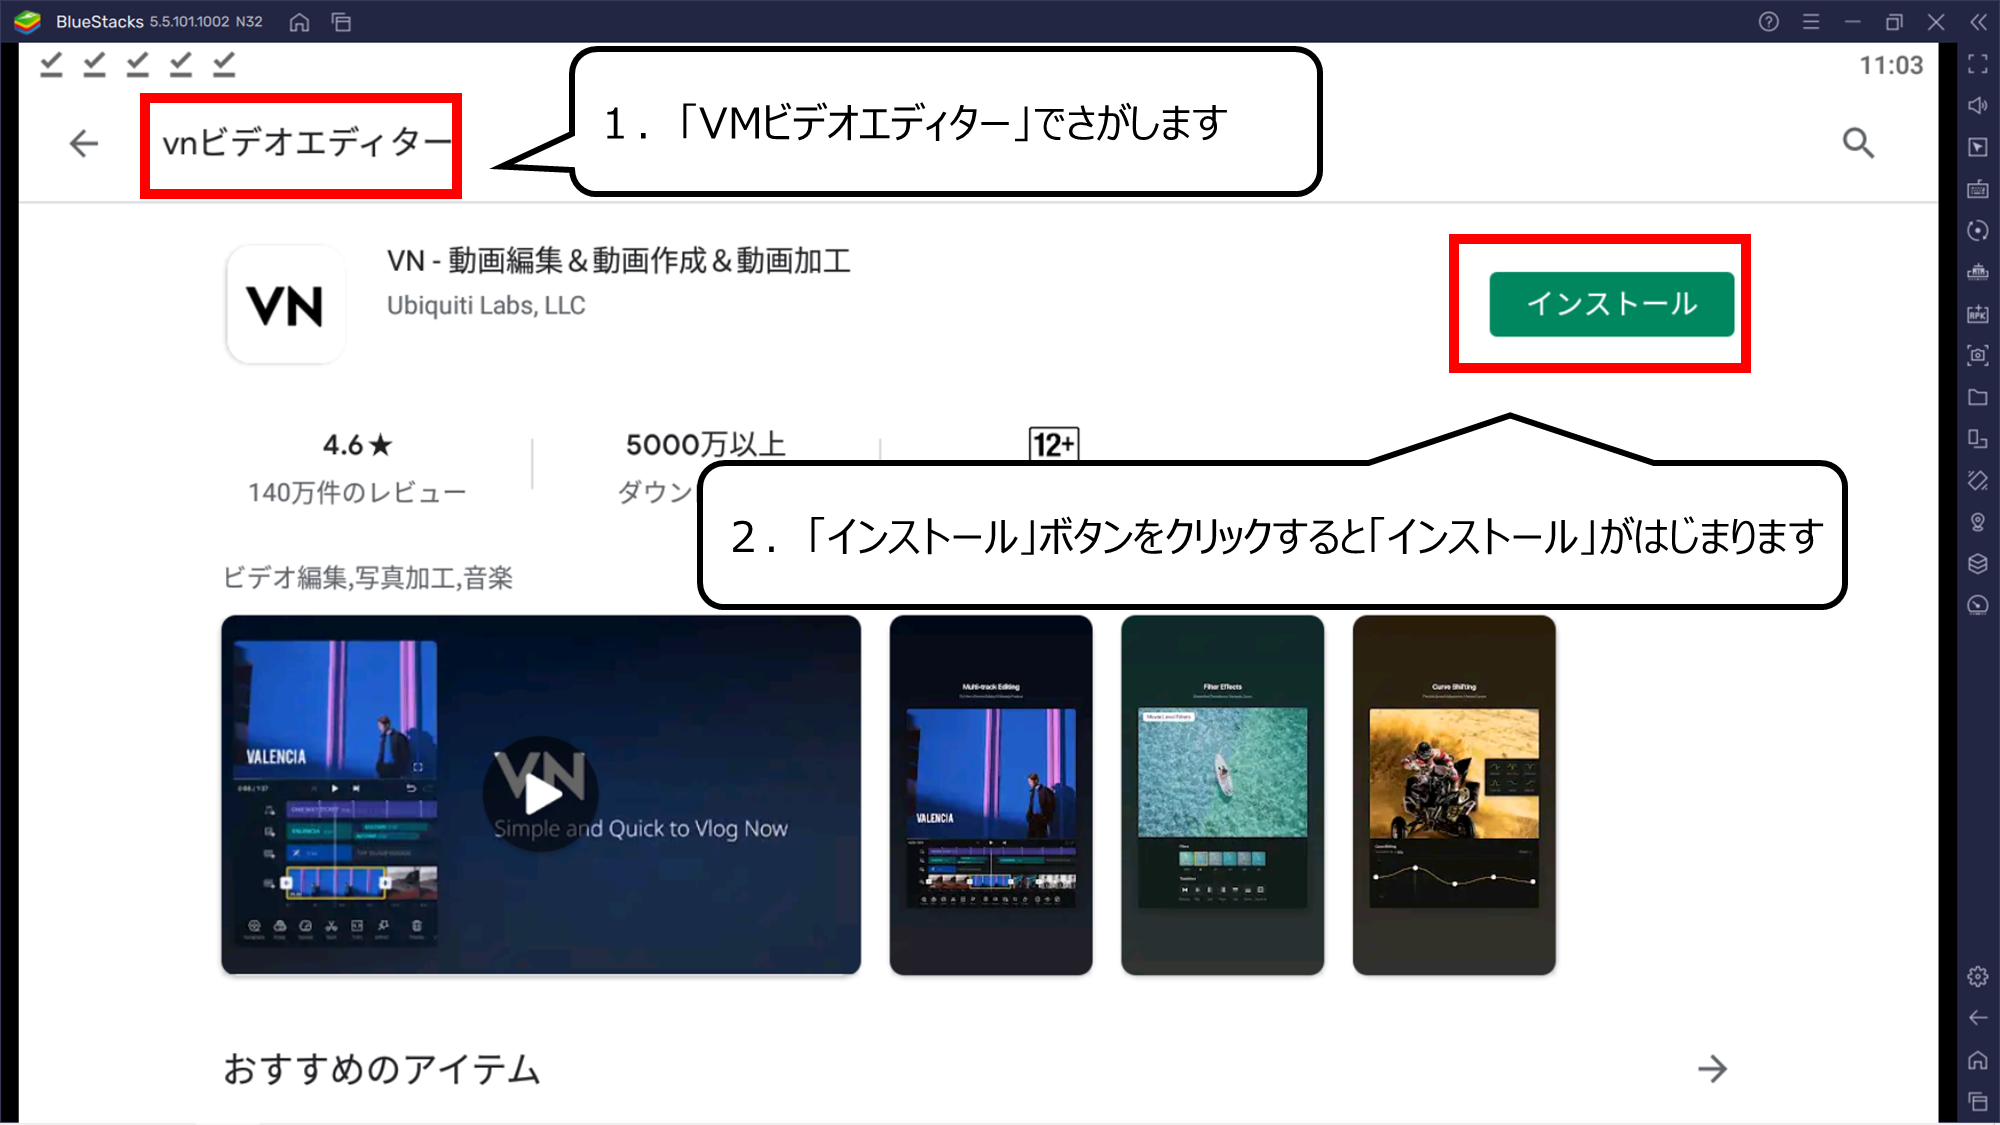
Androidの方は、Play Storeからダウンロードできます
1.Androidの方は、Play Storeにアクセスしてください
2.「VMビデオエディター」でさがします
3.「インストール」ボタンをクリックすると「インストール」がはじまります
※ 見つからない時、iPhoneの方は>> 公式サイトからもアクセスできます
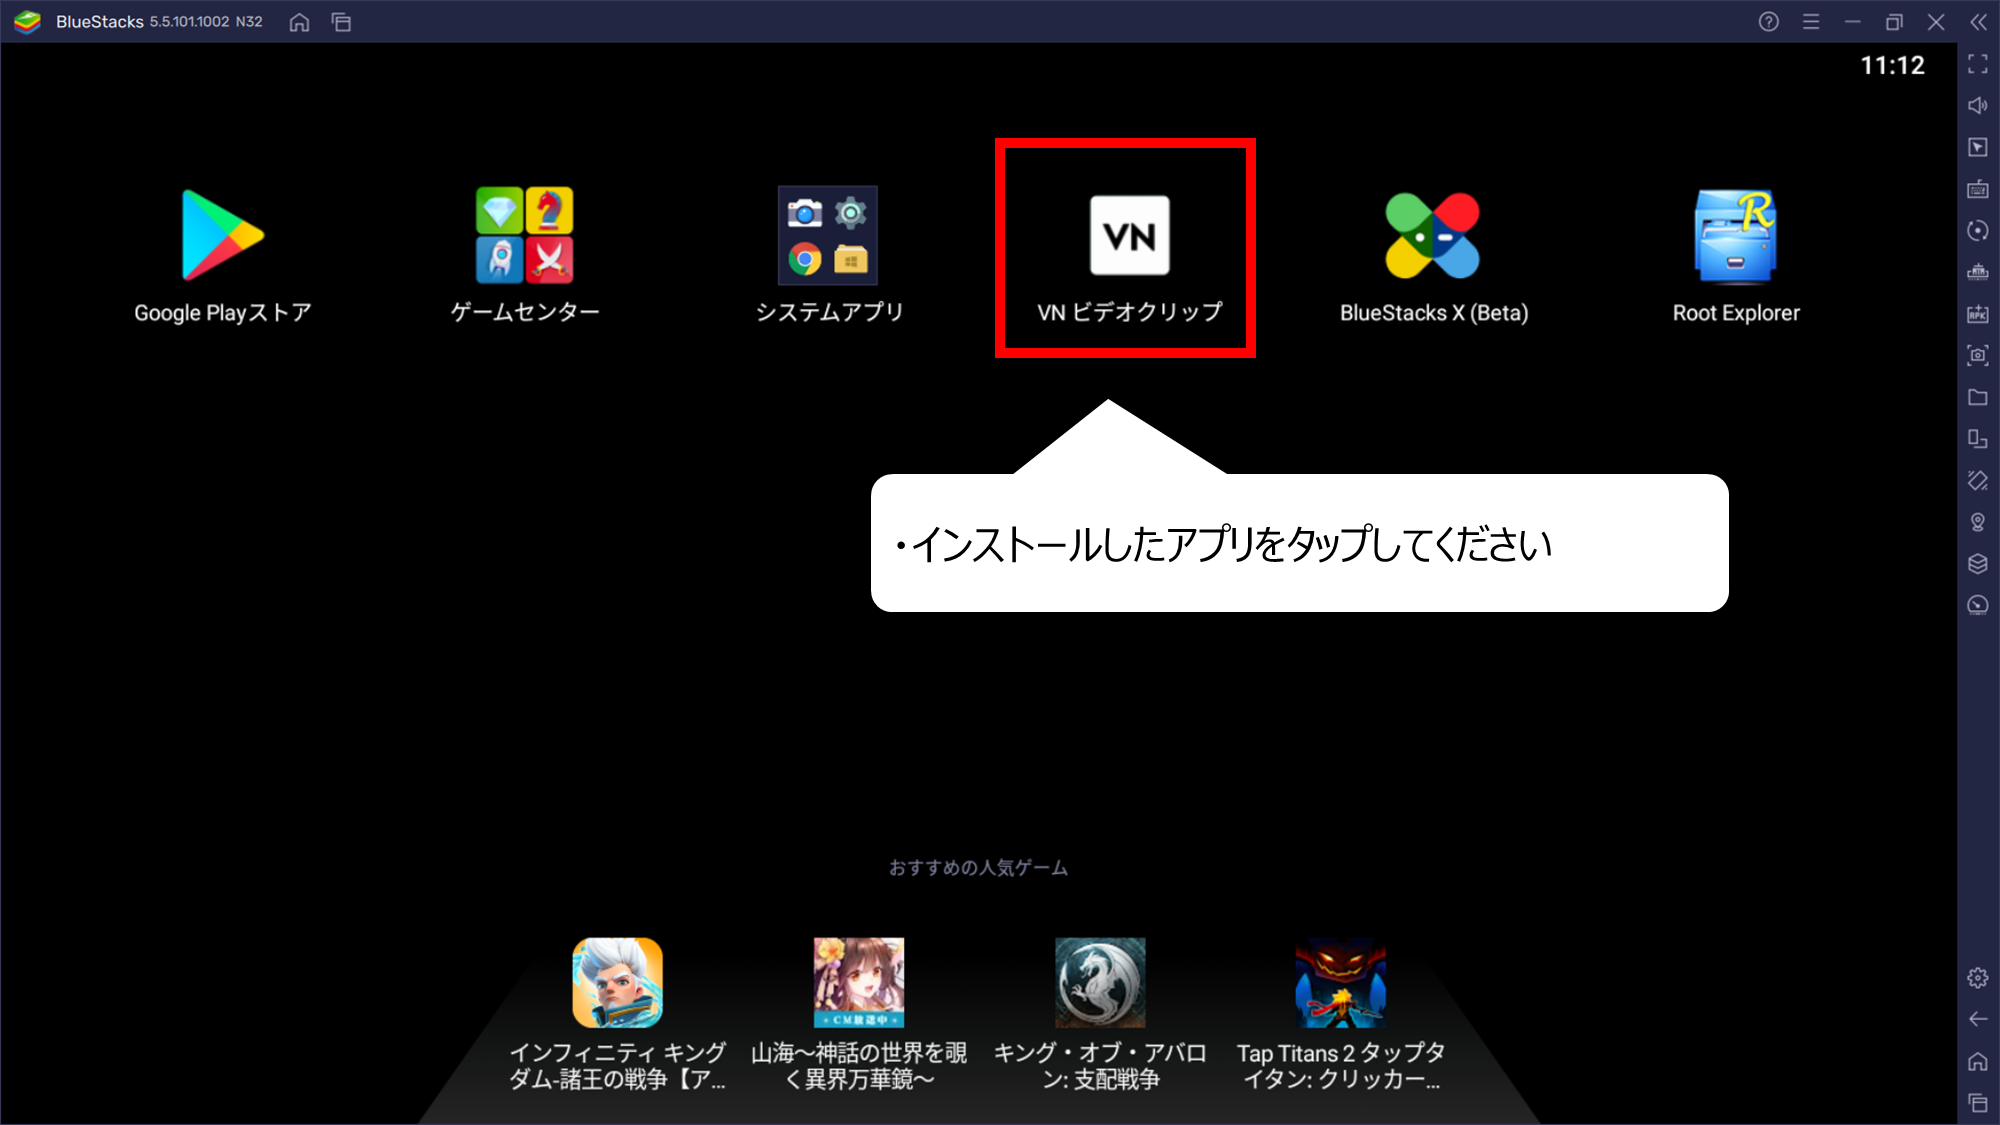
インストールしたアプリを起動してください
・インストールしたアプリをタップしてください
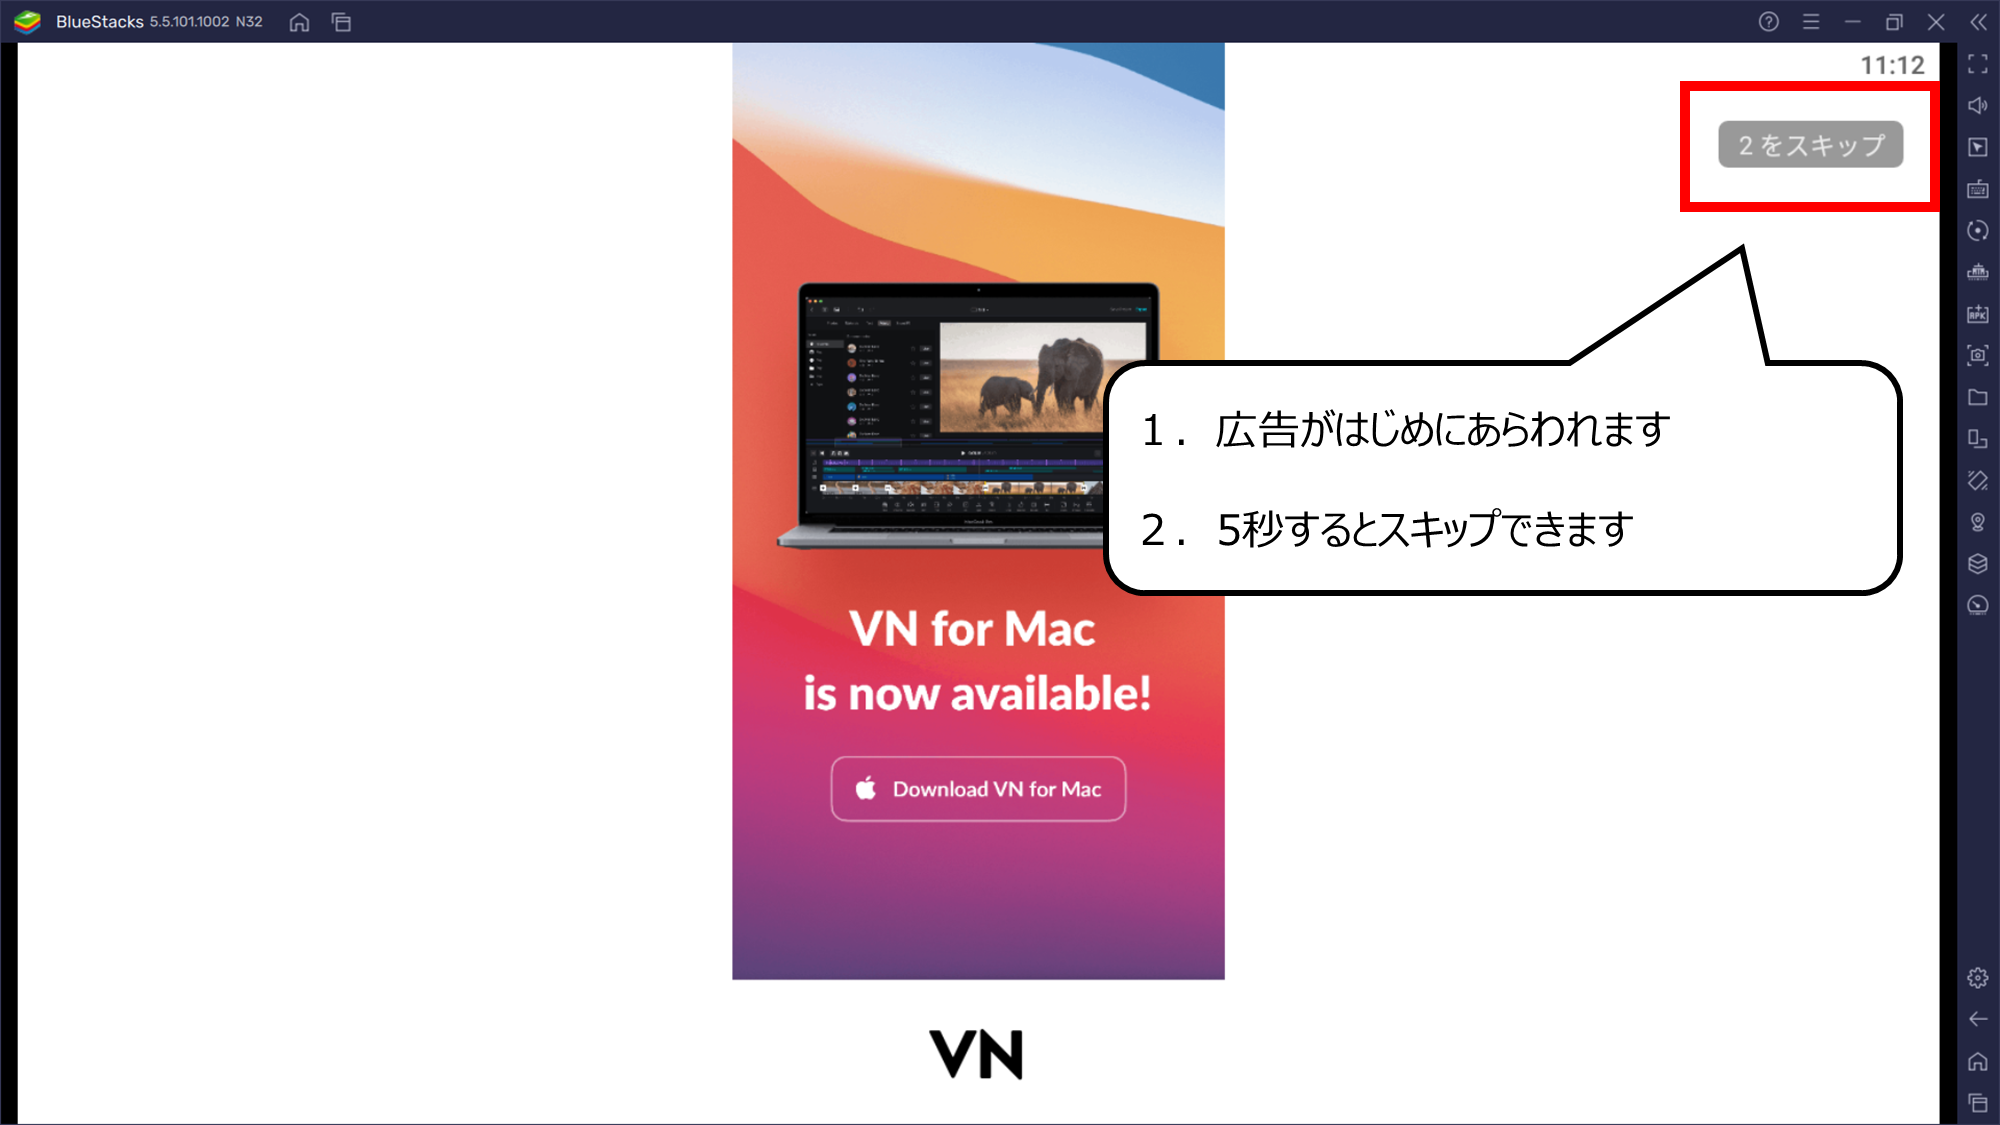
はじめにあらわれる広告は、少し待つとスキップできます
1.広告がはじめにあらわれます
2.5秒するとスキップできます

スマホの中のムービーにアクセスできるようにします
・「許可」をクリックするとムービーを取りこめるようになります

ムービーをつくる用意をします
・「+」アイコンをタップして、ムービーをつくる用意をします
ハサミにアイコンをタップしてください
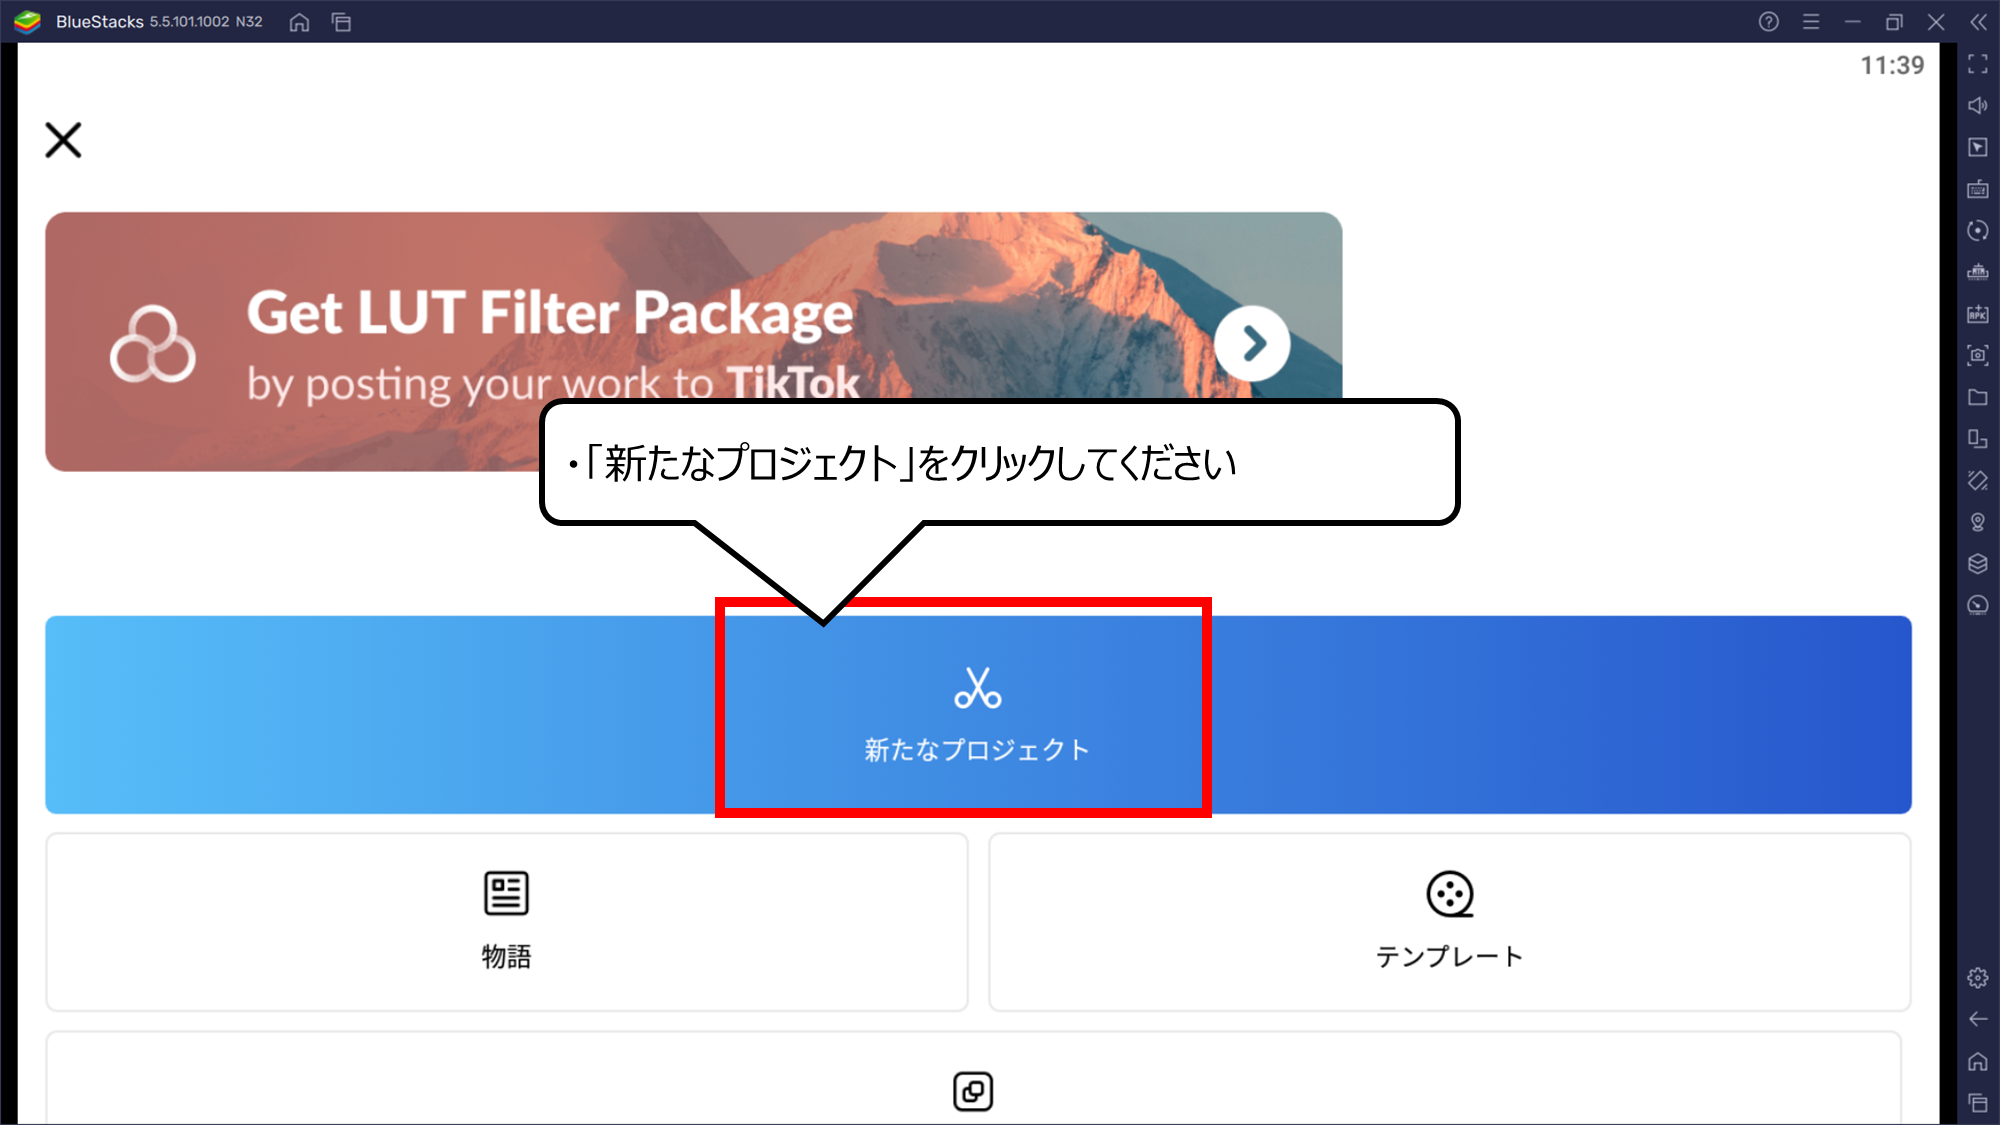
・「新たなプロジェクト」をクリックしてください
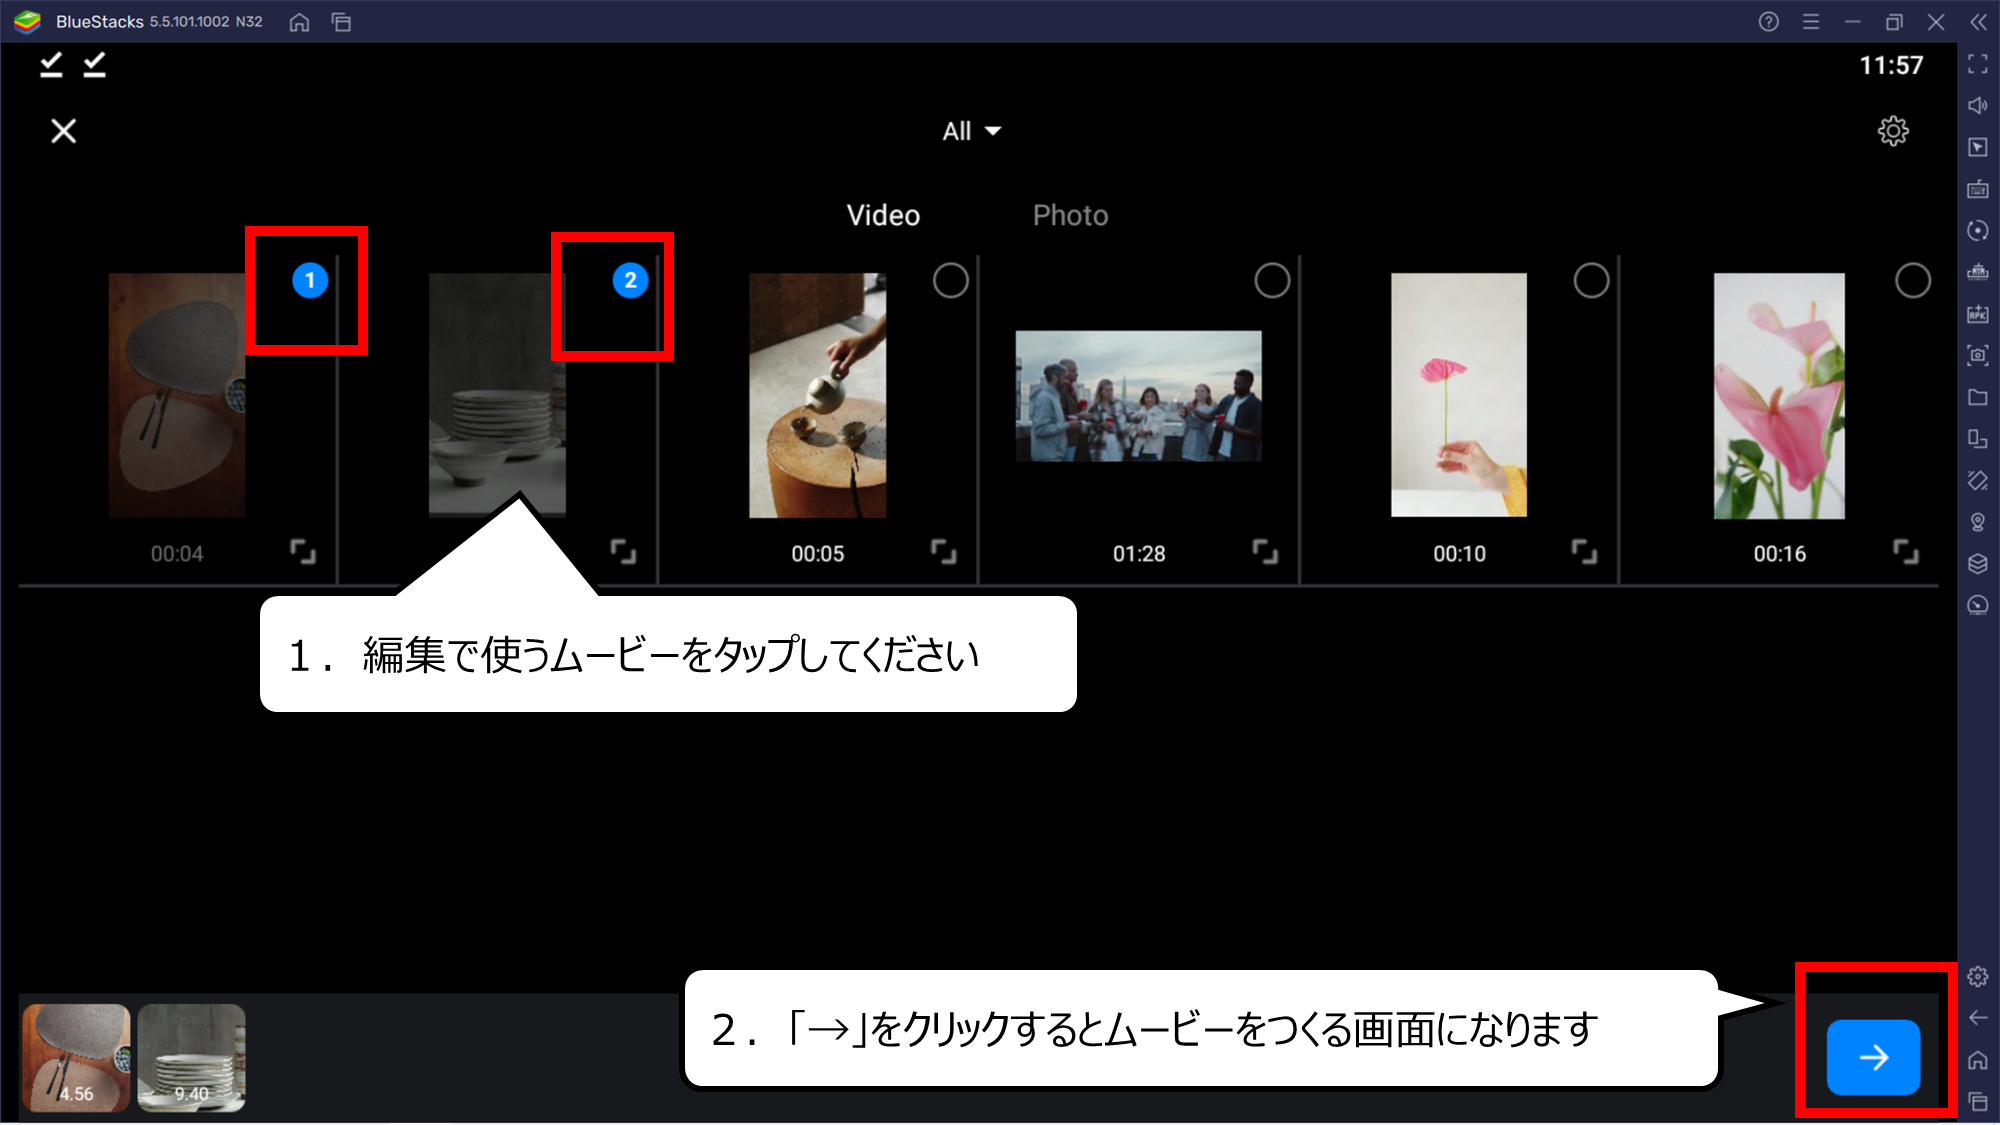
はじめに使うムービーをえらびます
1.編集で使うムービーをタップしてください
2.「→」をクリックするとムービーをつくる画面になります

ムービーを編集する所をタイムラインといいます
タイムラインにムービーがあらわれます
1.赤ワクを「タイムライン」といいます
2.「タイムライン」では、ムービーをつなげたり、切ったり、短くしたり、できます
3.「タイムライン」に、えらんだムービーがあらわれます

ムービーを途中で、カットします
1.「白いライン」で時間をコントロールできます
2.「白いライン」をドラッグして左右に動かしてください
3.「白いライン」の所でムービーを分けます
4.「分割」をタップしてください

ムービーを分けることができました
・「分割」をタップした所でムービーが分かれました
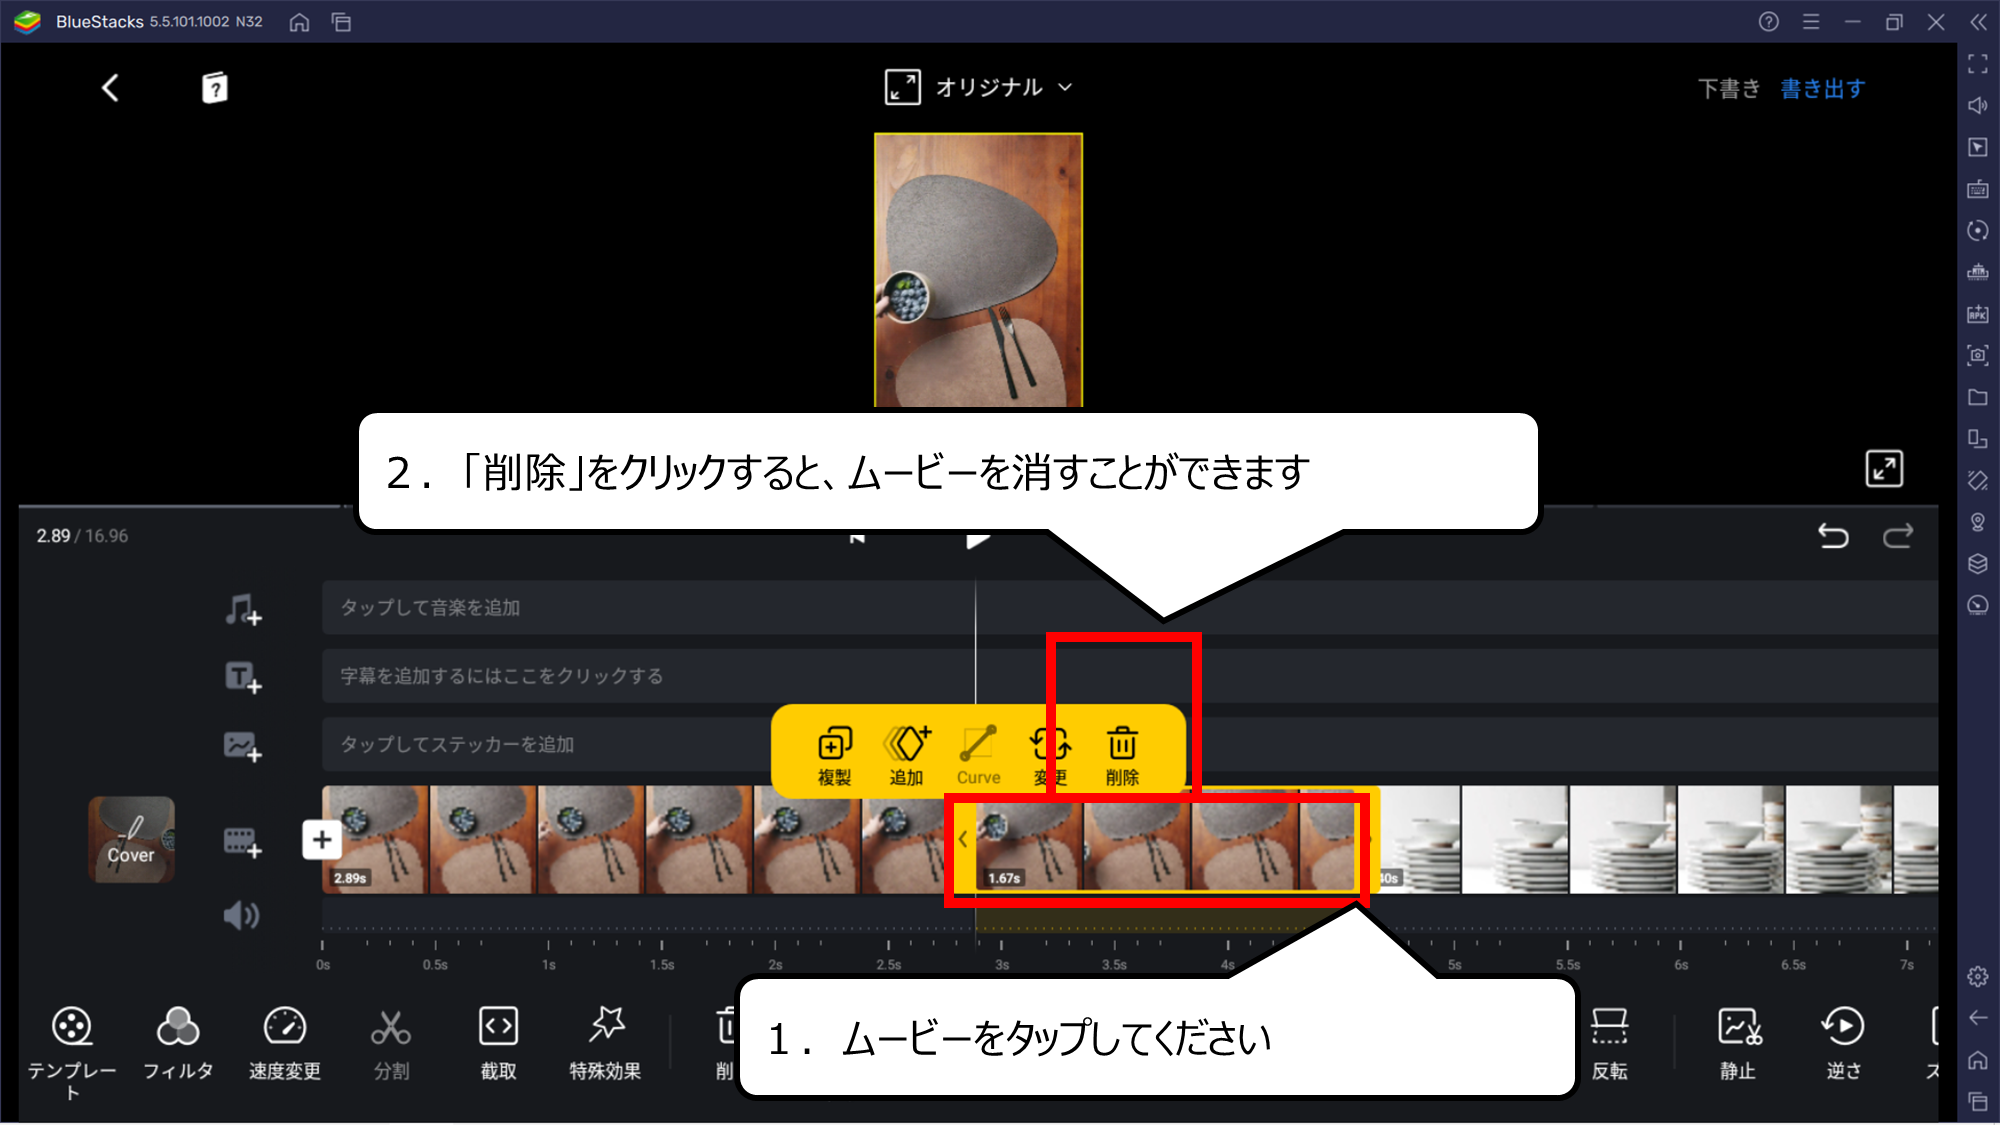
ムービーをタップするとメニューがあらわれます
1.ムービーをタップしてください
2.「削除」をクリックすると、ムービーを消すことができます
・ムービーとムービーをスムーズに切りかえよう(トランジション)
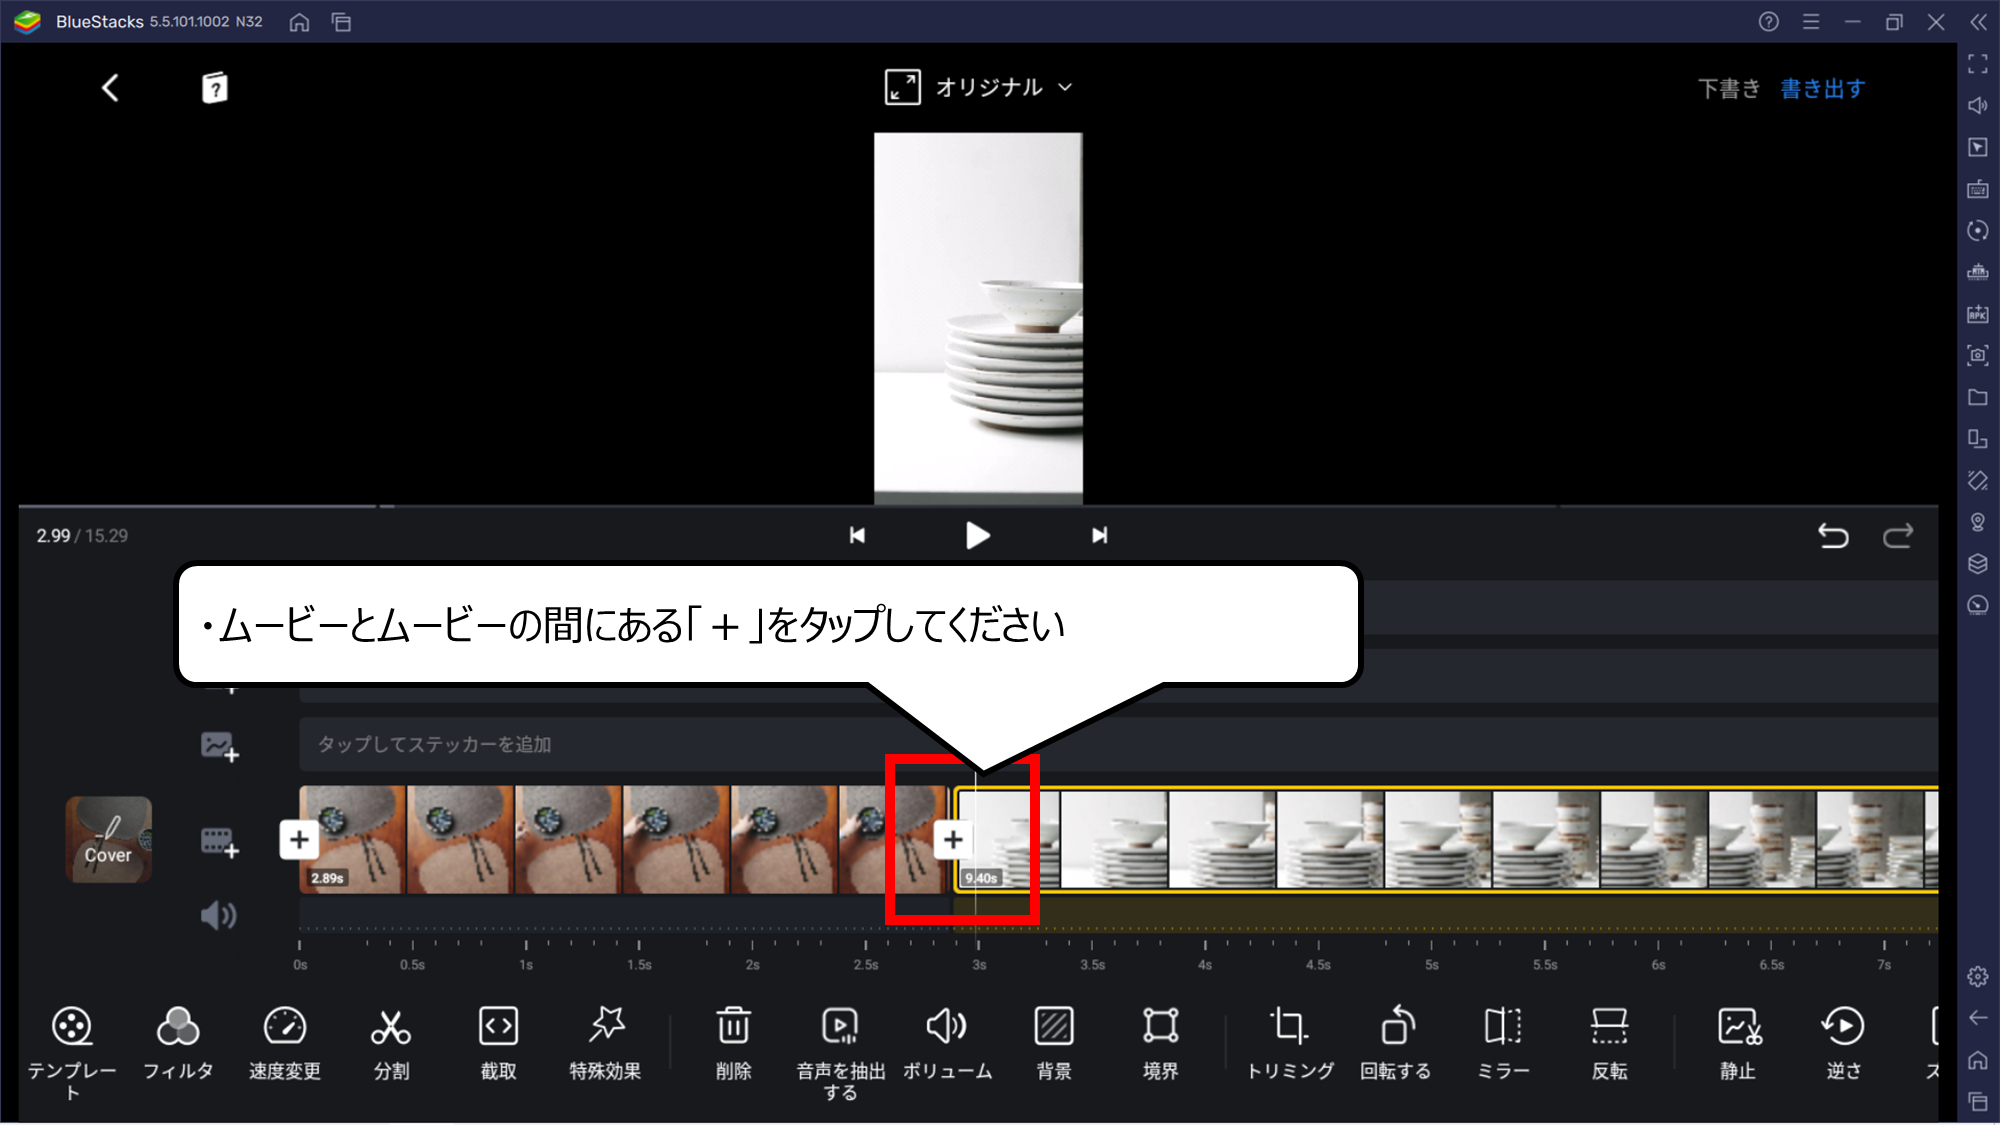
次は、ムービーとムービーをエフェクトでつなげます
・ムービーとムービーの間にある「+」をタップしてください
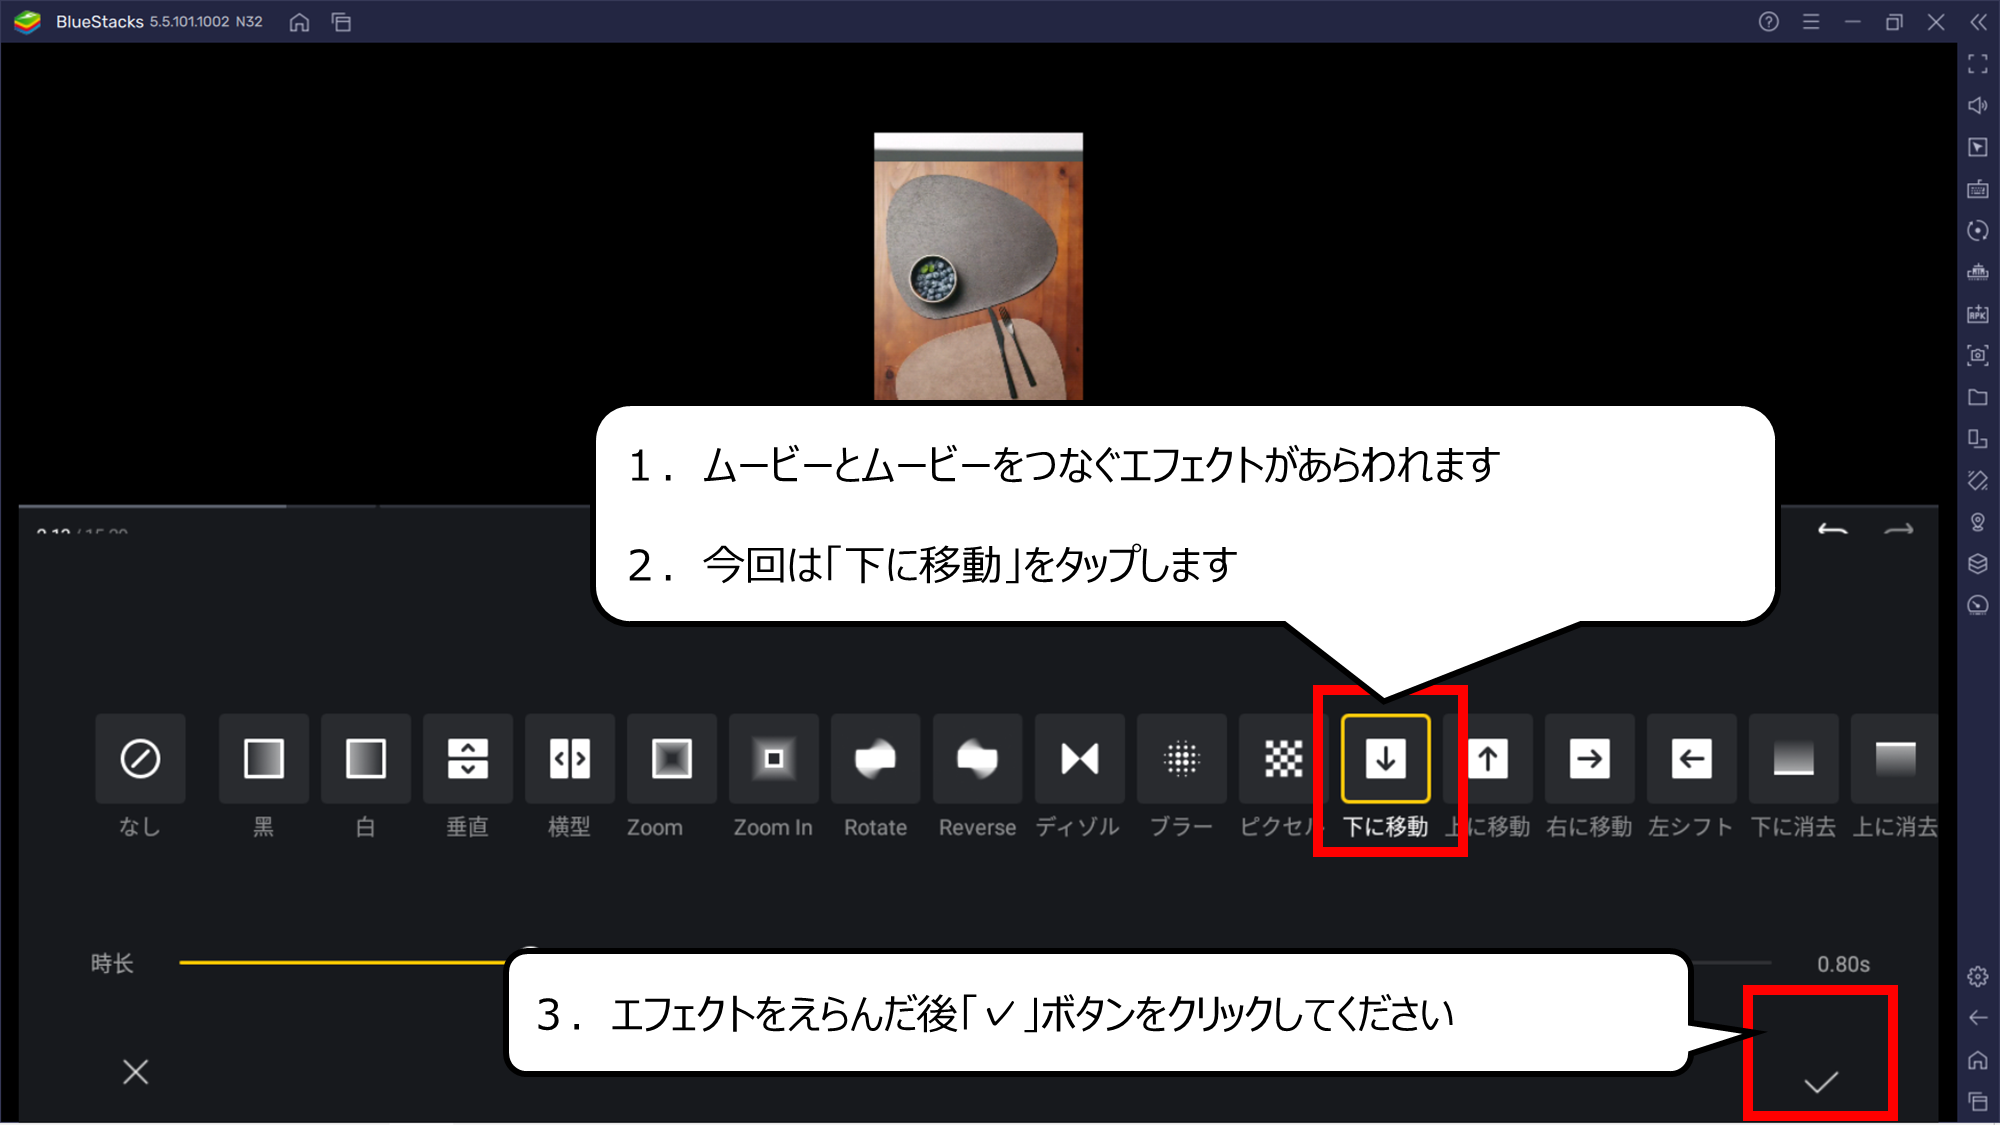
あらわれた、エフェクトをえらんでください
1.ムービーとムービーをつなぐエフェクトがあらわれます
2.今回は「下に移動」をタップします
3.エフェクトをえらんだ後「✓」ボタンをクリックしてください
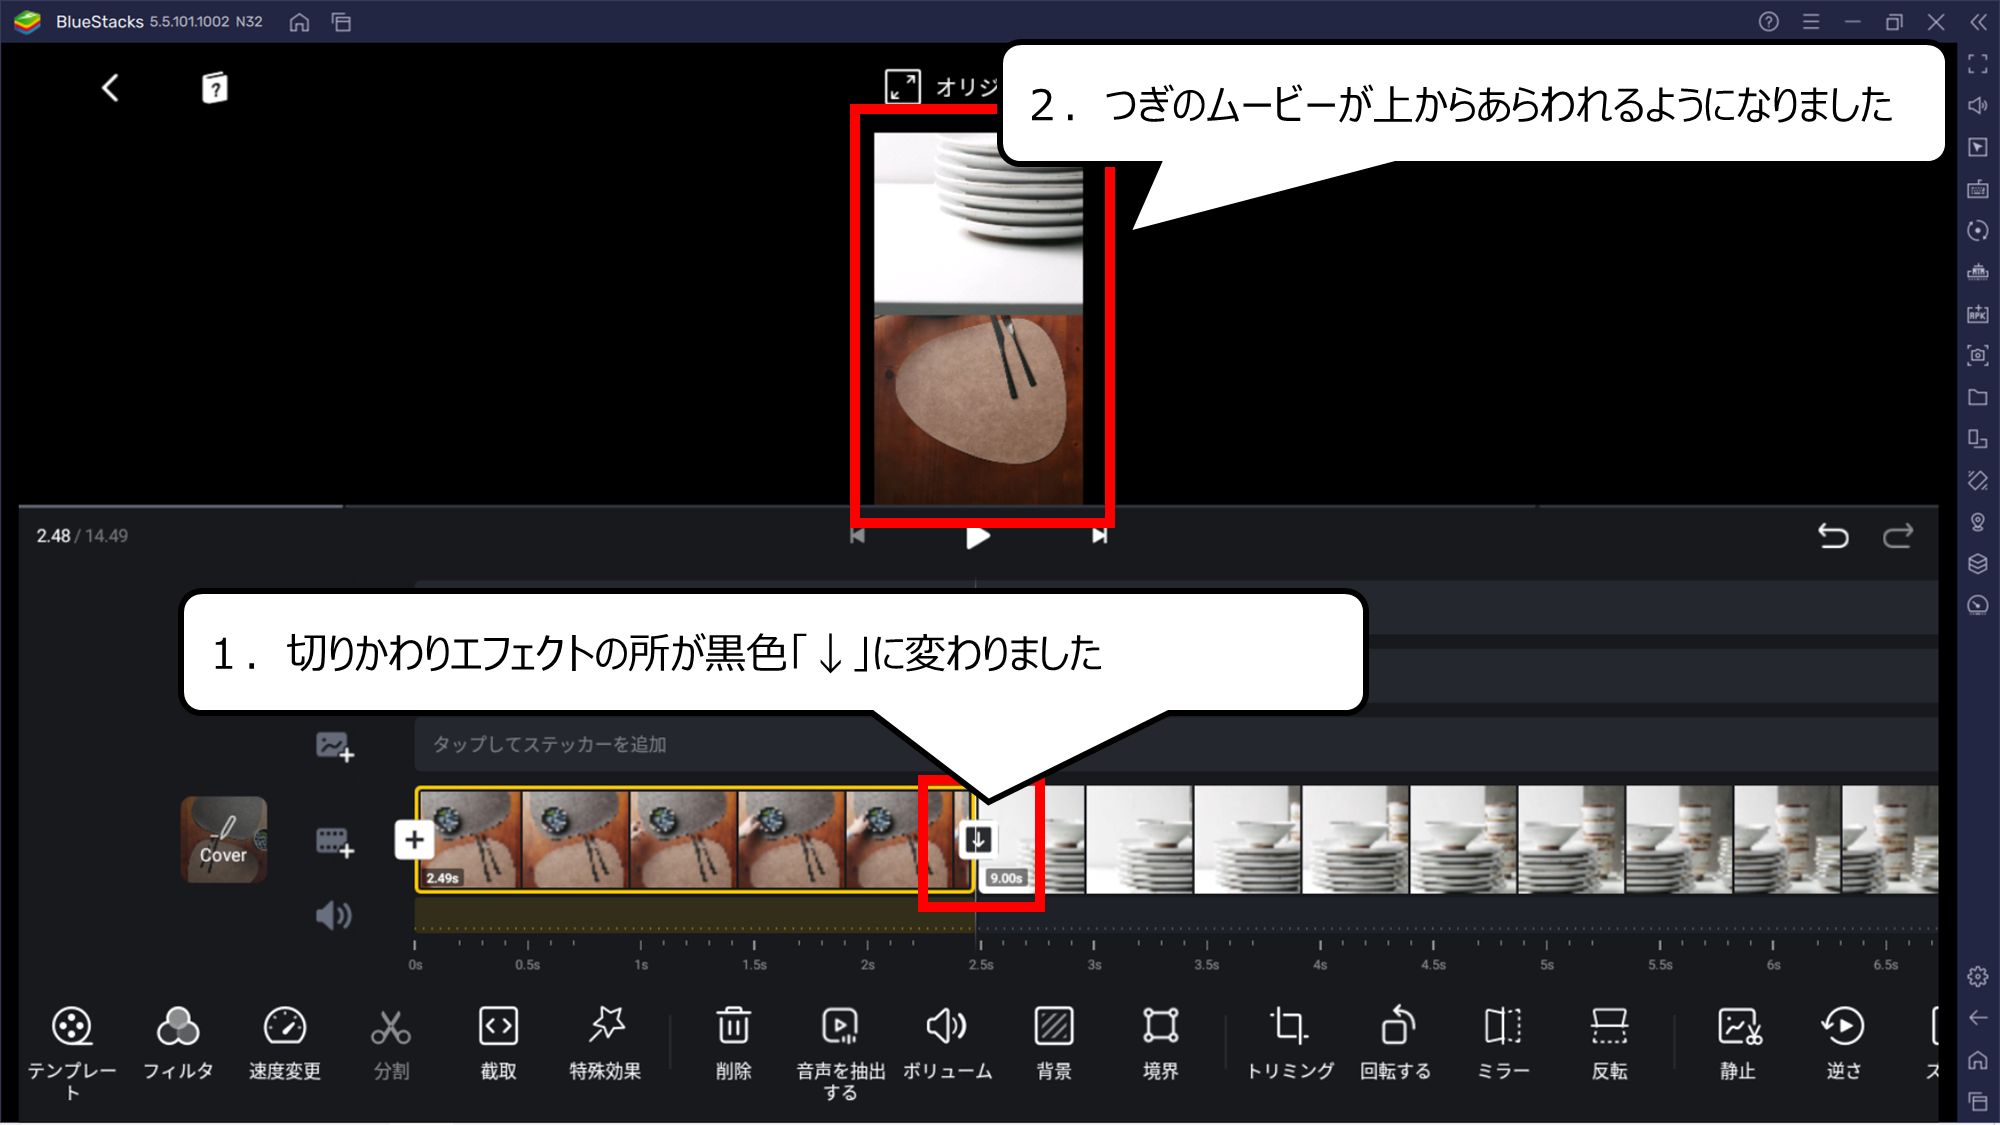
エフェクトをつくると「+」アイコンが変わります
1.切りかわりエフェクトの所が黒色「↓」に変わりました
2.つぎのムービーが上からあらわれるようになりました
・ムービーにテロップ&字幕をくわえよう
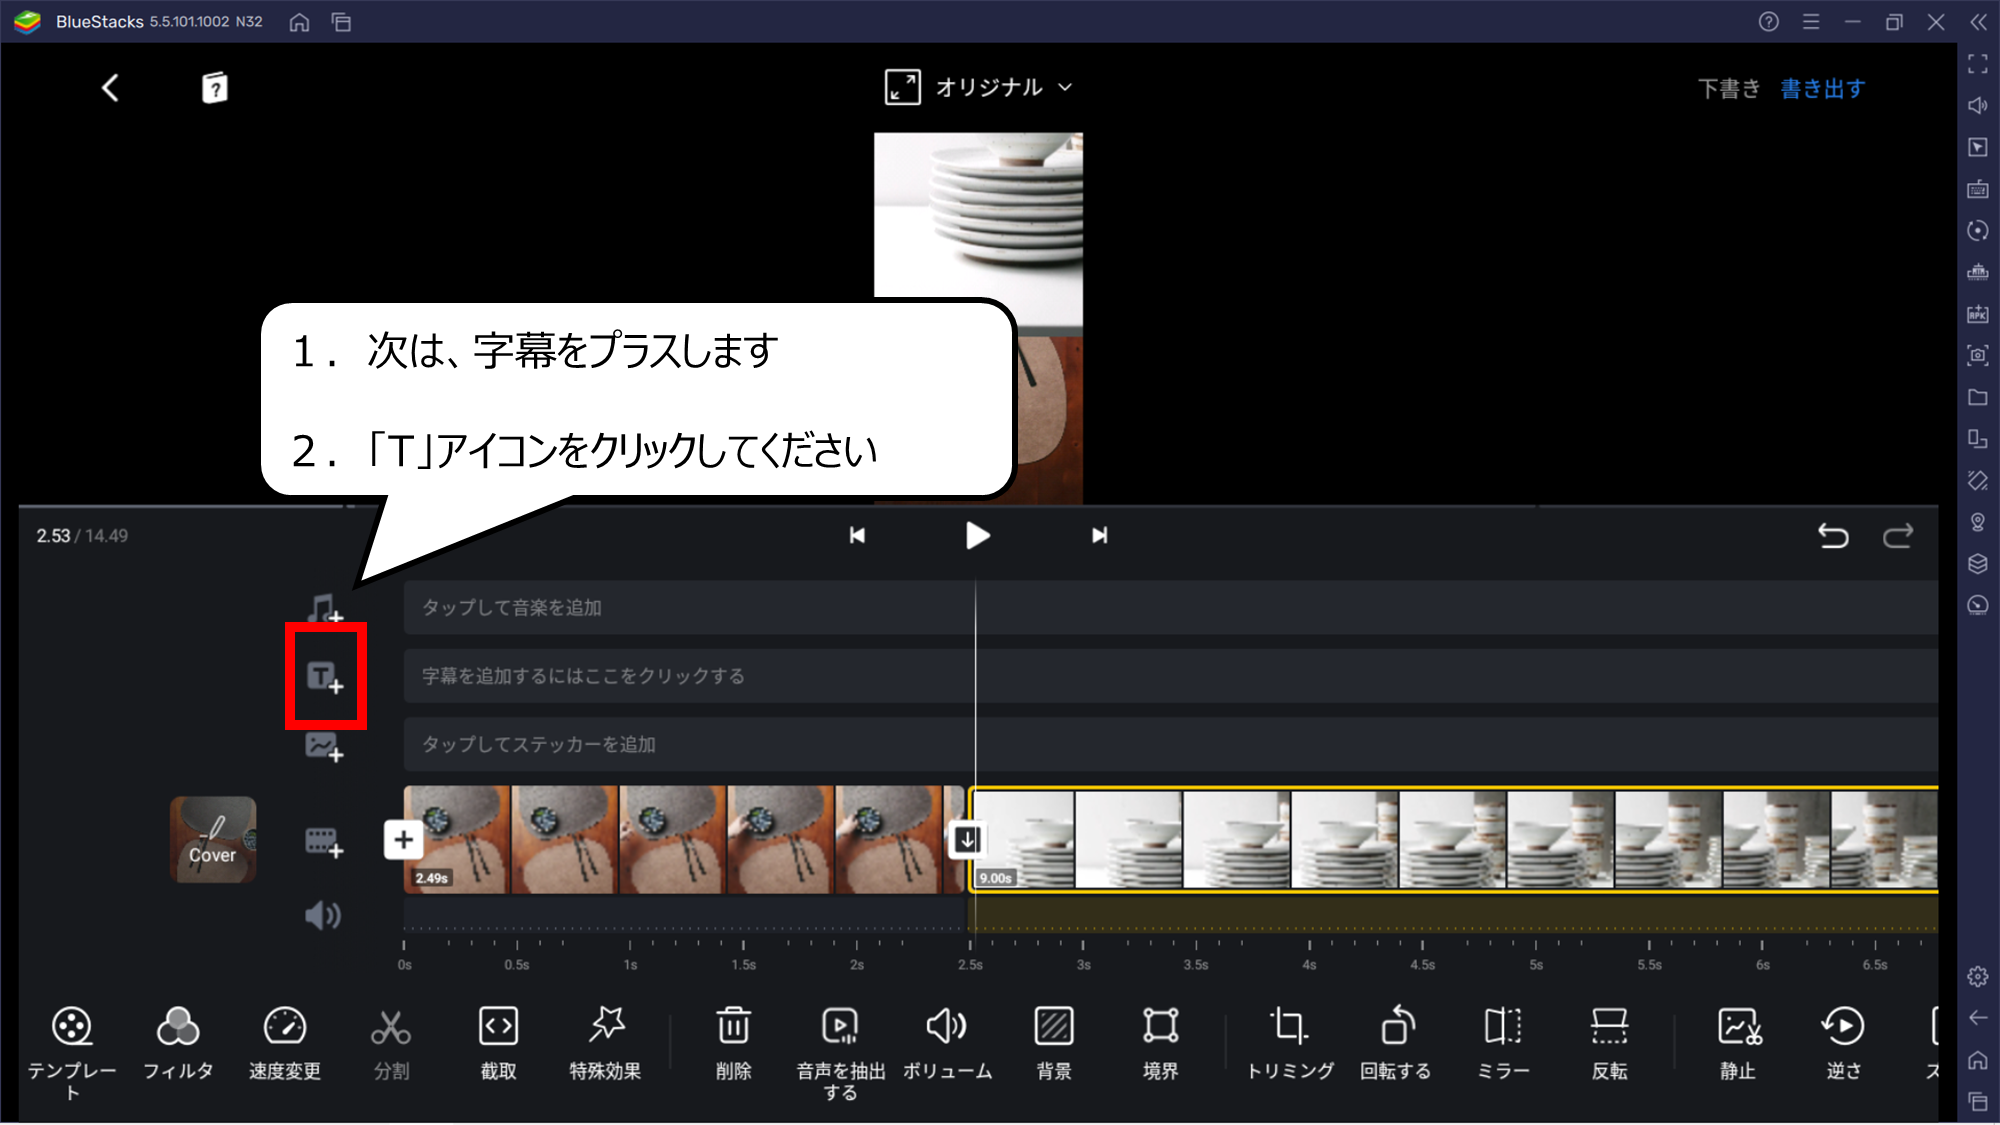
ムービーに文字をプラスします
1.次は、字幕をプラスします
2.「T」アイコンをクリックしてください
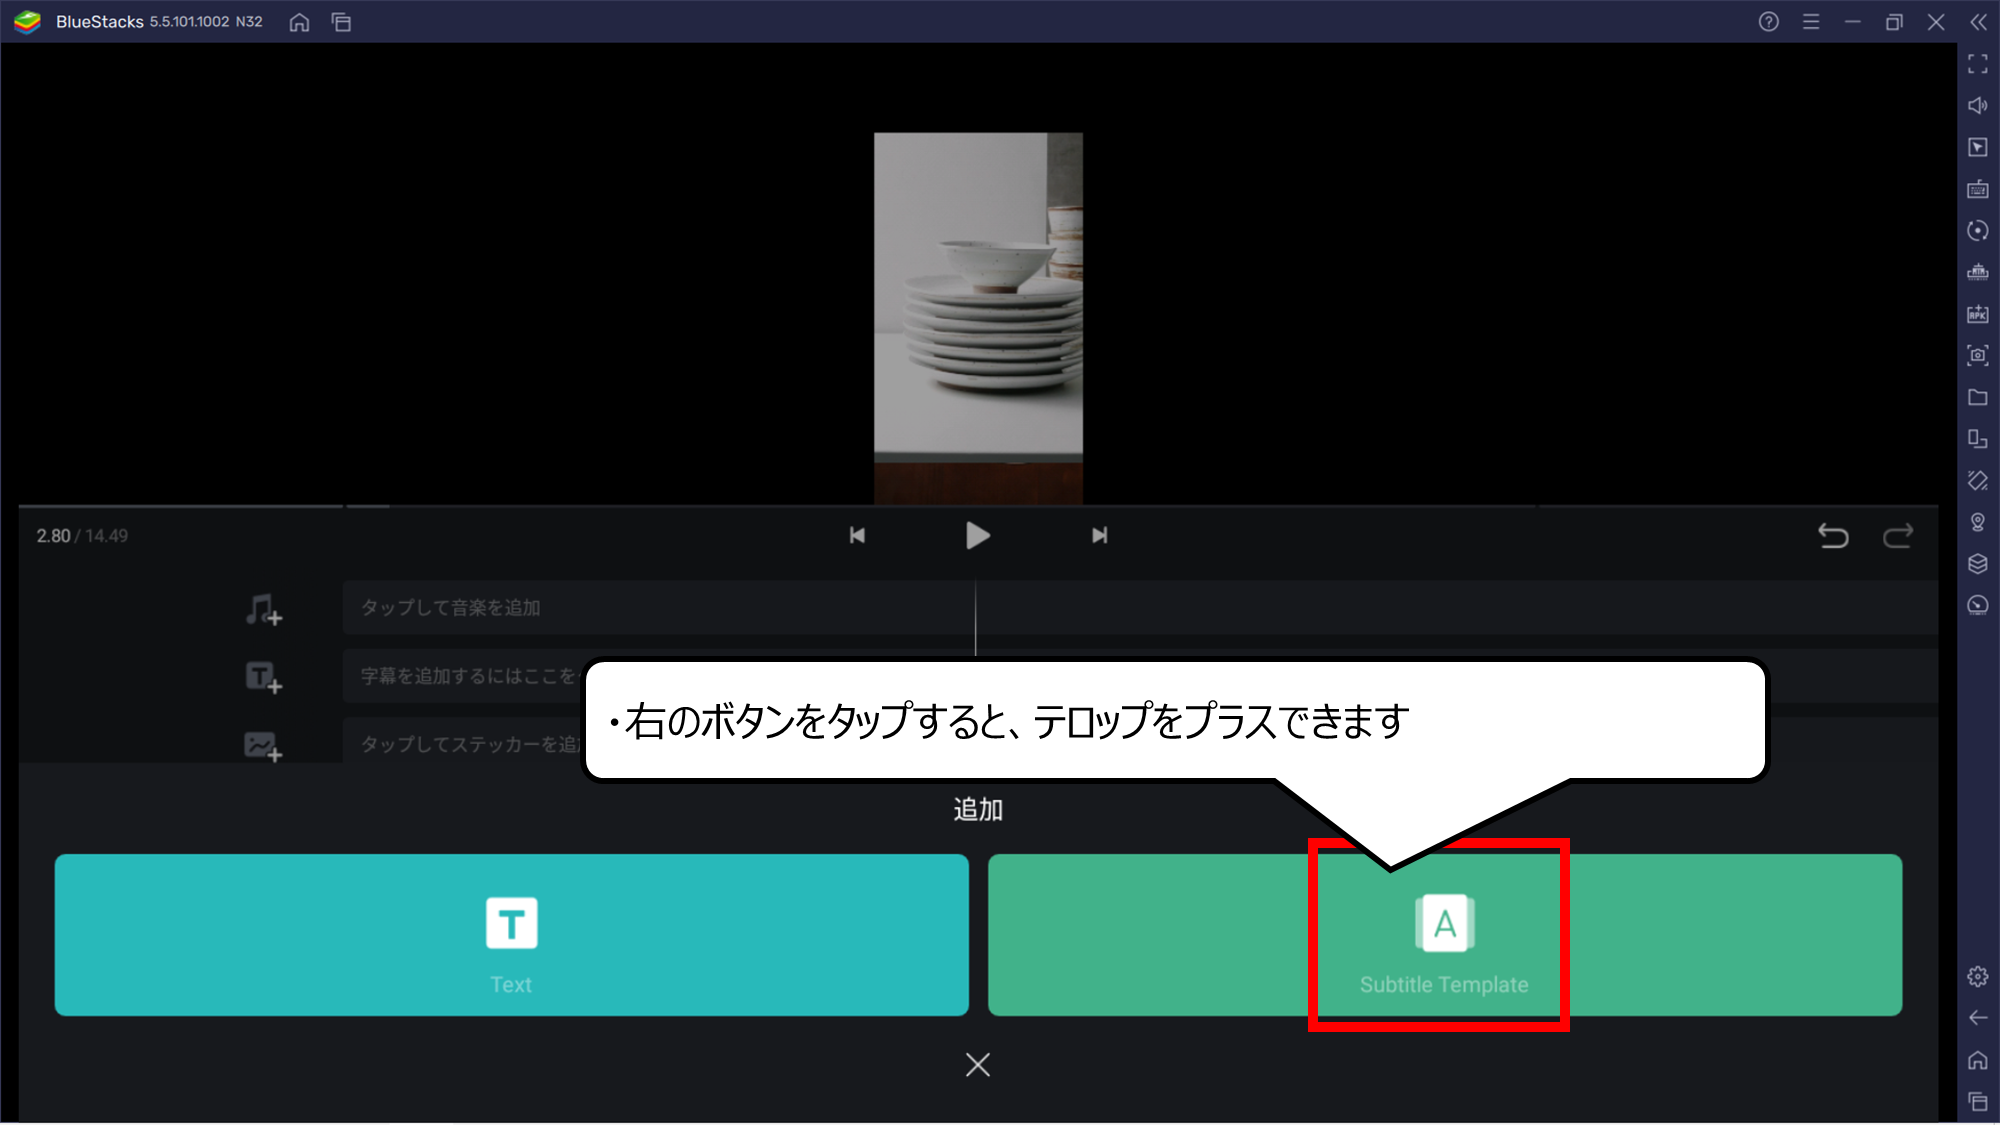
左はふつうの字幕、右がテロップです
・右のボタンをタップすると、テロップをプラスできます
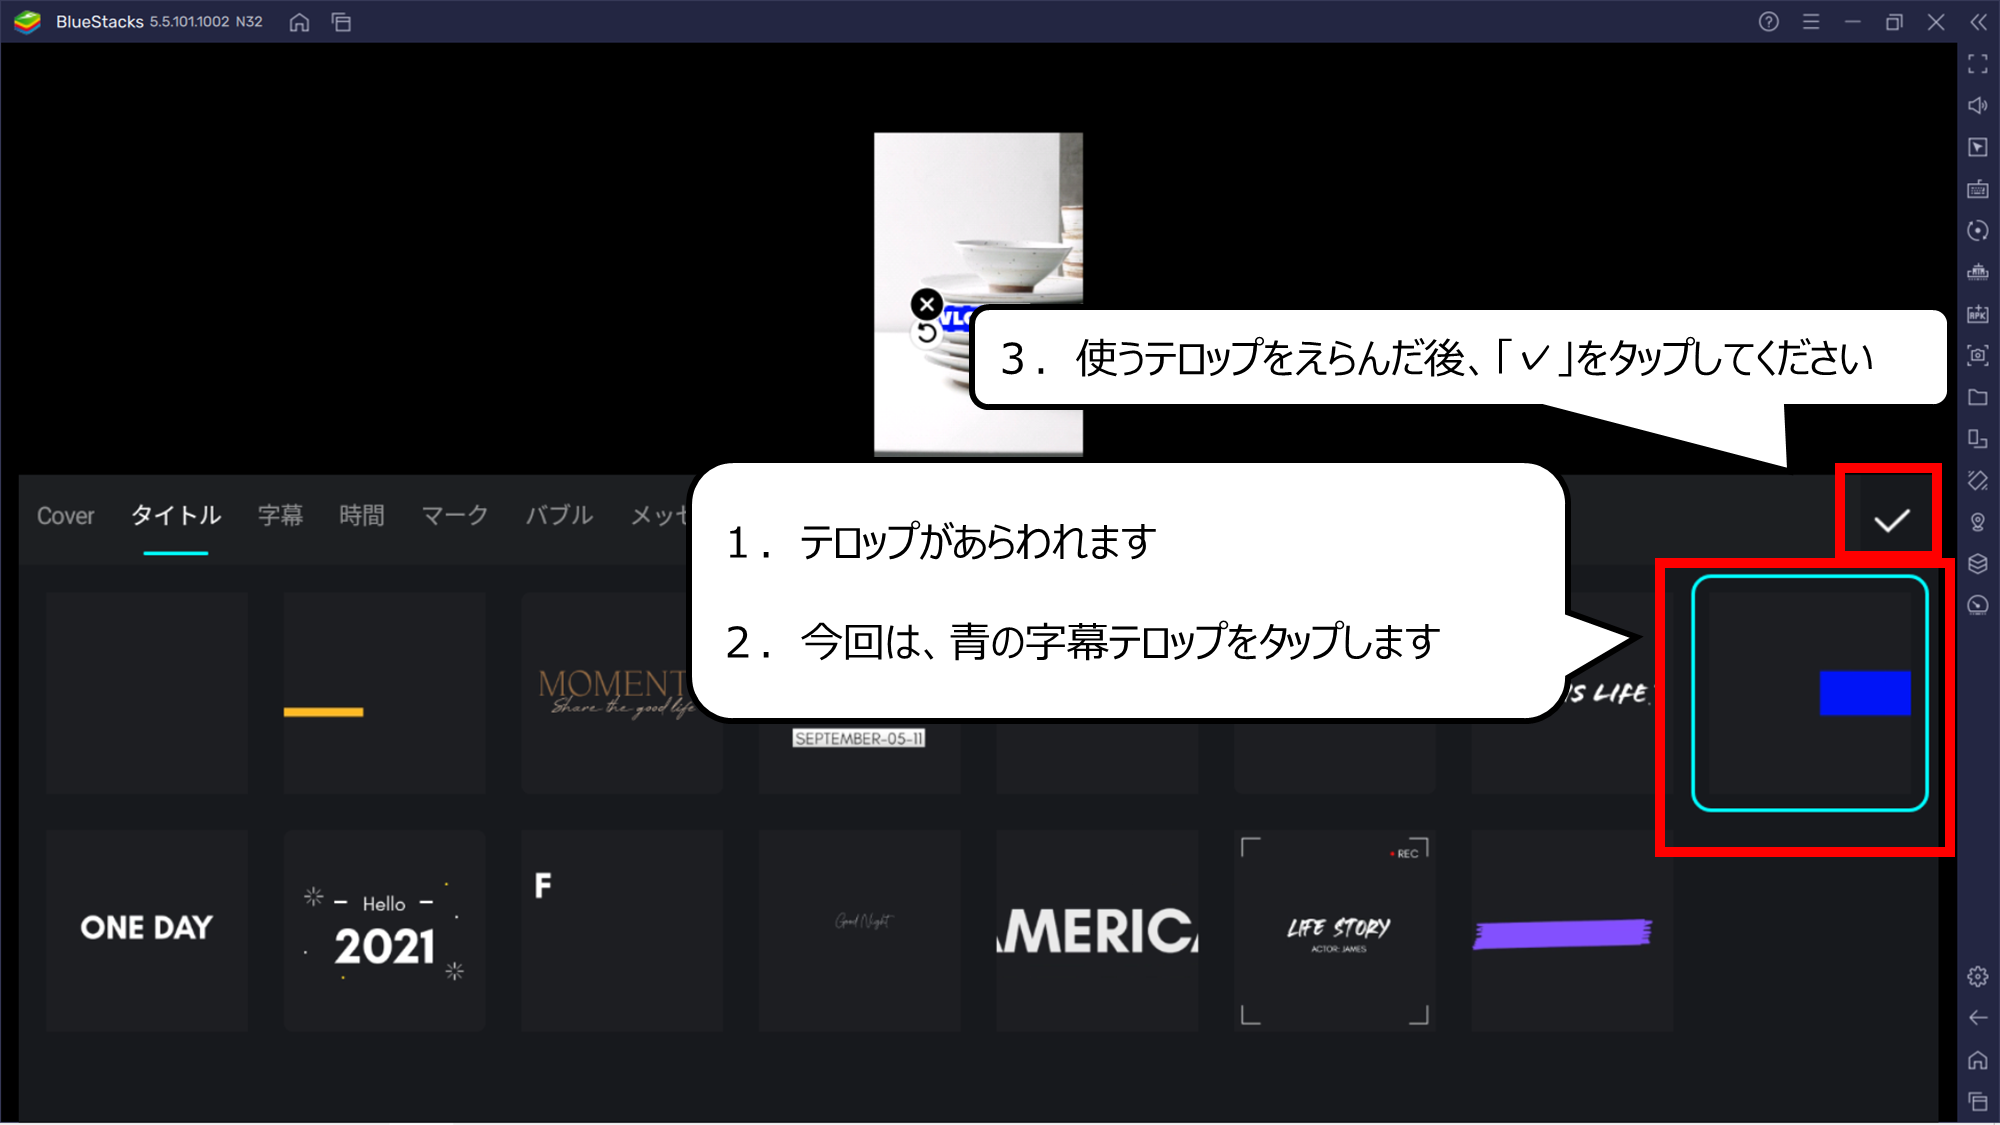
いろいろな、テロップがあらわれます
1.テロップがあらわれます
2.今回は、青の字幕テロップをタップします
3.使うテロップをえらんだ後、「✓」をタップしてください

ムービーにテロップを加えることができました
1.テロップがあらわれました
2.テロップに文字を入れます
3.「Edit」をタップしてください
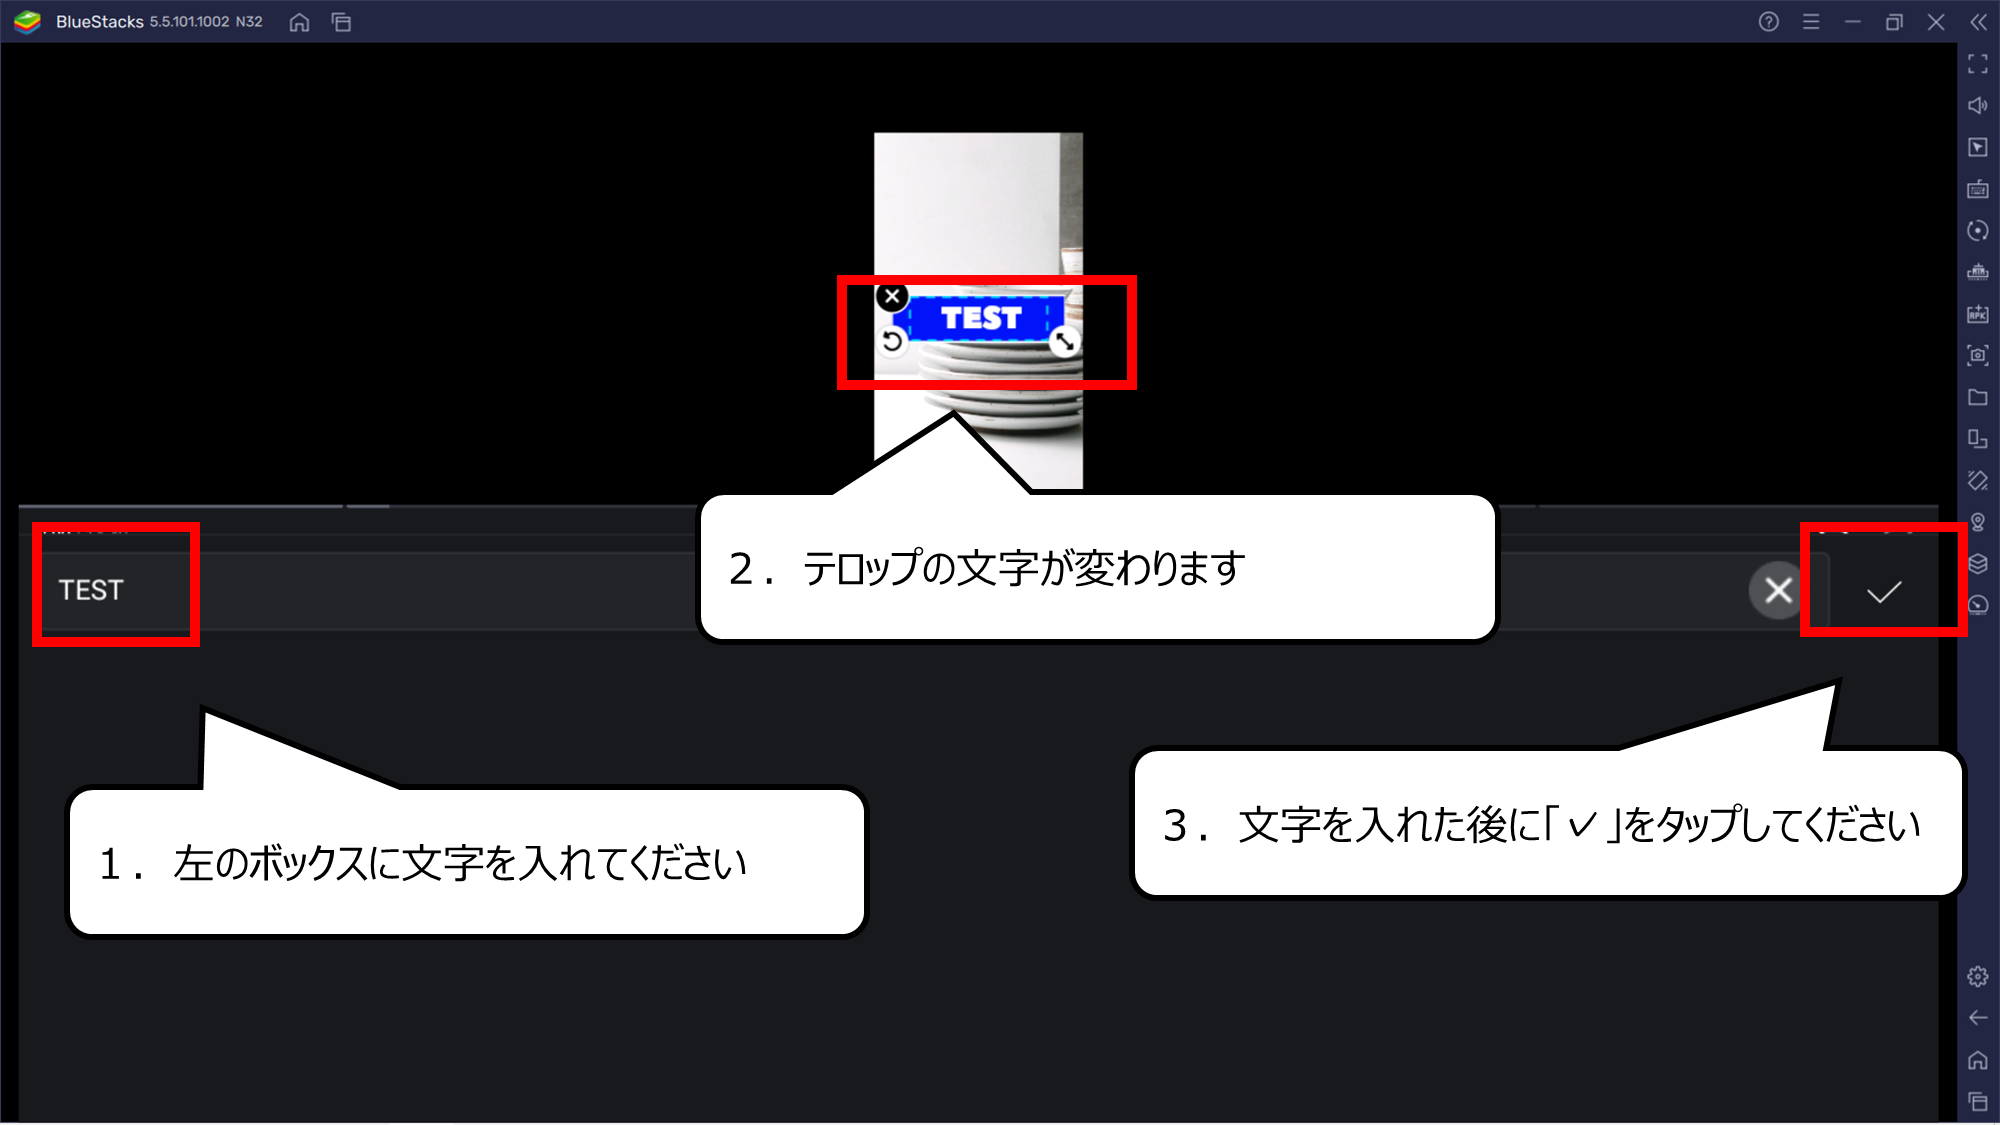
テロップの文字を変えることができます
1.左のボックスに文字を入れてください
2.テロップの文字が変わります
3.文字を入れた後に「✓」をタップしてください
テロップにはアニメーションもつきます
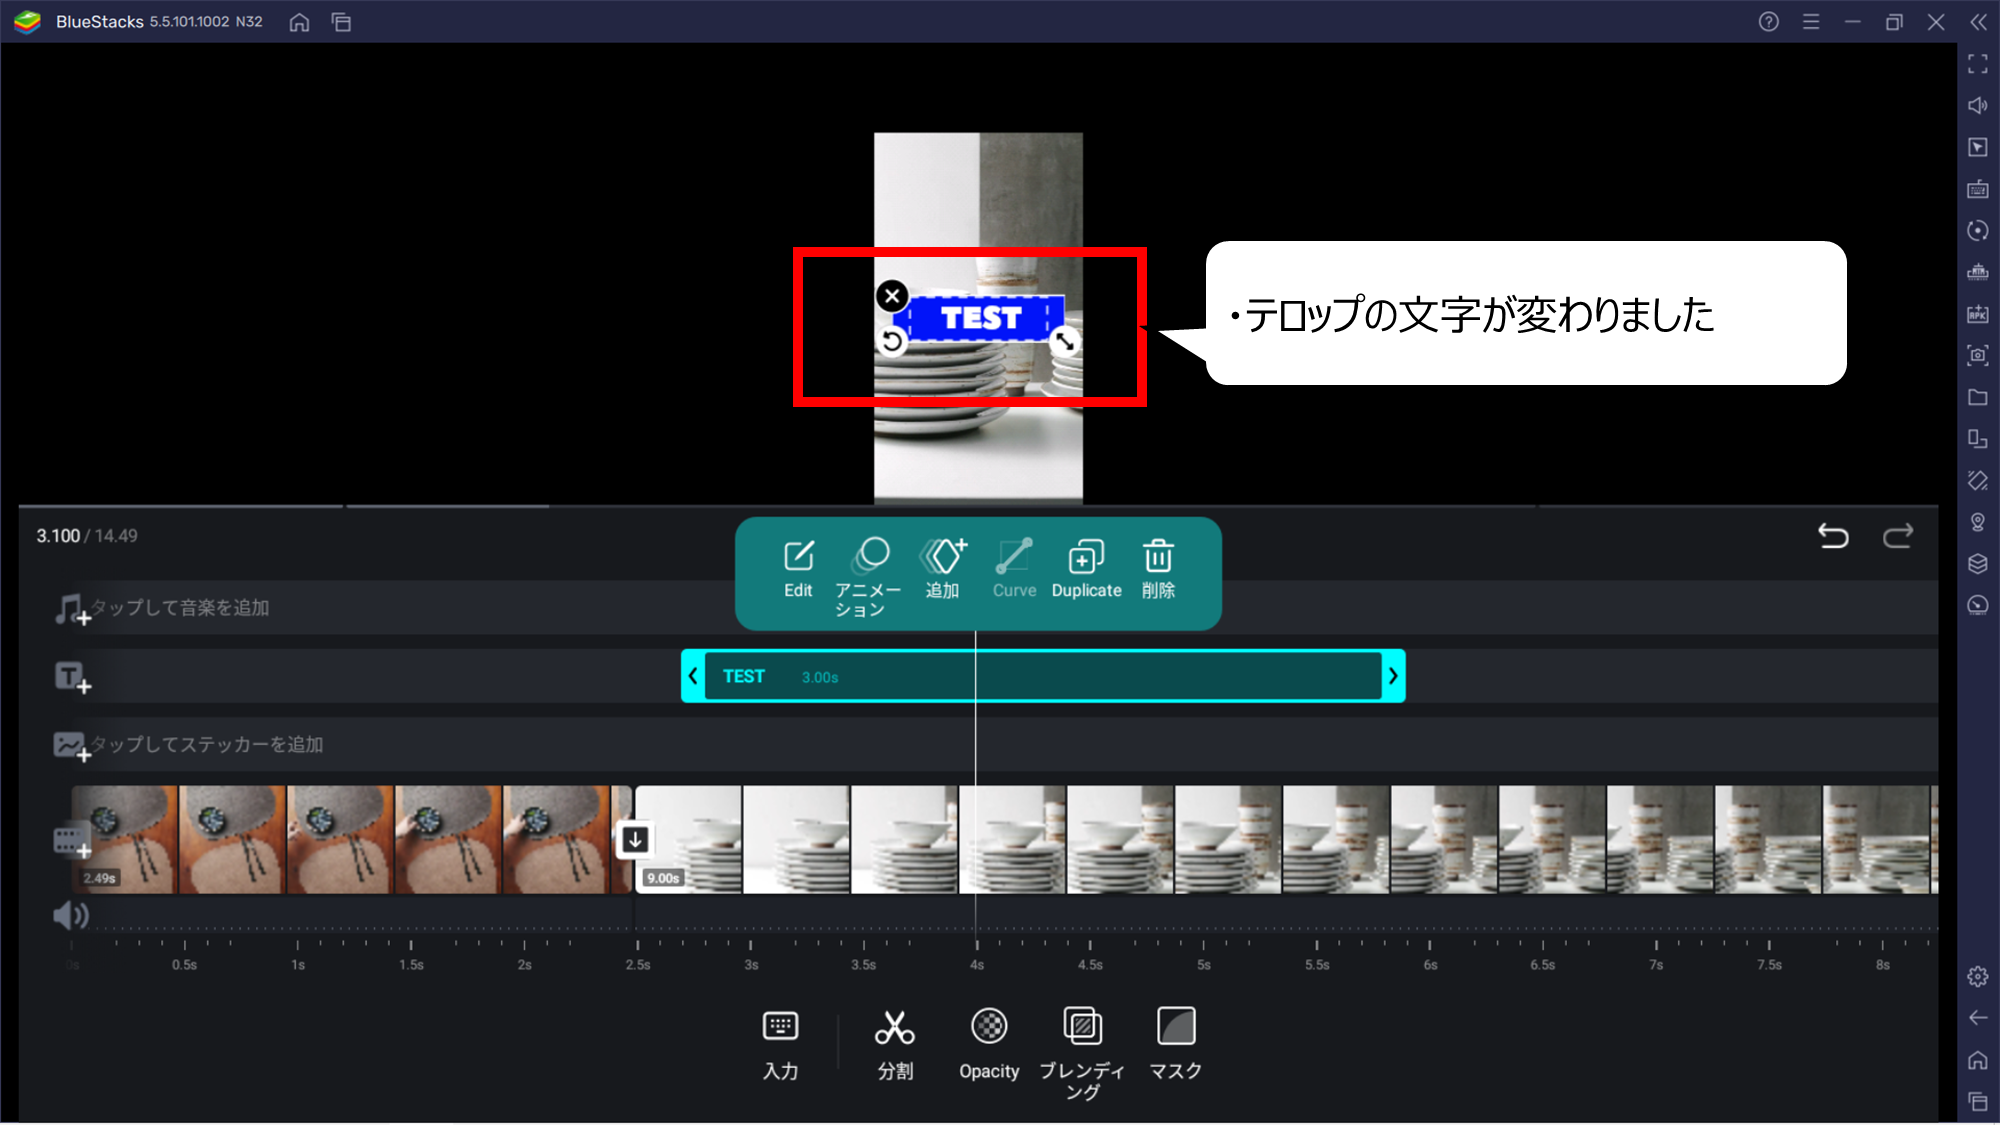
・テロップの文字が変わりました
・ムービーの中にムービーや絵を入れよう(ピクチャーインピクチャー)

ムービーの中にムービーや絵を入れることができます
1.次は、ムービーを同時に動かします
2.「ステッカーを追加」ボタンをタップしてください
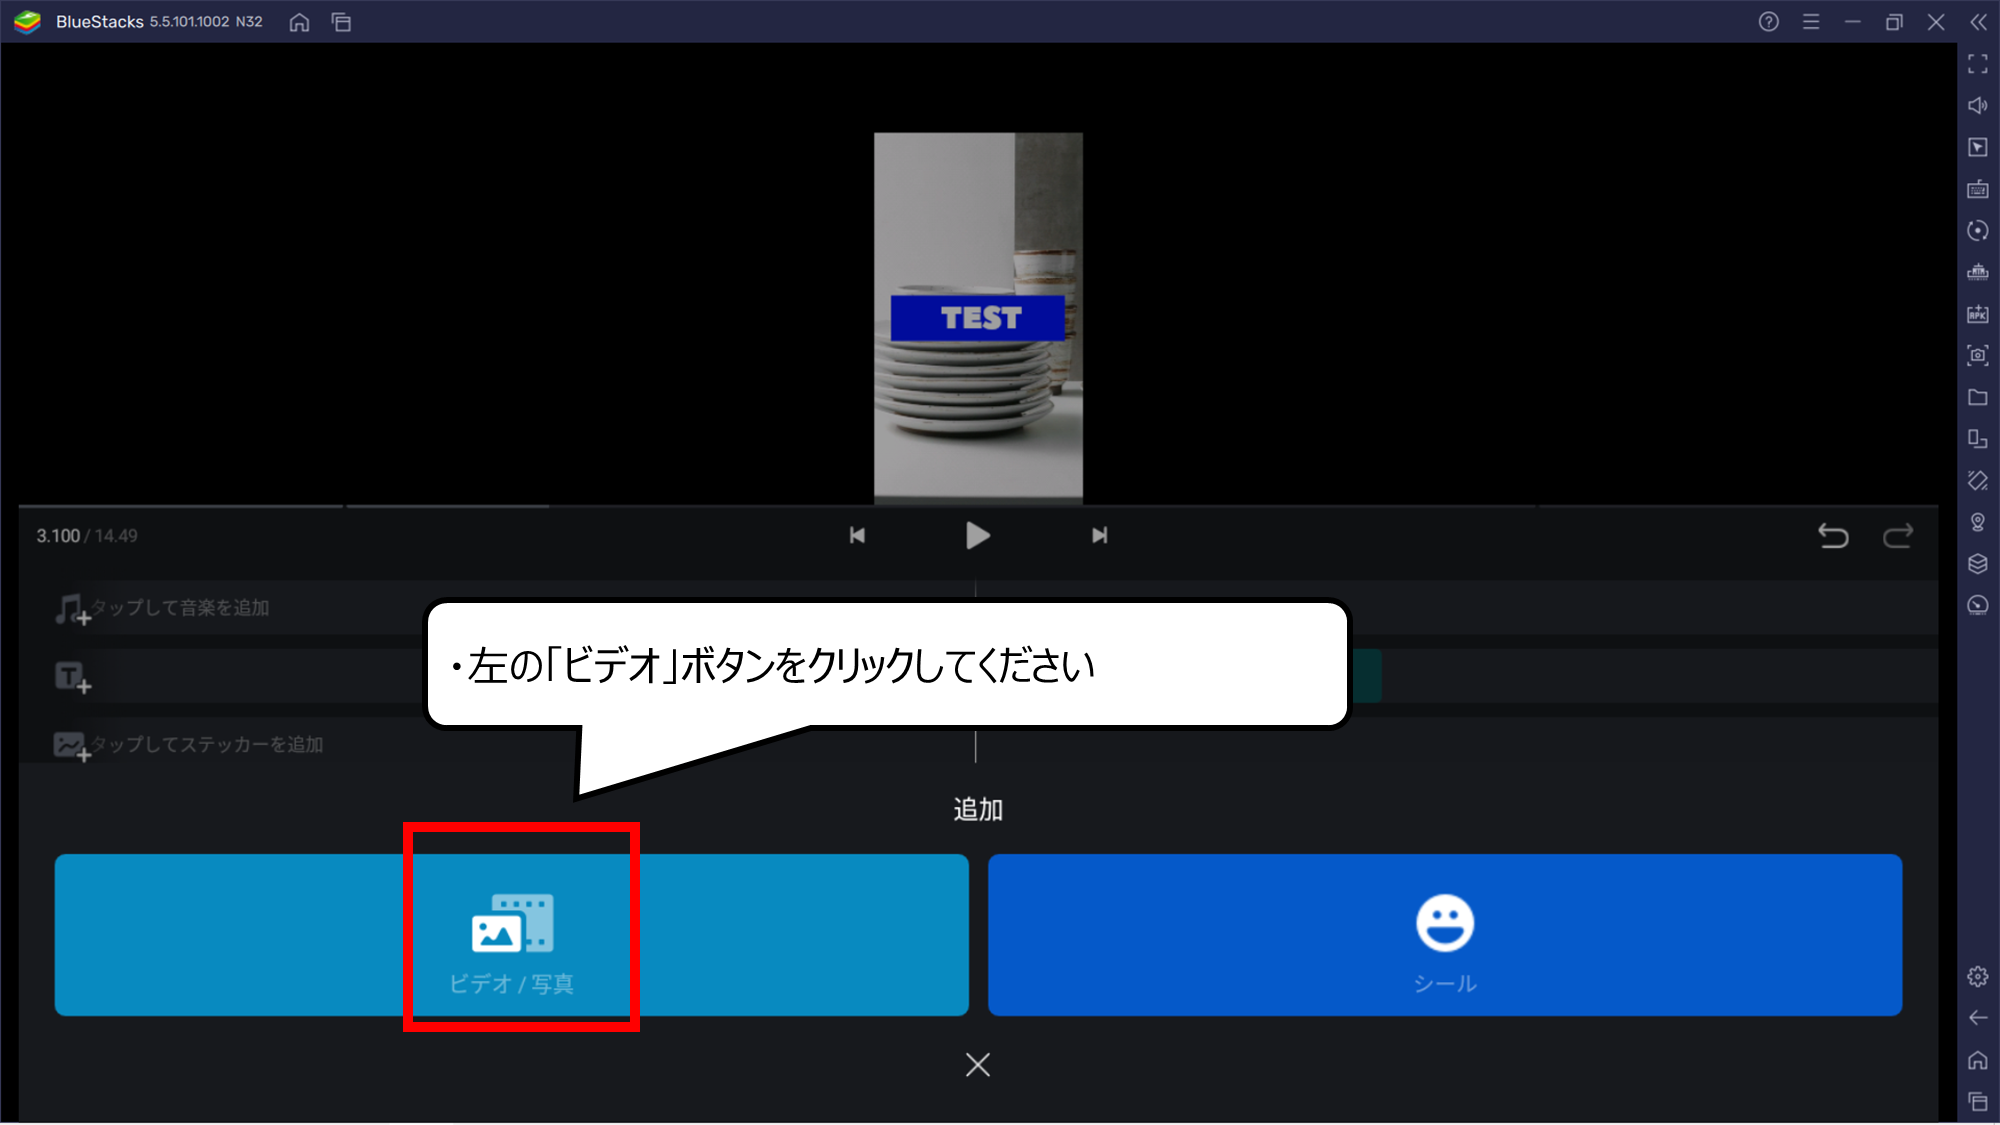
今回は、ムービーを加えます
・左の「ビデオ」ボタンをクリックしてください
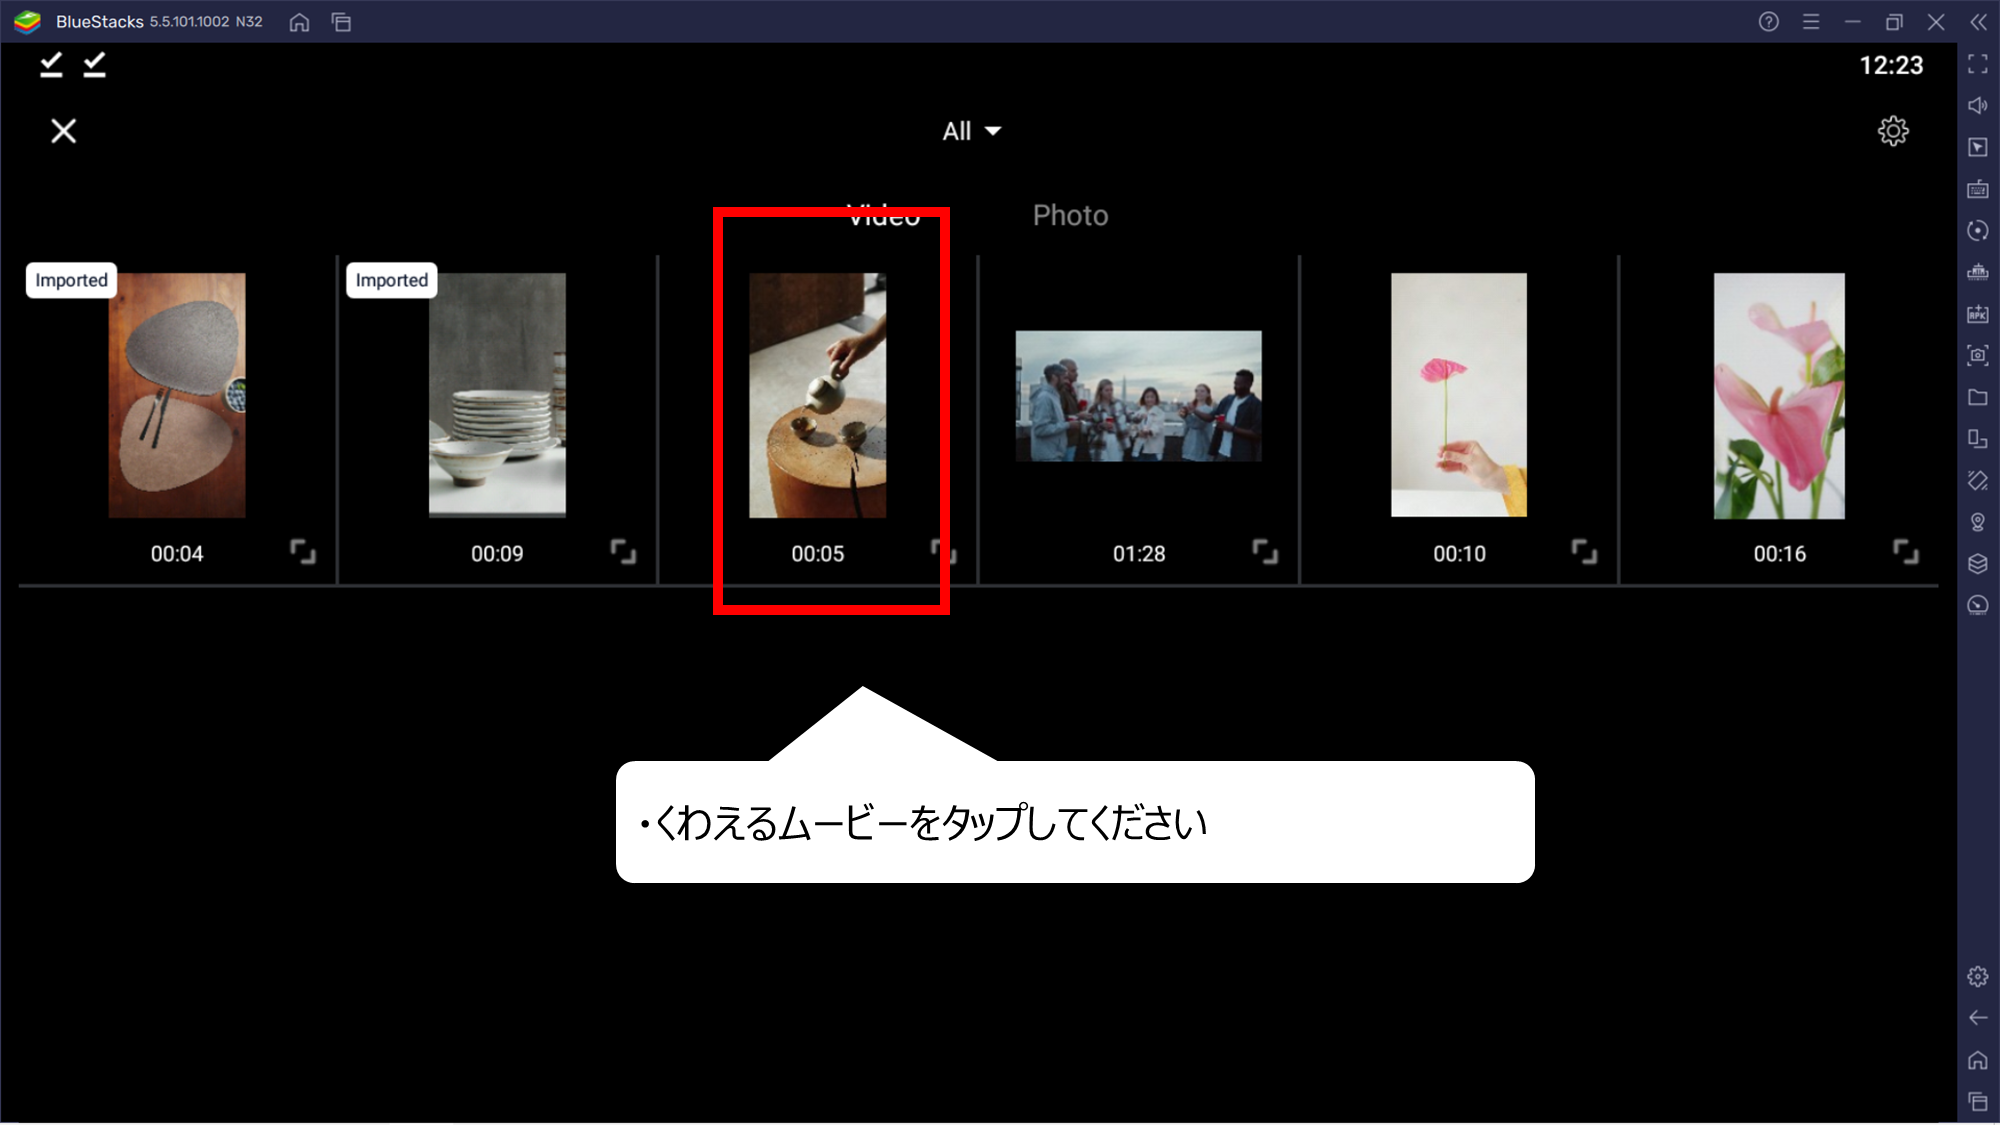
プラスできるムービーがあらわれます
・くわえるムービーをタップしてください

ムービーの中にムービーがあらわれます
1.ムービーの中にムービーがあらわれました
2.新しいムービーも、こまかく変えることができます
・ムービーにミュージックをくわえよう
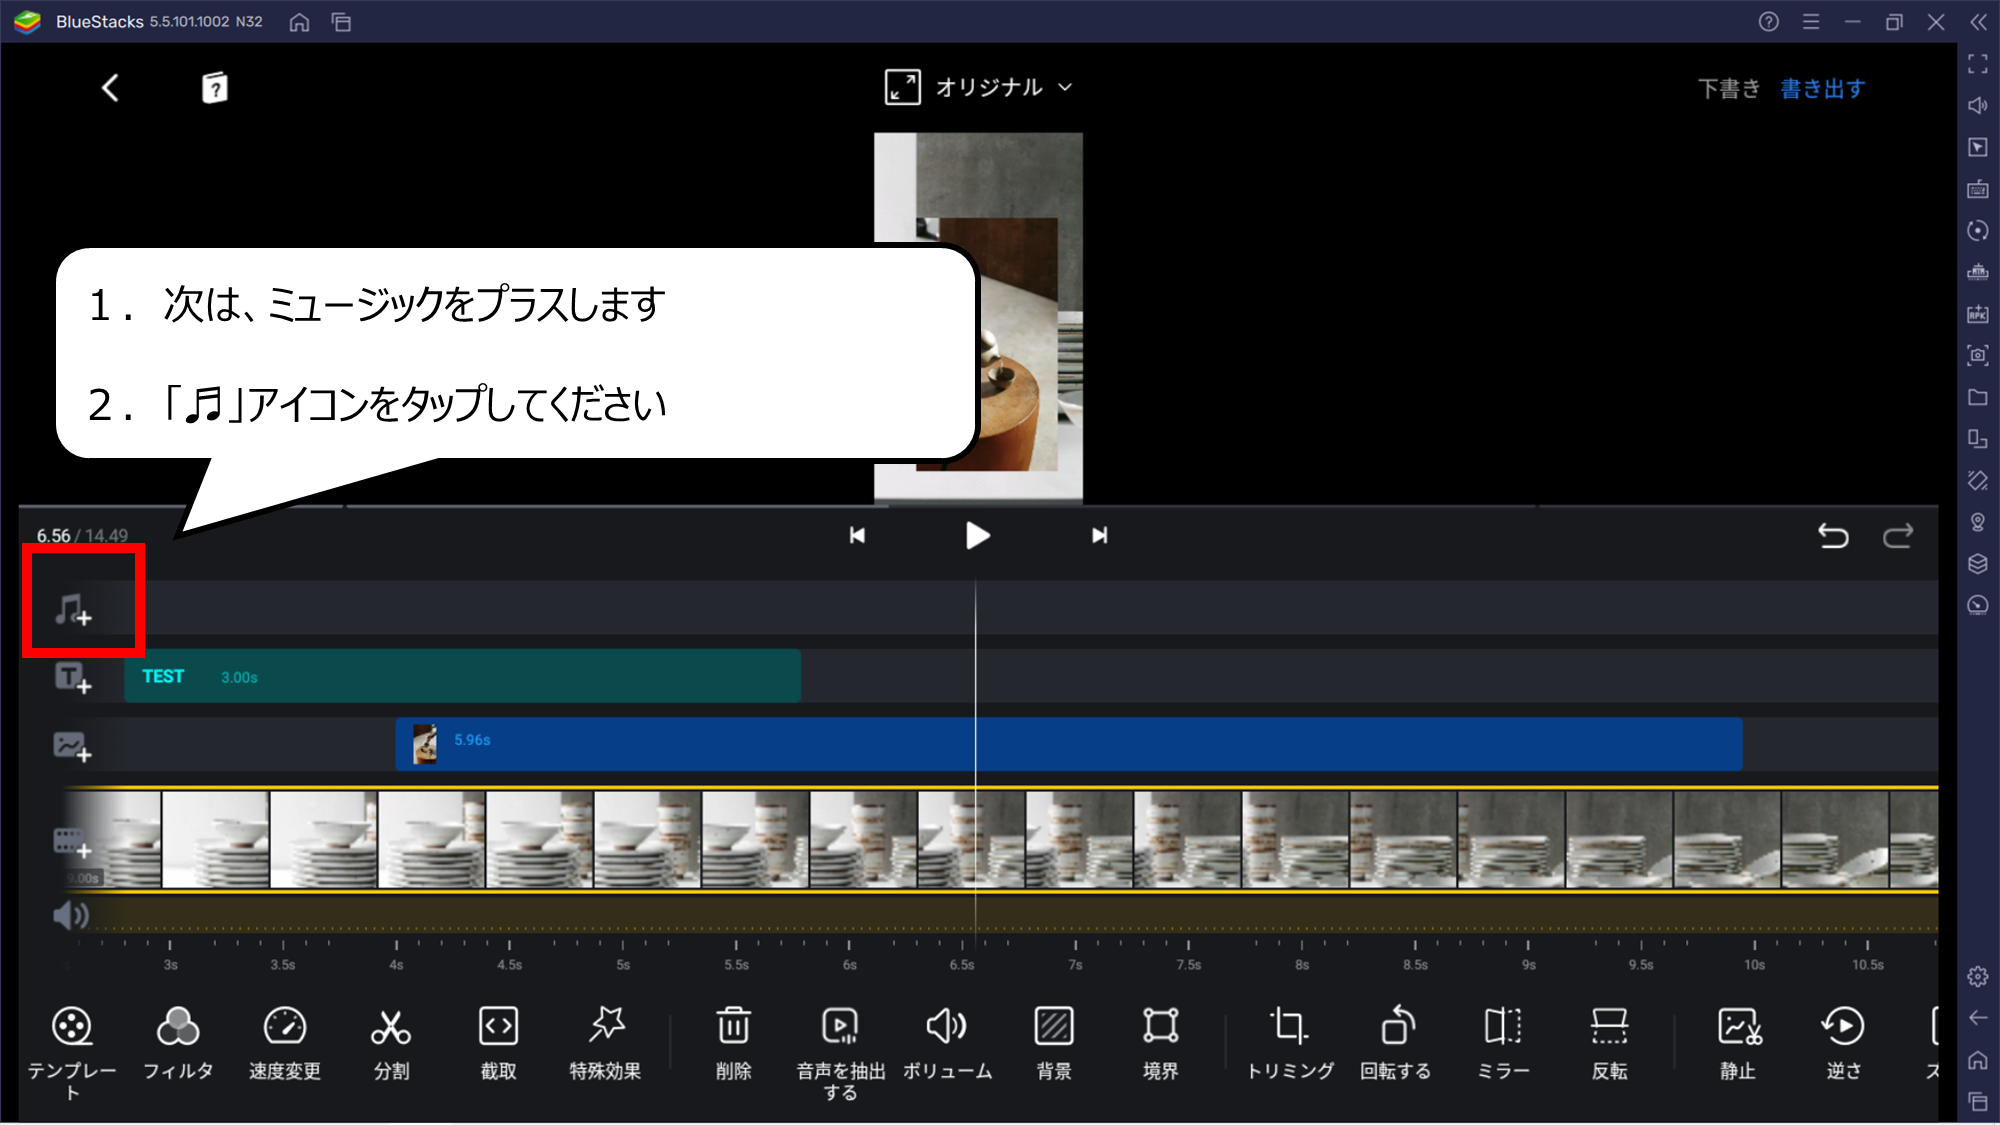
次は、ミュージックをくわえます
1.次は、ミュージックをプラスします
2.「♬」アイコンをタップしてください
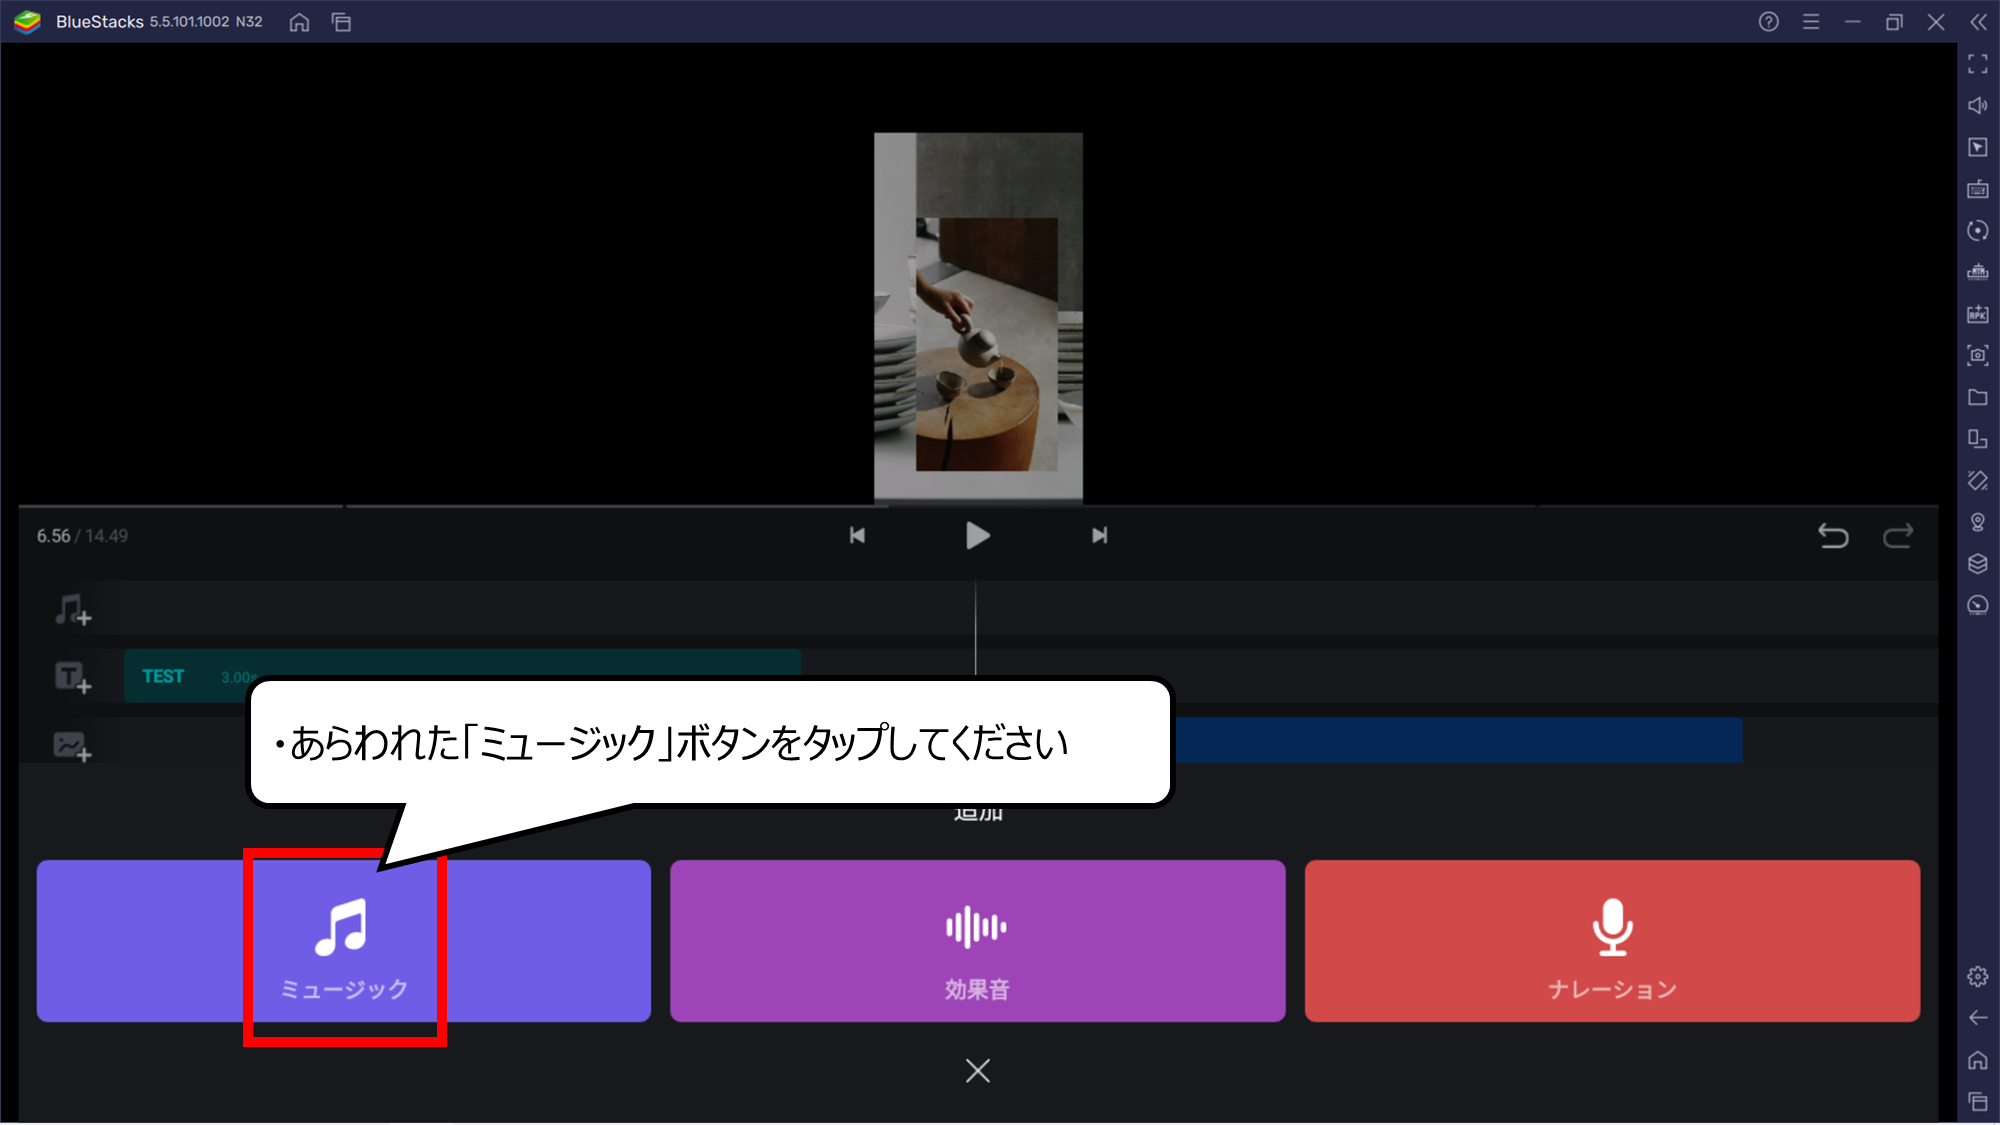
プラスできる音楽のメニューがあらわれます
・あらわれた「ミュージック」ボタンをタップしてください
プラスできる音楽があらわれます
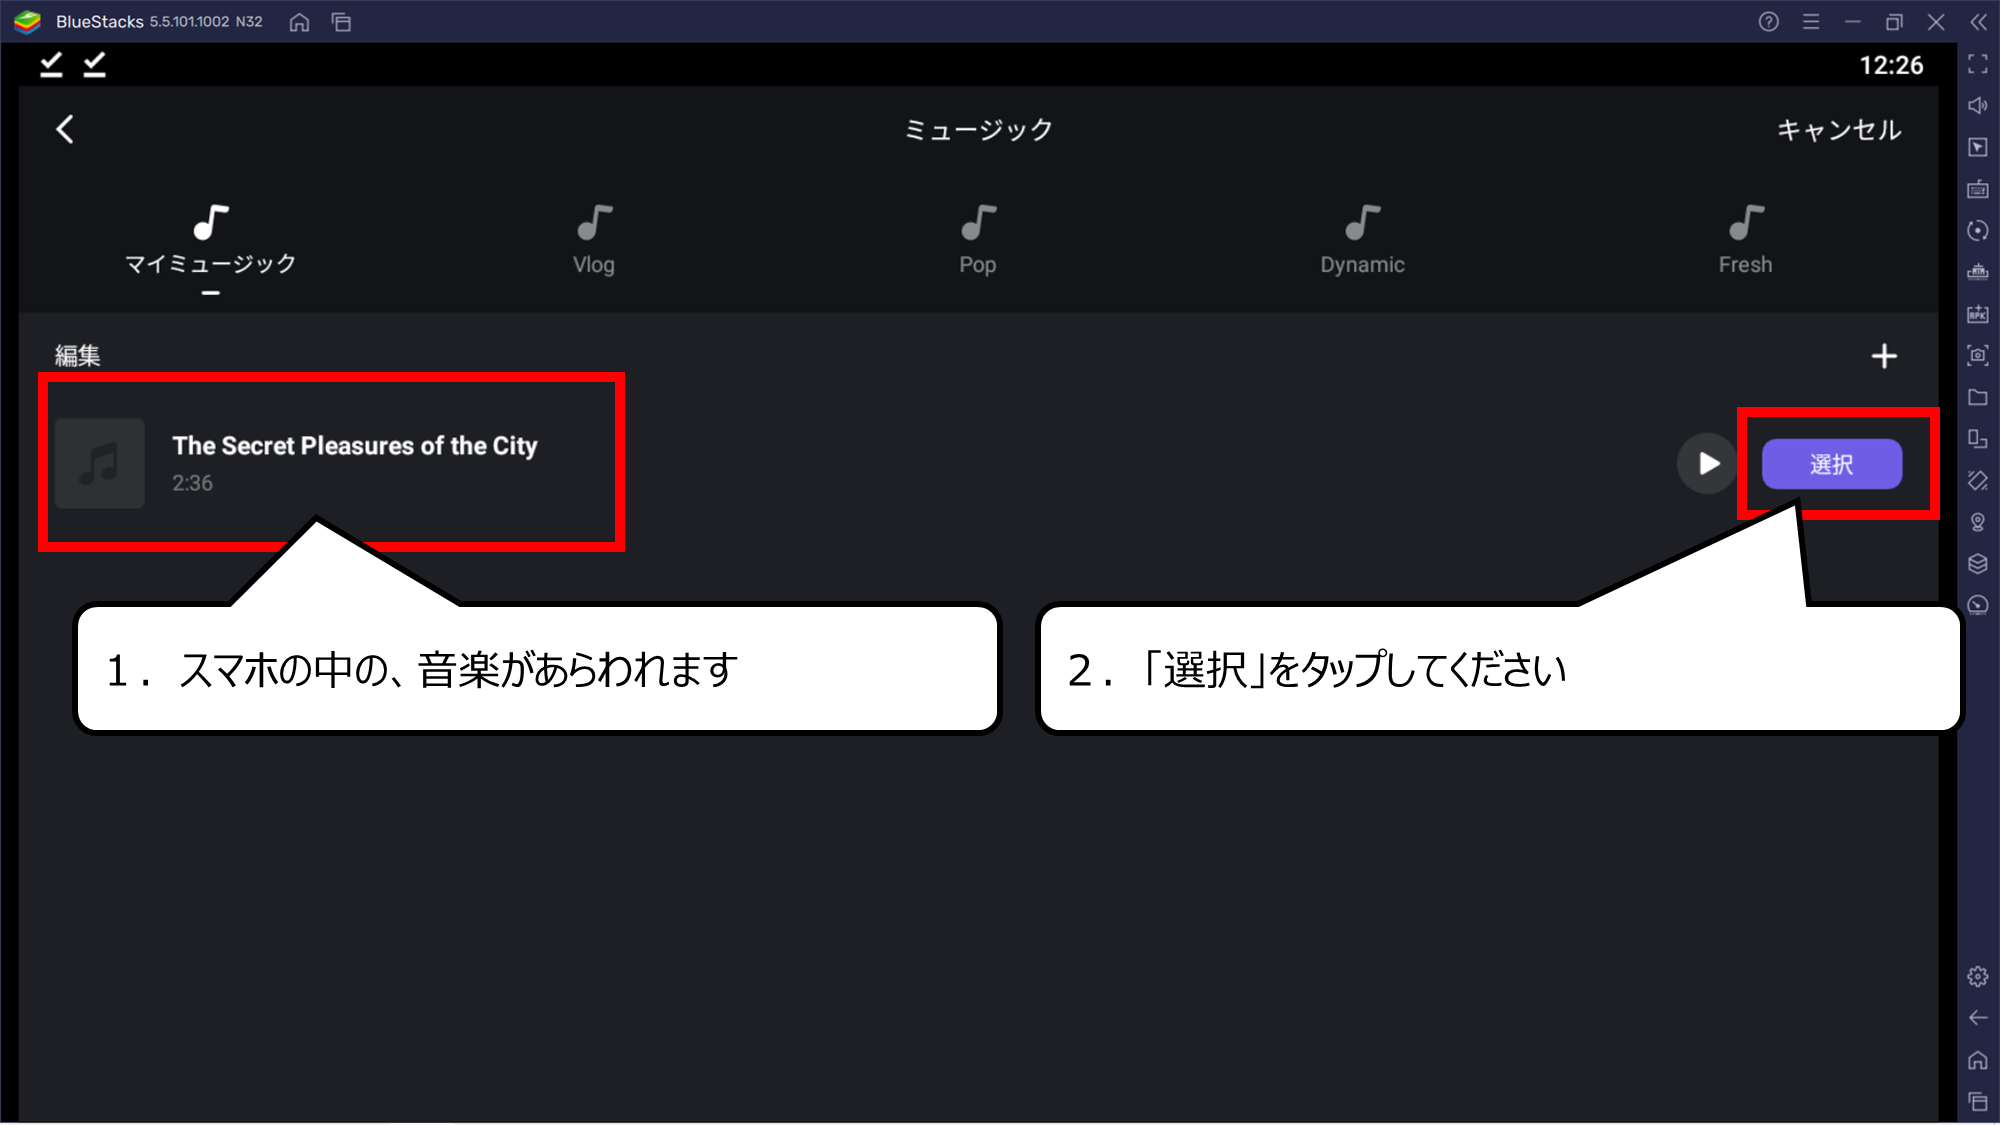
1.スマホの中の、音楽があらわれます
2.「選択」をタップしてください
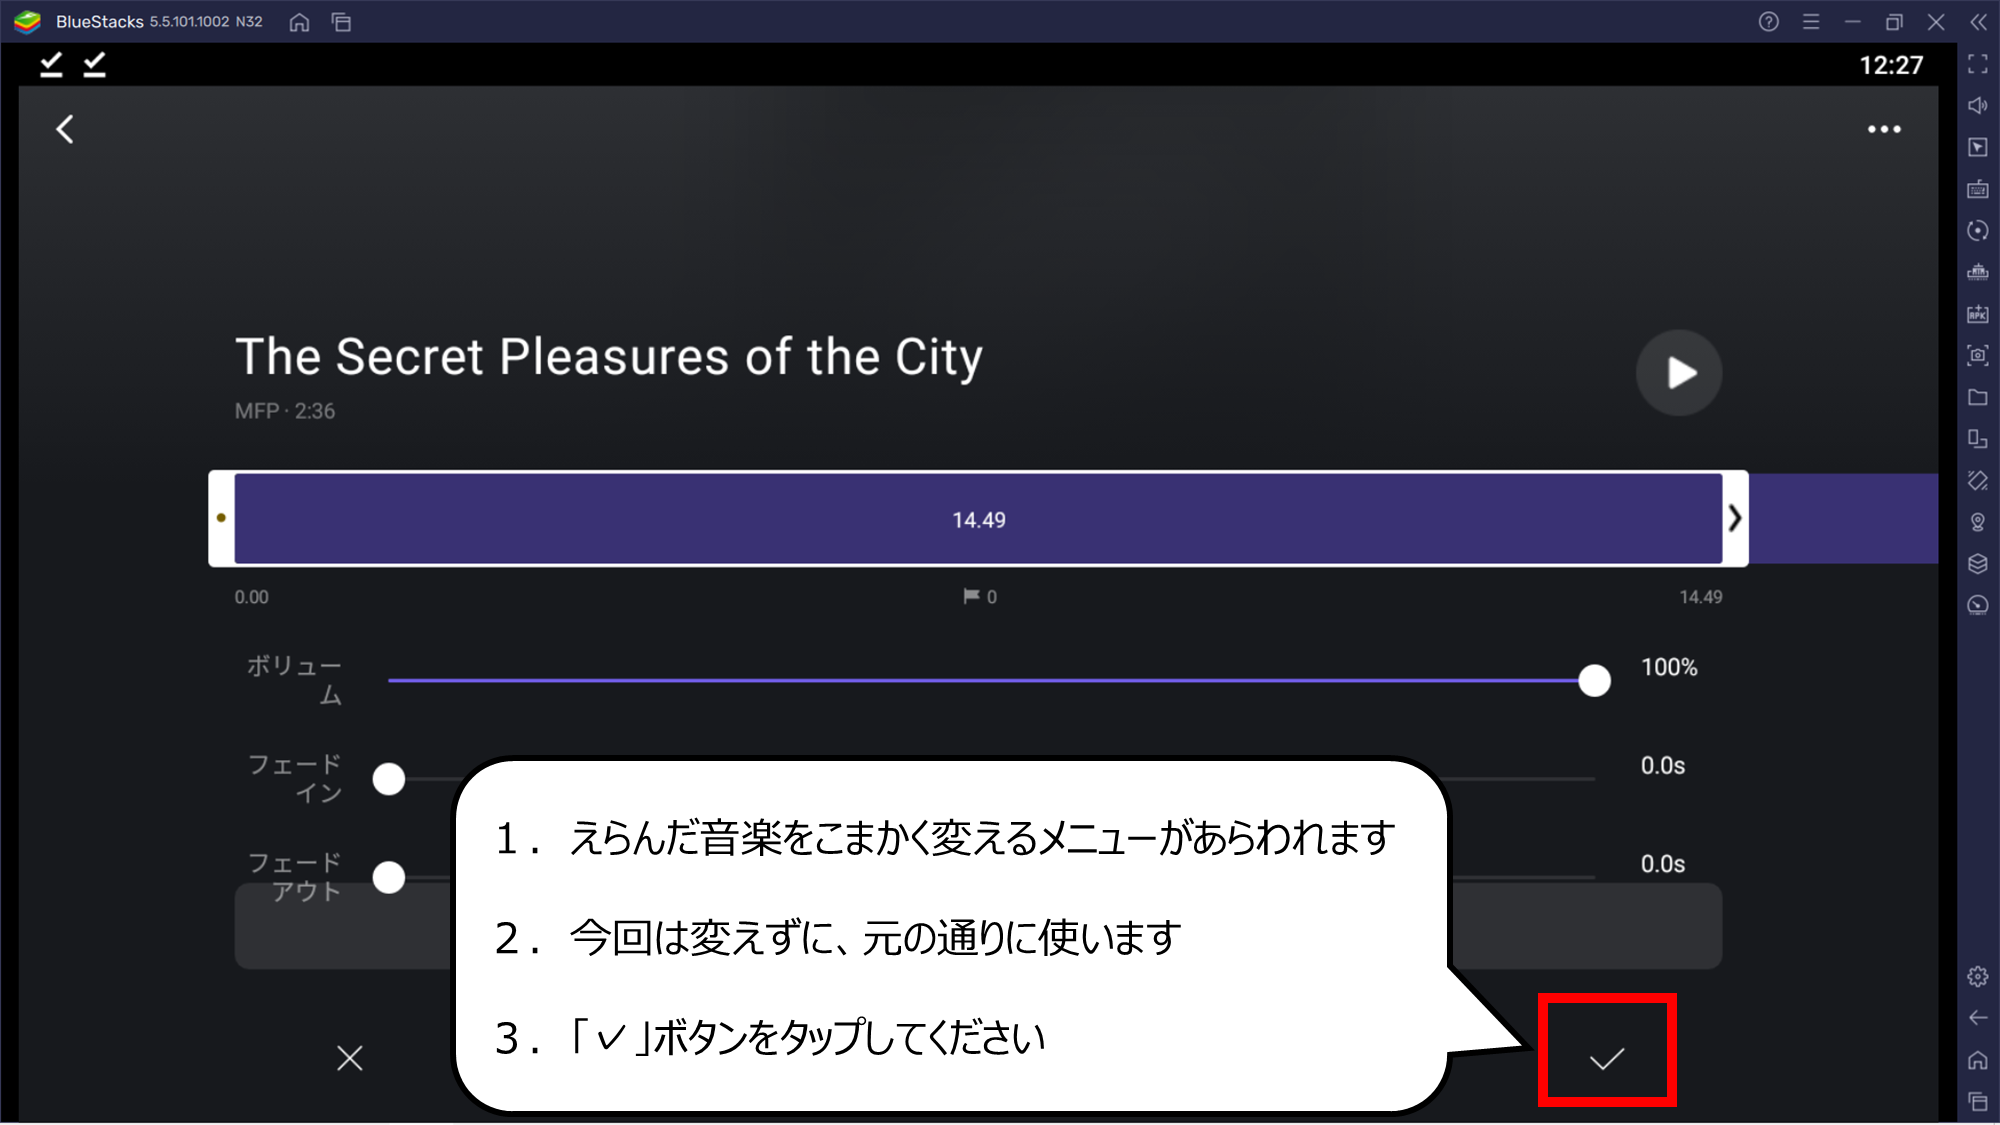
音楽にエフェクトをプラスできるメニューがあらわれます
1.えらんだ音楽をこまかく変えるメニューがあらわれます
2.今回は変えずに、元の通りに使います
3.「✓」ボタンをタップしてください

ミュージックを加えた後でも、こまかく変えることができます
1.音楽が「タイムライン」にあらわれます
2.音楽もこまかく変えることができます
つくったムービーを他のアプリでも使えるファイルにしよう

「書き出す」ボタンをタップして、ムービーファイルをつくります
1.次は、ムービーをファイルにします
2.「書き出す」ボタンをタップしてください
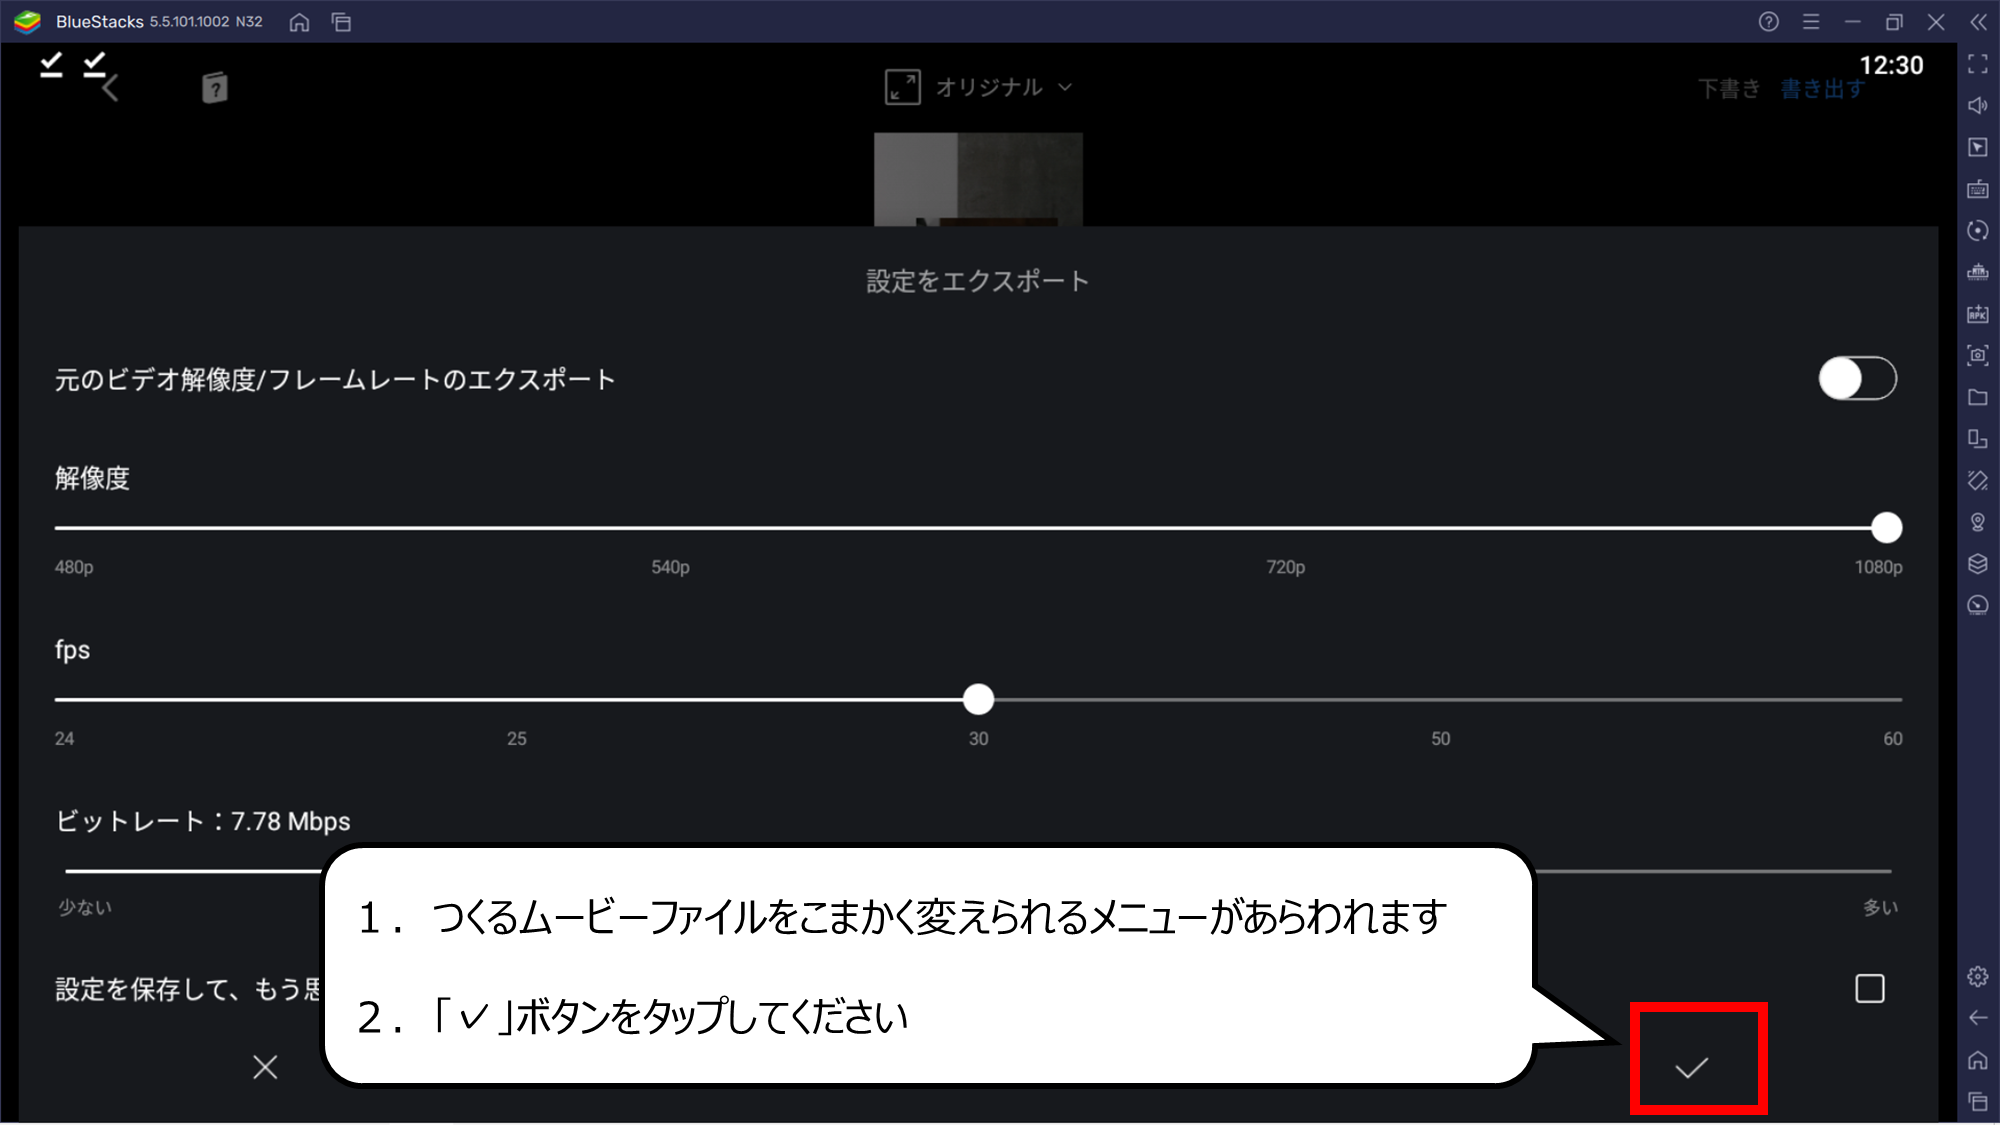
つくるムービーを変えるメニューが、あらわれます
1.つくるムービーファイルをこまかく変えられるメニューがあらわれます
2.「✓」ボタンをタップしてください

100%になるとムービーファイルが、できあがります
・進み具合のゲージがあらわます

ファイルの名前ではありません
1.「題名」、「説明」を入れてください
2.「アルバムに保存」をタップしてください
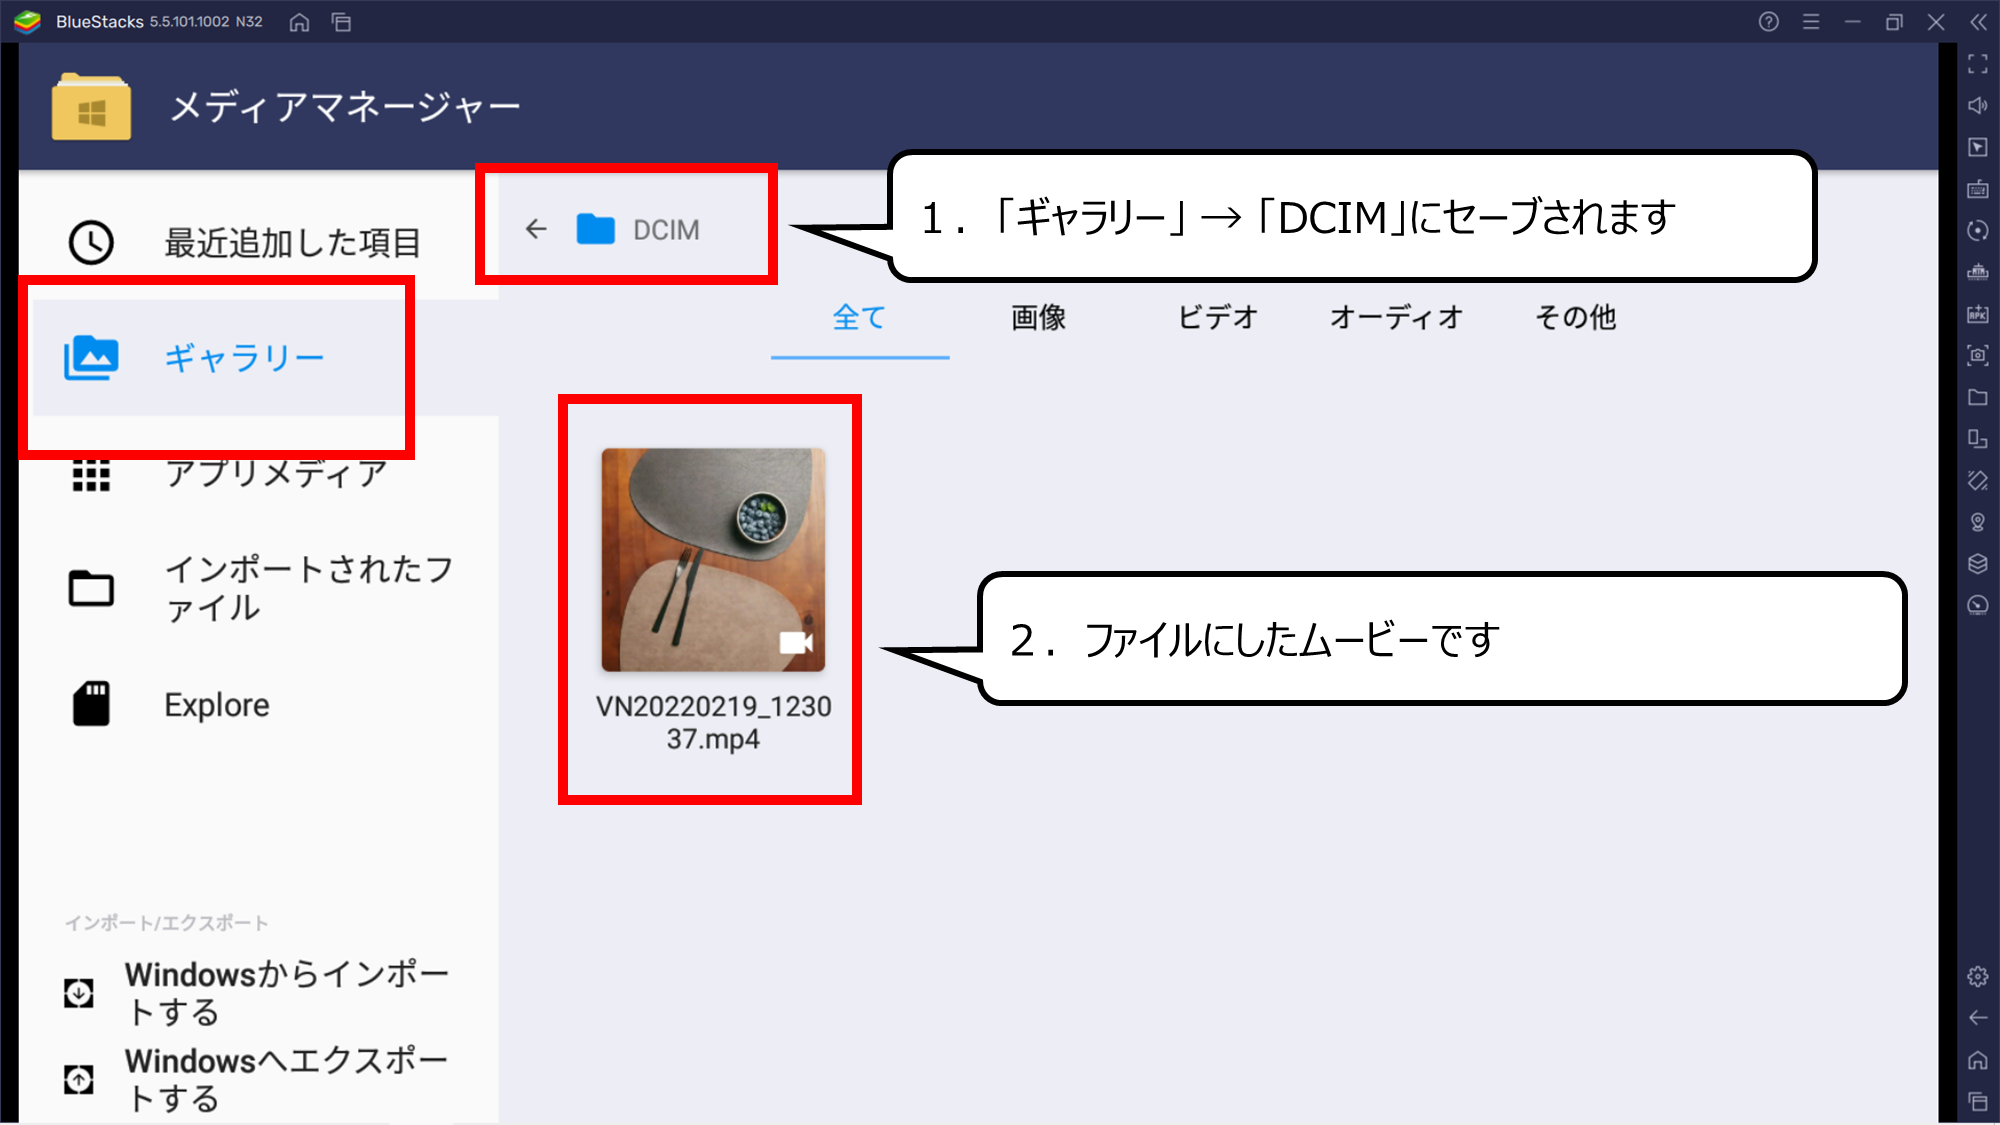
ふつうのファイルアプリは「ギャラリー」からアクセスしてください
1.「ギャラリー」 → 「DCIM」にセーブされます
2.ファイルにしたムービーです
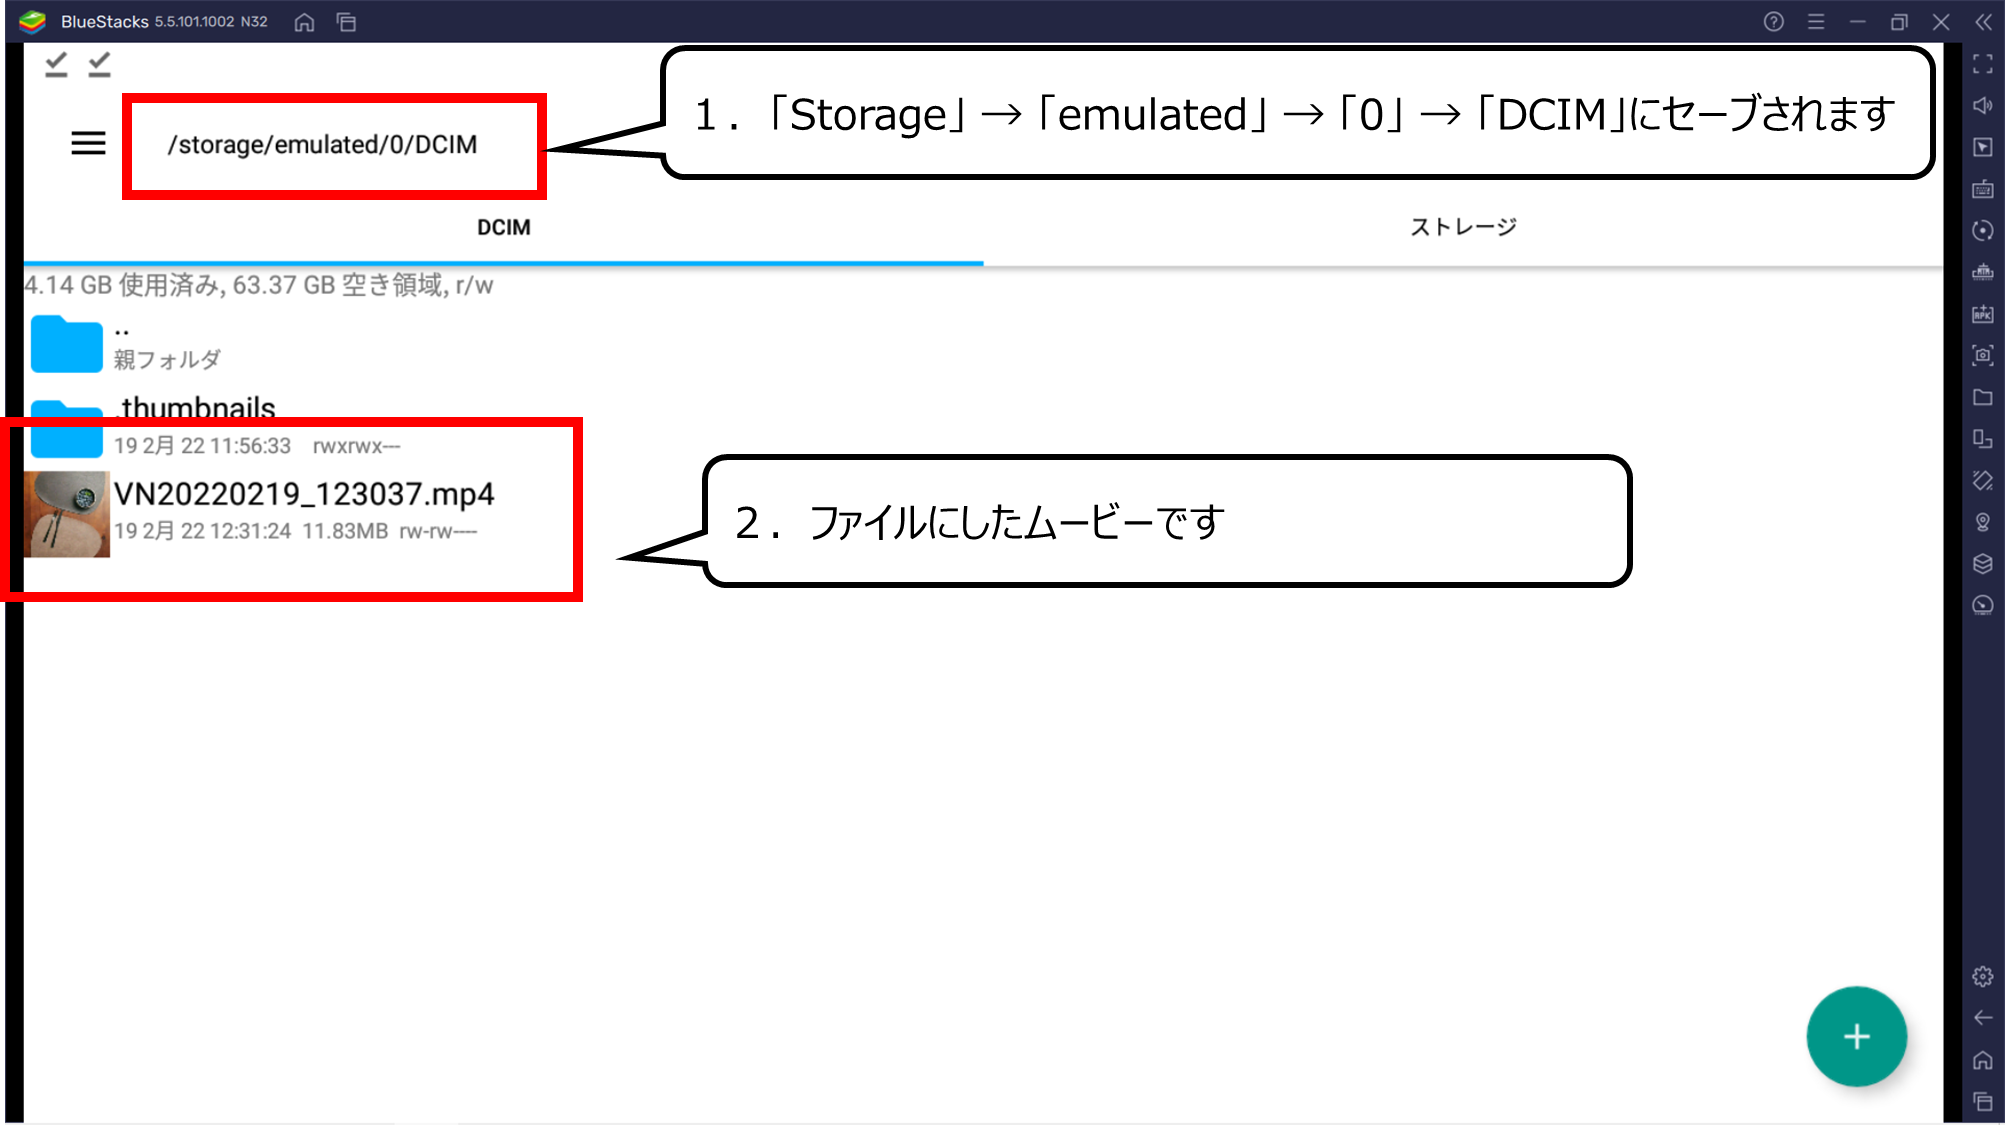
ルートからアクセスする方は、内部ストレージをご覧ください
1.「Storage」 → 「emulated」 → 「0」 → 「DCIM」にセーブされます
2.ファイルにしたムービーです
・まとめ
今回は、スマホでムービーのカッコいいつくり方、VN動画編集ソフトの使い方を紹介しました
Youtubeでは、さらにおもしろく絵のつくり方を紹介しています
また、他のページでもCG・映像のつくり方について紹介しています


コメント