
「こだわったムービーをつくってみたい」
「おしゃれなムービーのつくり方が知りたい」
・・・でも
「なにから始めればいいか、わからない」
「ムズかしそう」
と悩んでいませんか?
このページでは、だれでも、できる方法で、動画のつくり方を紹介しています
今回は無料ソフトの「HitFilm Express」で光る目のつくり方、トラッキング合成を紹介します
ぜひ、チャレンジしてください
つぎの目次の流れにそって進めます
また、Youtubeでは、さらにくわしく絵のつくり方を紹介しています
>> 動画で紹介!絵と映像のつくり方
・HitFilm Expressをはじめて聞いた方
・HitFilm Expressとはなに?
HitFilmExpressはムービーをおしゃれに変えられるソフトです
HitFilm Expressはとくしゅな効果など多くの映像をつくることができる無料のソフトです
HitFilm Expressをつかって作られた映像です
HitFilm Expressは公式サイトからダウンロードできます
インストールなどキホンの使い方は次のリンクをごらんください
>> HitFilm Expressの公式サイト
>> 動画編集ソフト HitFilmExpressの始めの方ページ
・Hitfilm Expressで目が光る目のエフェクトをつくろう
・はじめに動画テクニックでつかうムービーをダウンロードしよう
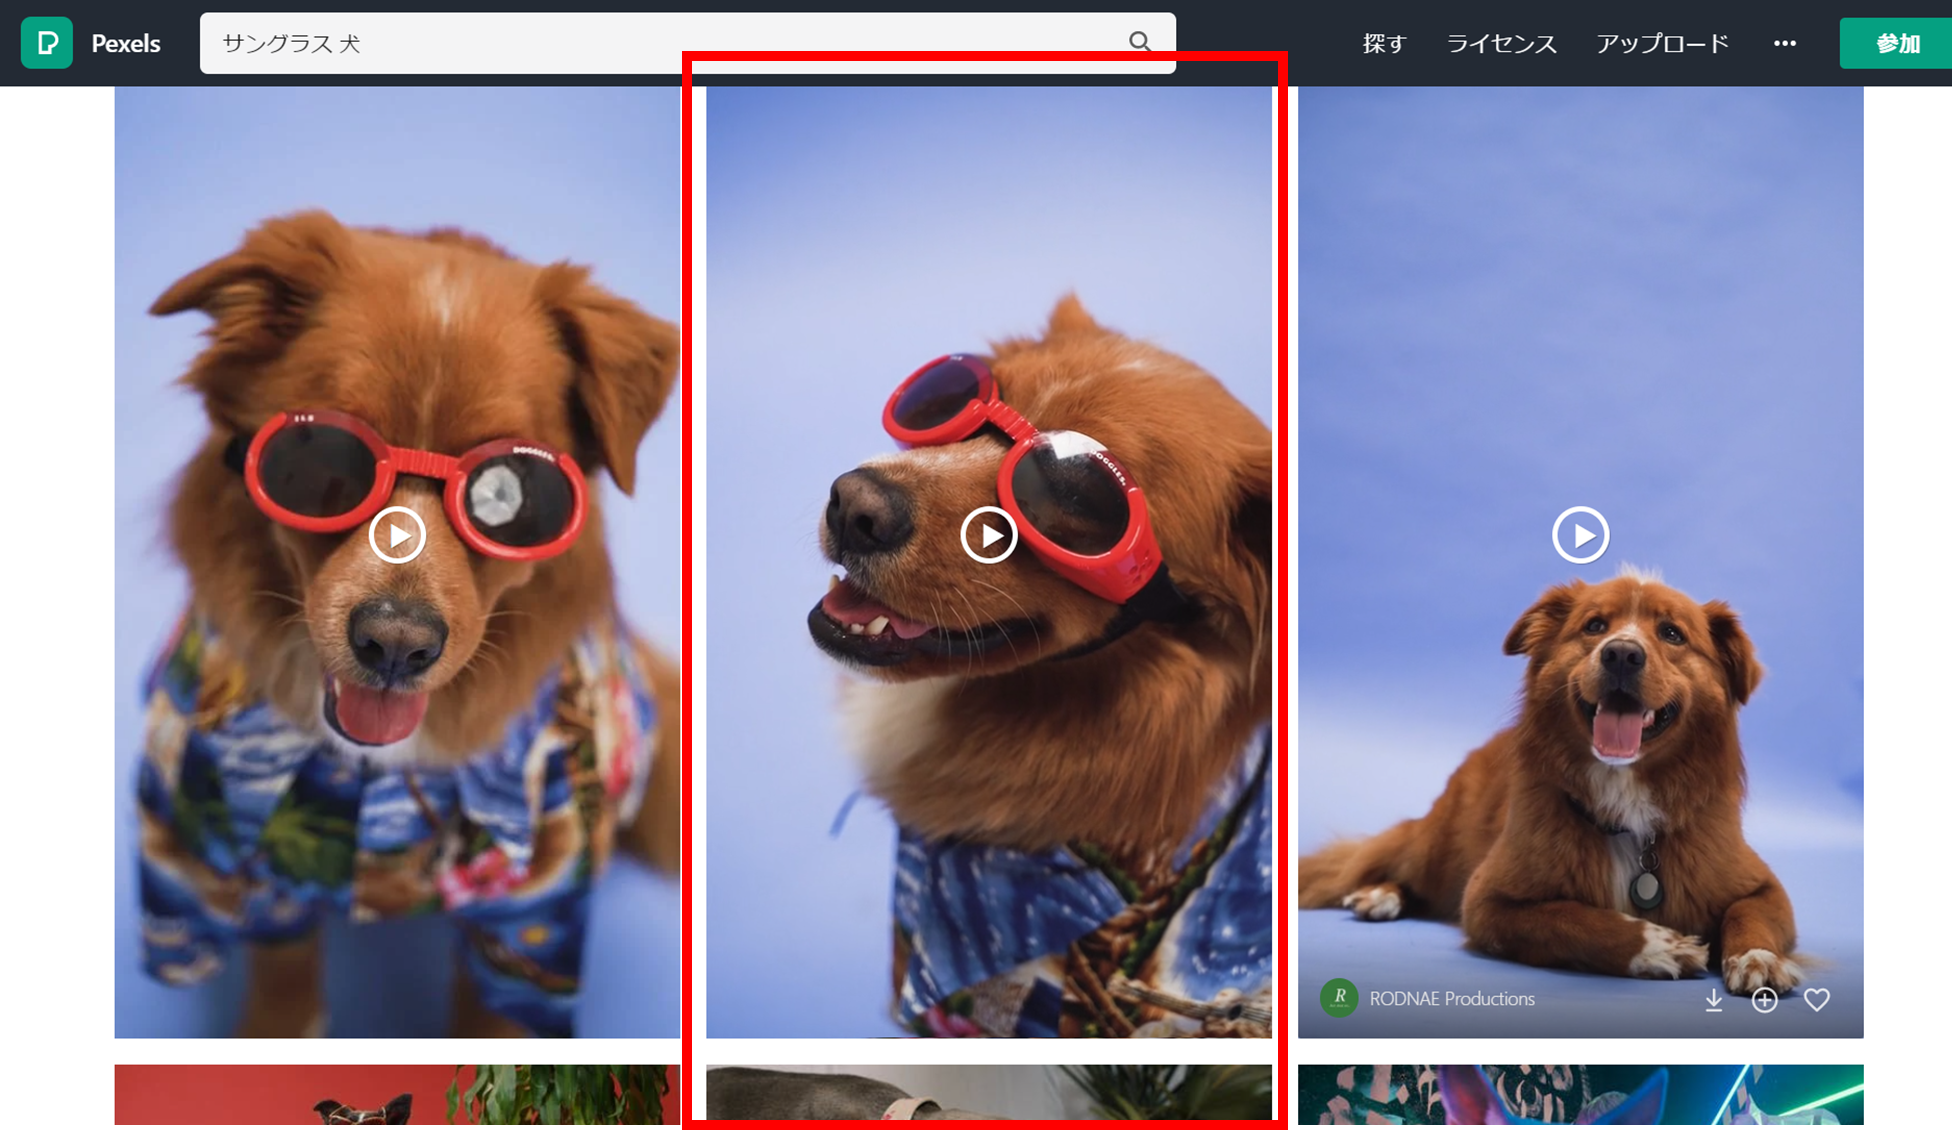
はじめに今回のテクニックで使うムービーをダウンロードしてください
※ 今回つかうムービーは無料ムービー配布サイトの「Pexels」からダウンロードします
> RODNAE Productionsさんの動画”>>> RODNAE Productionsさんの動画
・ダウンロードしたムービーで光る目をつくる用意をしよう

Hitfilm Expressを起動してください
1.「New」をクリックしてください
2.新しいムービーをつくるウィンドウがあらわれます
3.「OK」をクリックしてください
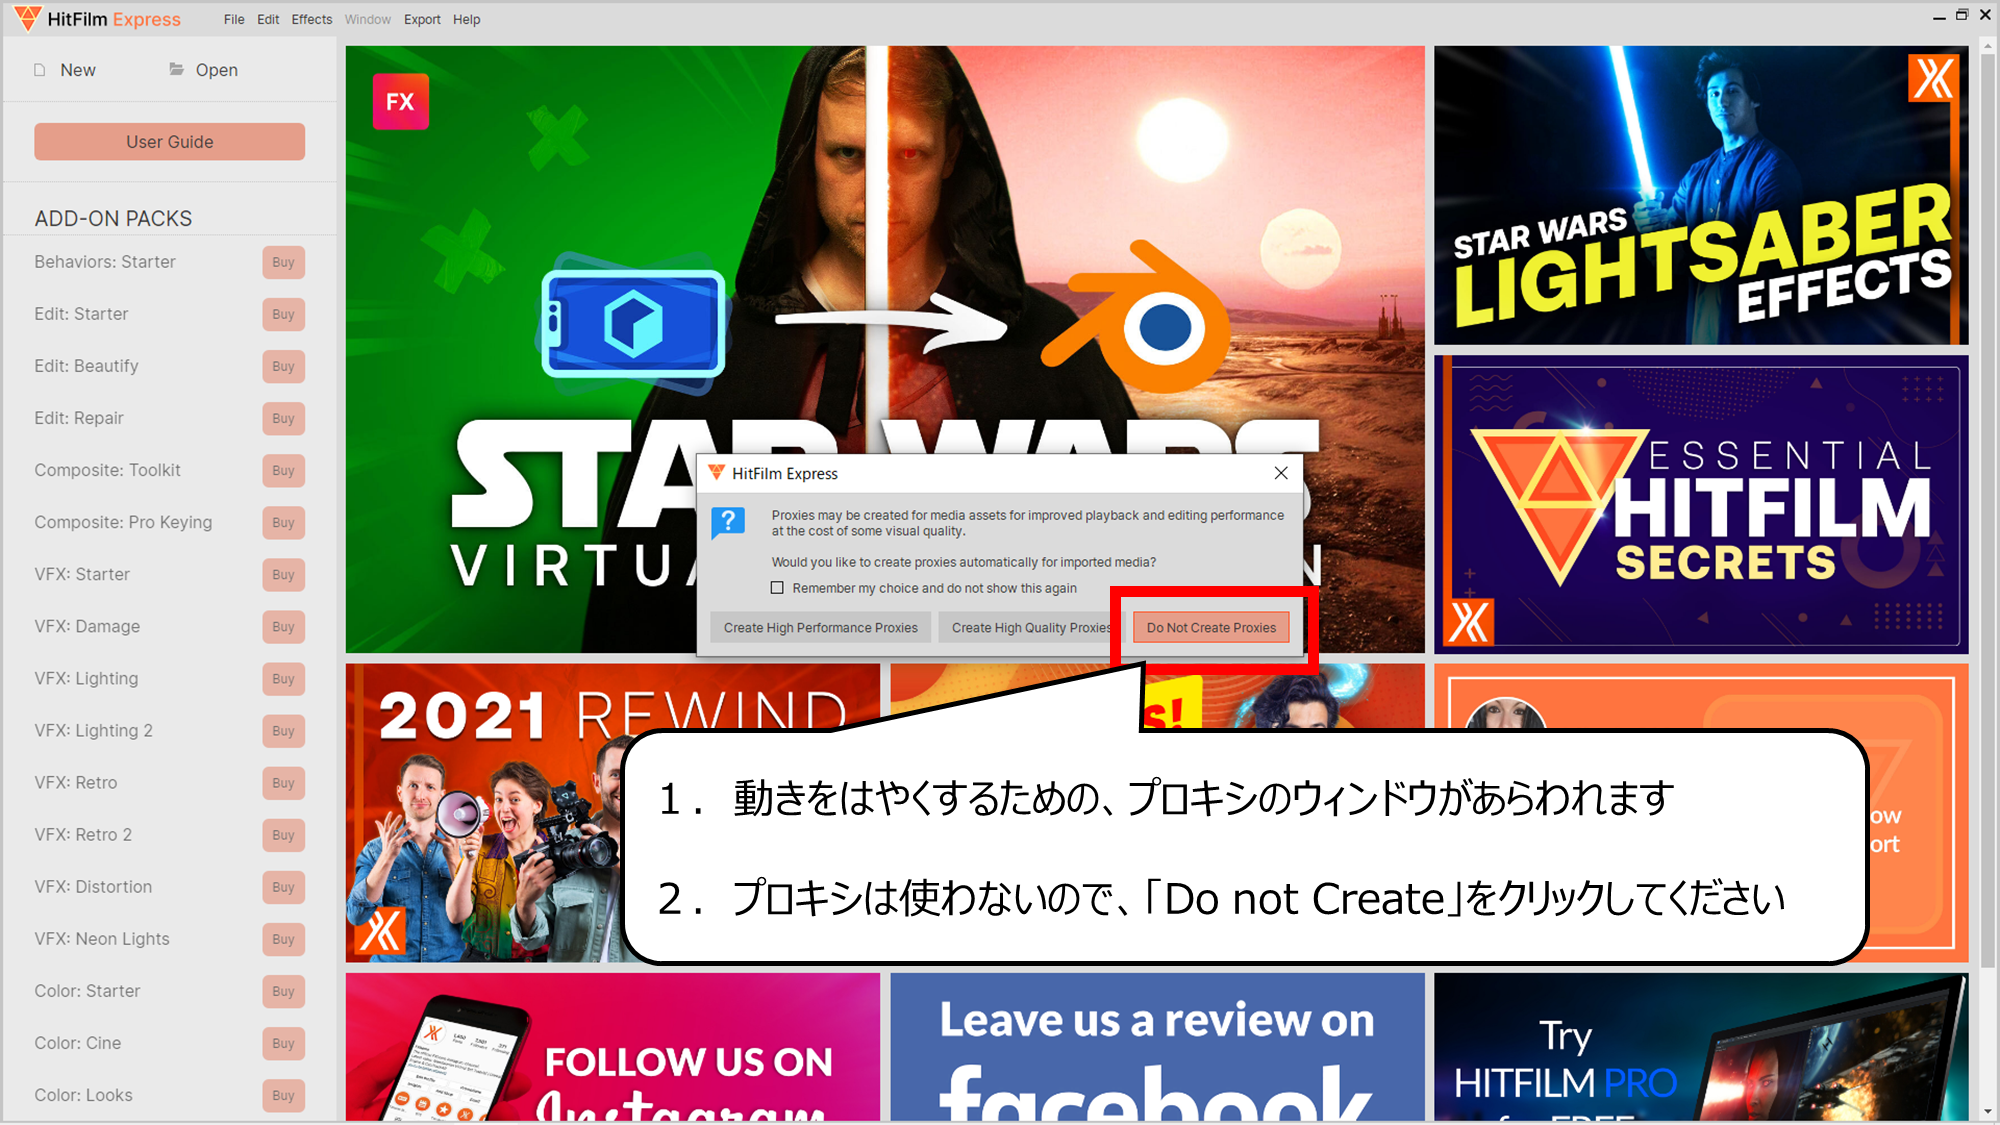
動きをはやくするためのプロキシの画面があらわれます
1.動きをはやくするための、プロキシのウィンドウがあらわれます
2.プロキシは使わないので、「Do not Create」をクリックしてください
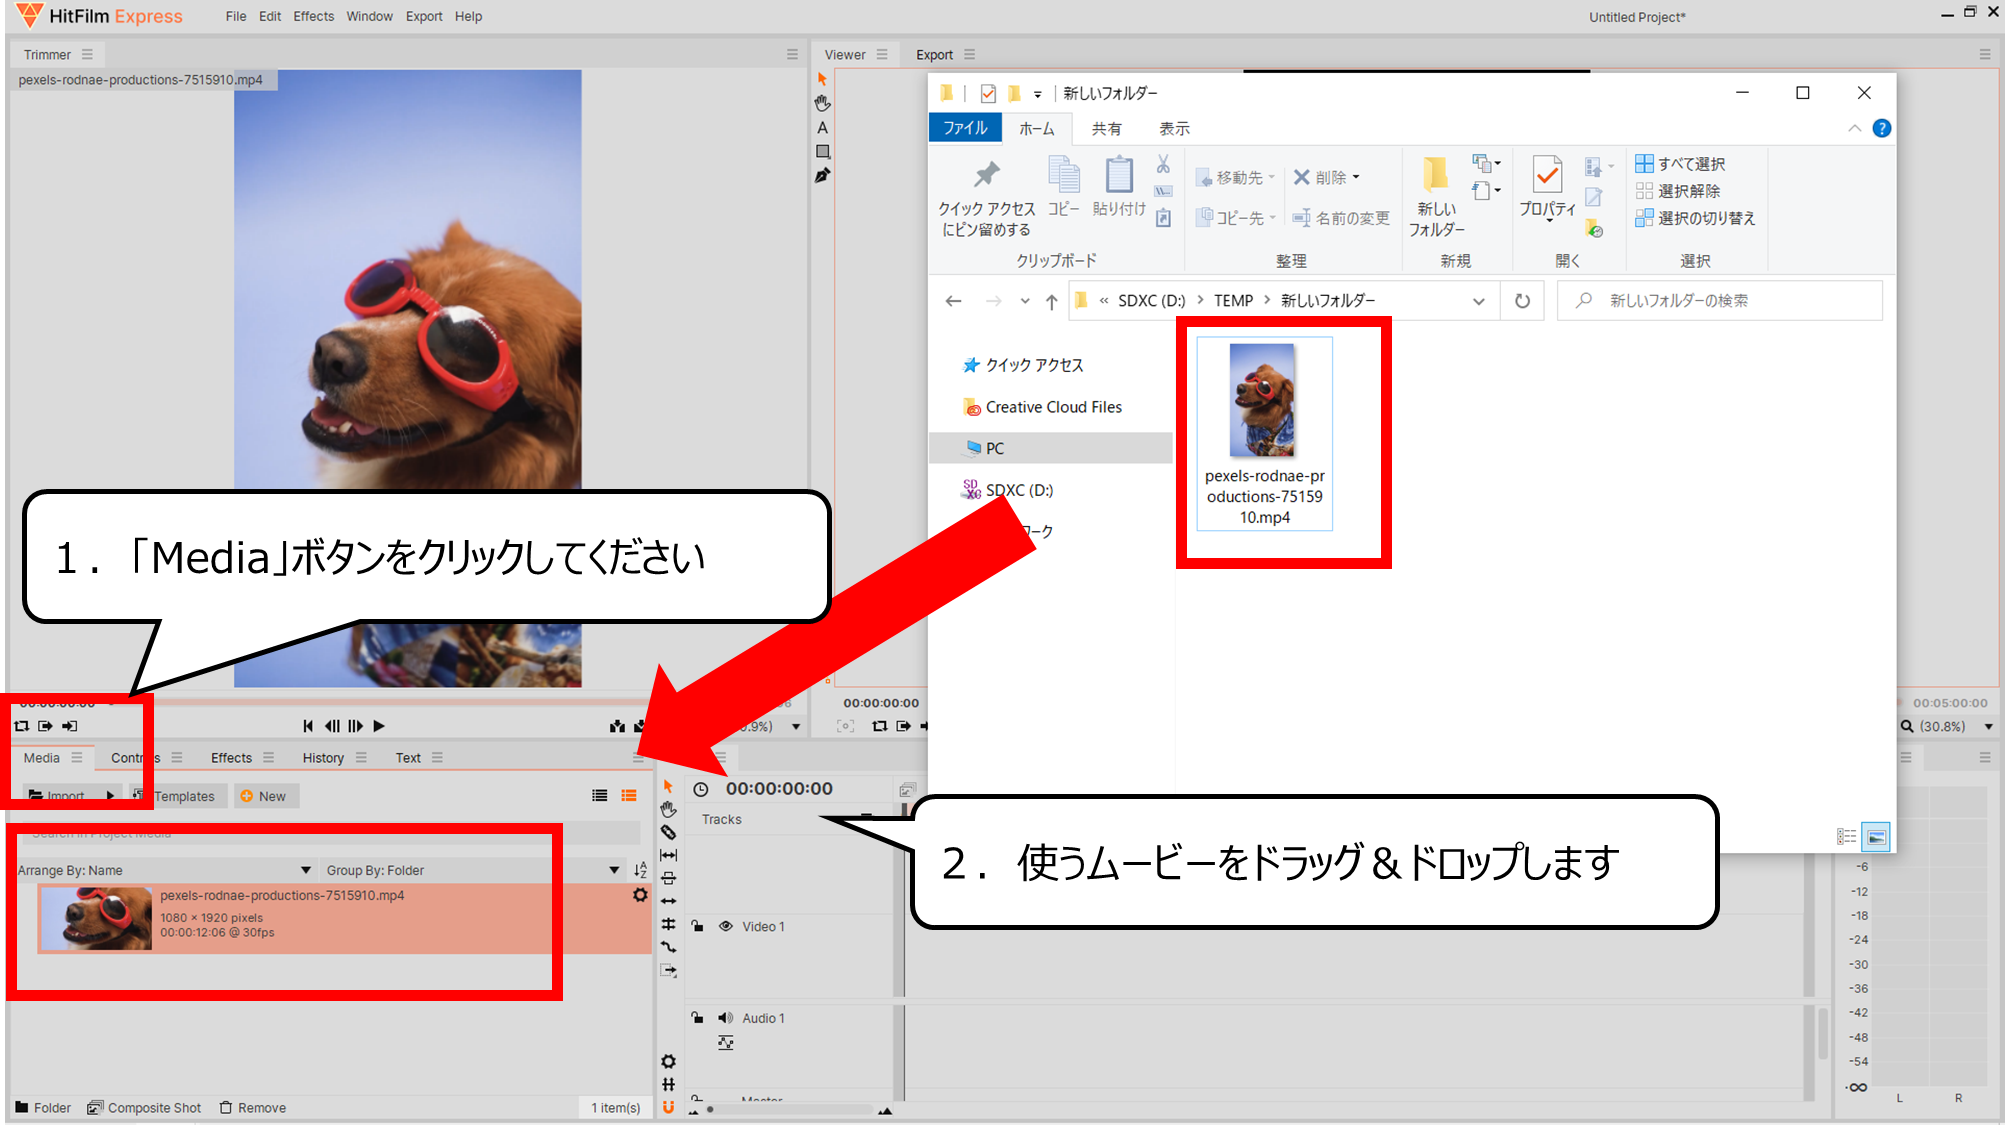
つかう動画をドラッグ&ドロップしてソフトに読みこみます
1.「Media」ボタンをクリックしてください
2.使うムービーをドラッグ&ドロップします
・サングラスの動きを記録しよう
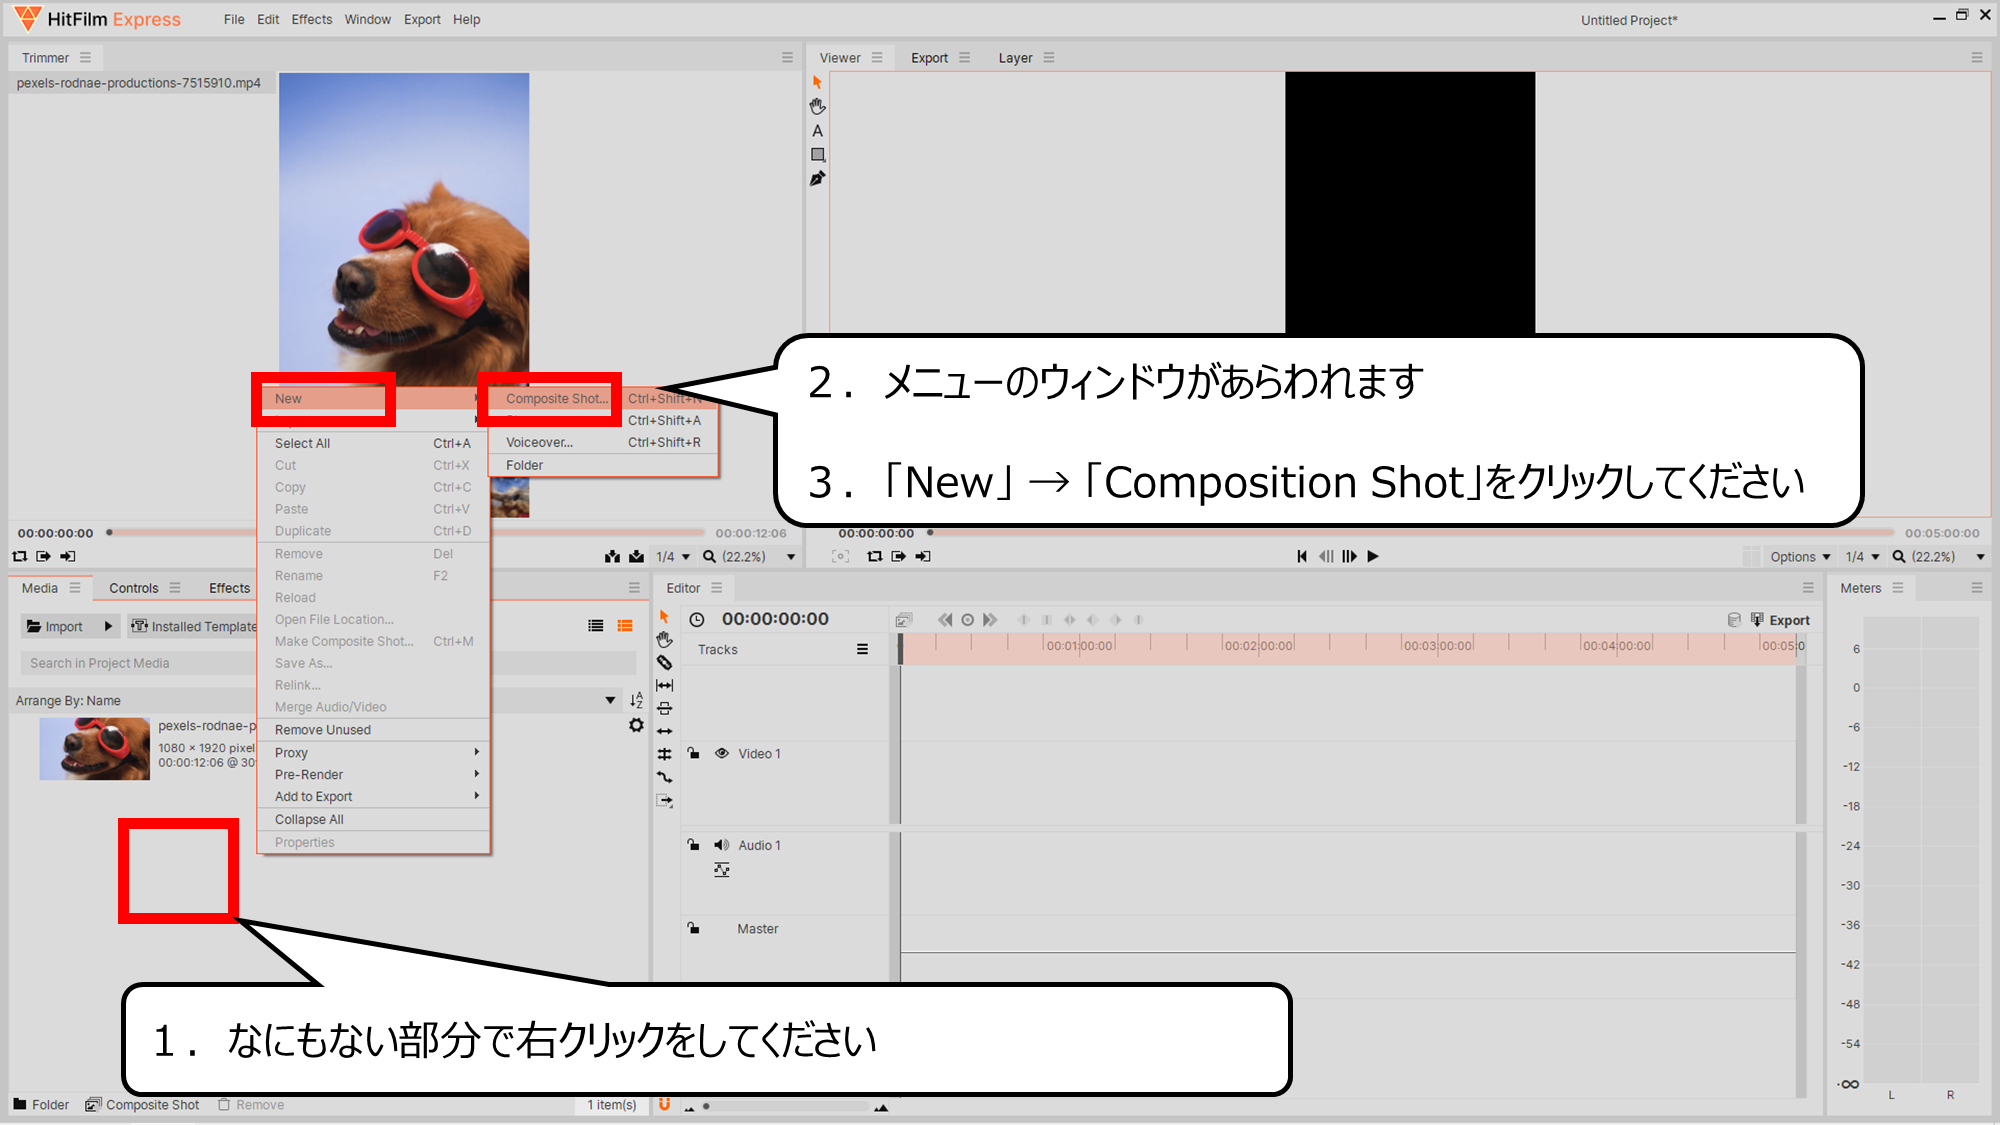
コンポジションというフォルダのようなパーツをつくります
1.なにもない部分で右クリックをしてください
2.メニューのウィンドウがあらわれます
3.「New」 → 「Composition Shot」をクリックしてください
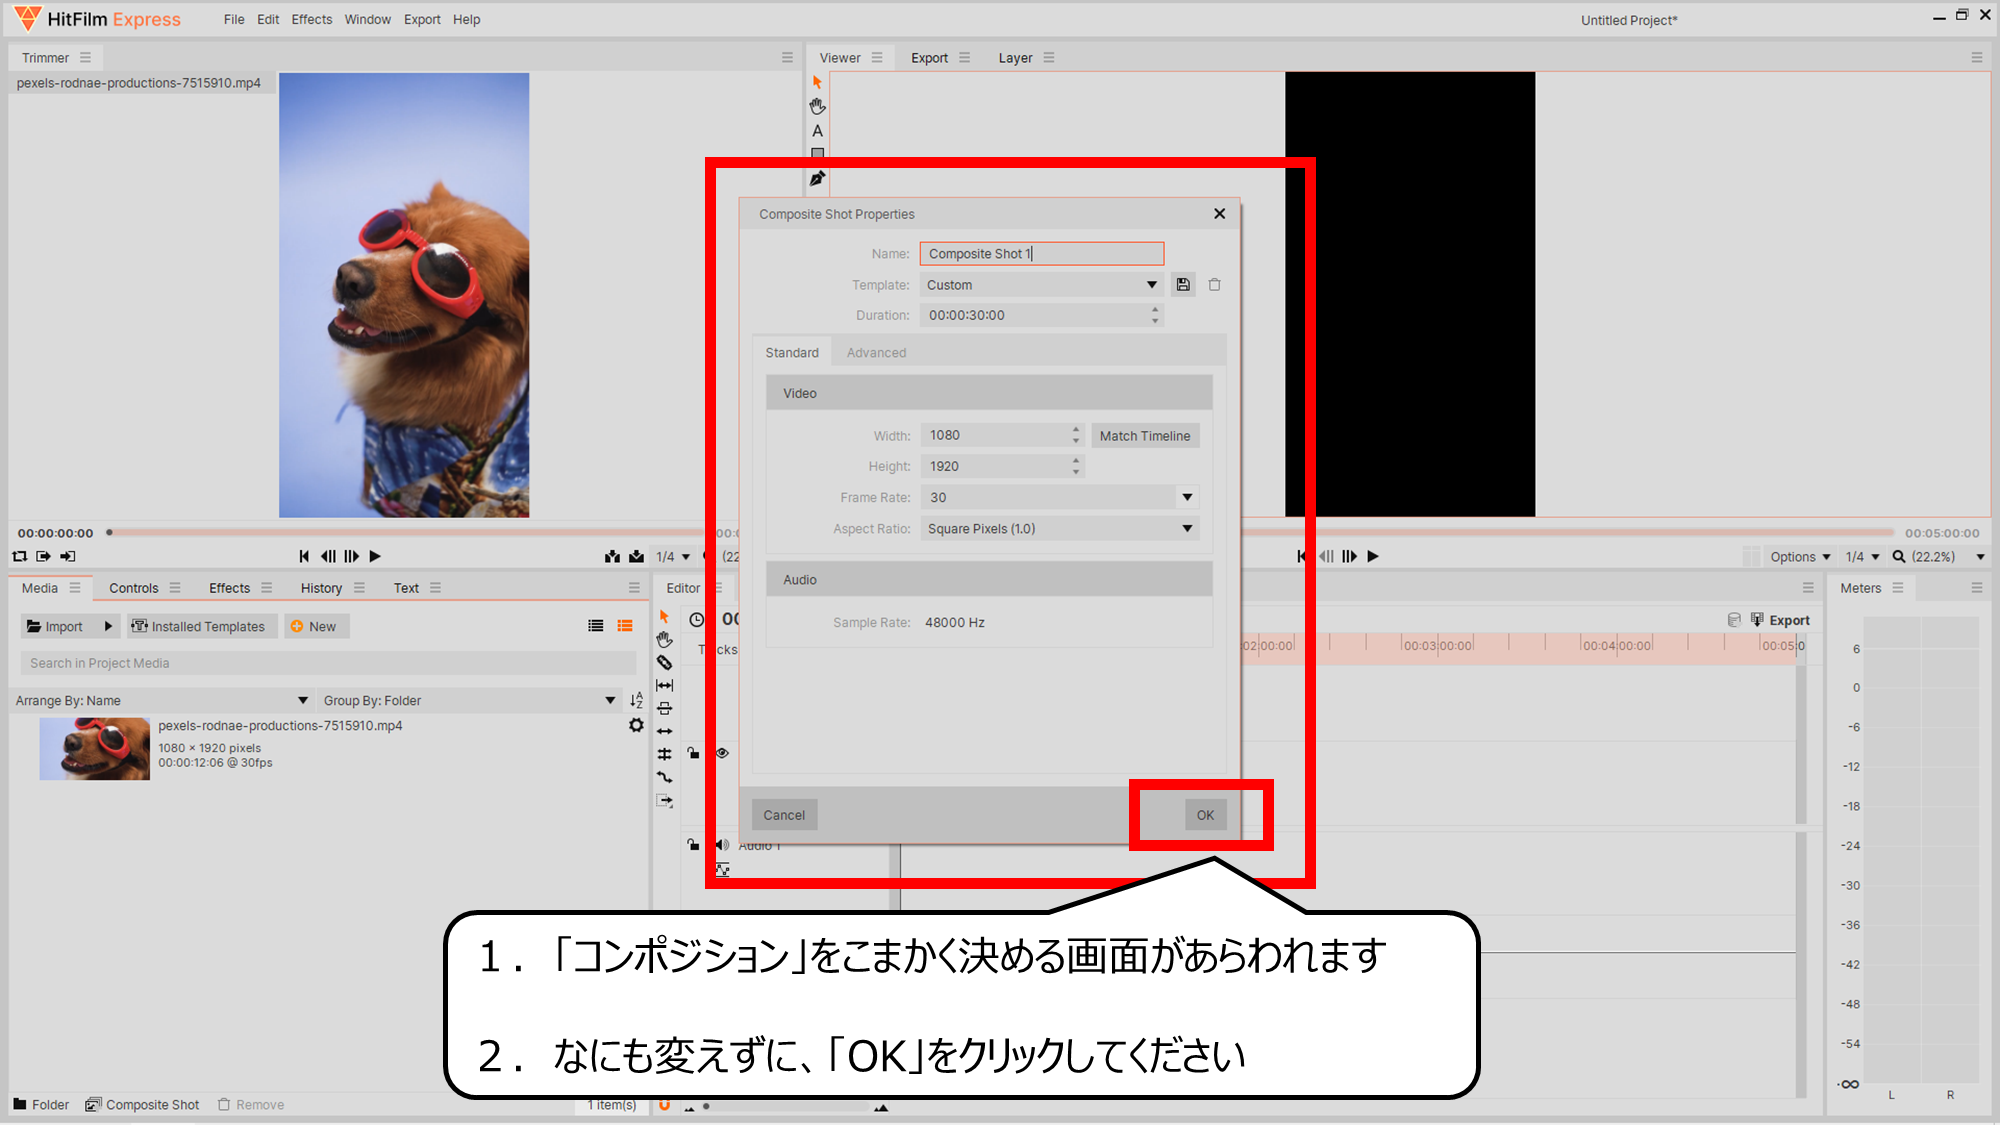
コンポジションの設定画面があらわれます
1.「コンポジション」をこまかく決める画面があらわれます
2.なにも変えずに、「OK」をクリックしてください
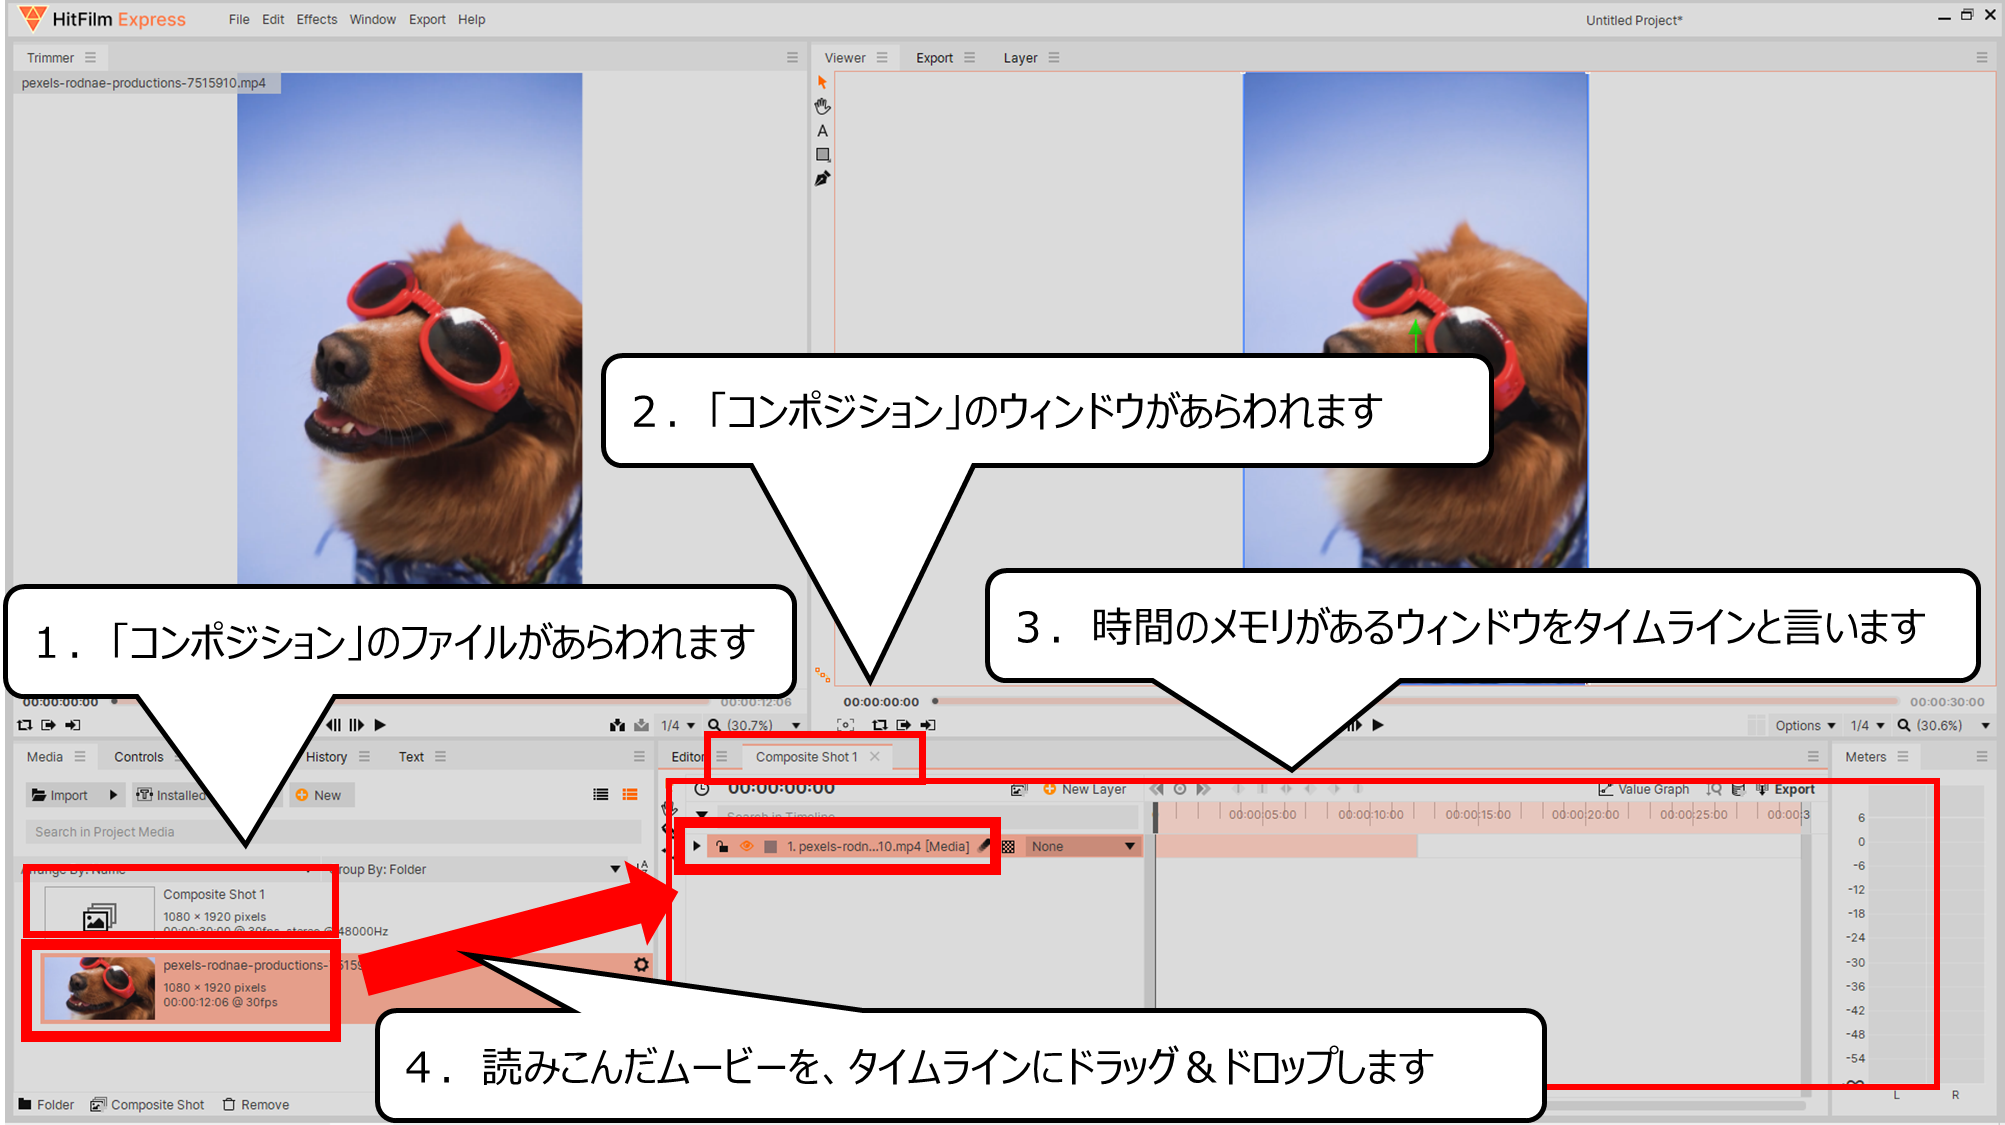
コンポジションの中にムービーを読みこみます
1.「コンポジション」のファイルがあらわれます
2.「コンポジション」のウィンドウがあらわれます
3.時間のメモリがあるウィンドウをタイムラインと言います
4.読みこんだムービーを、タイムラインにドラッグ&ドロップします
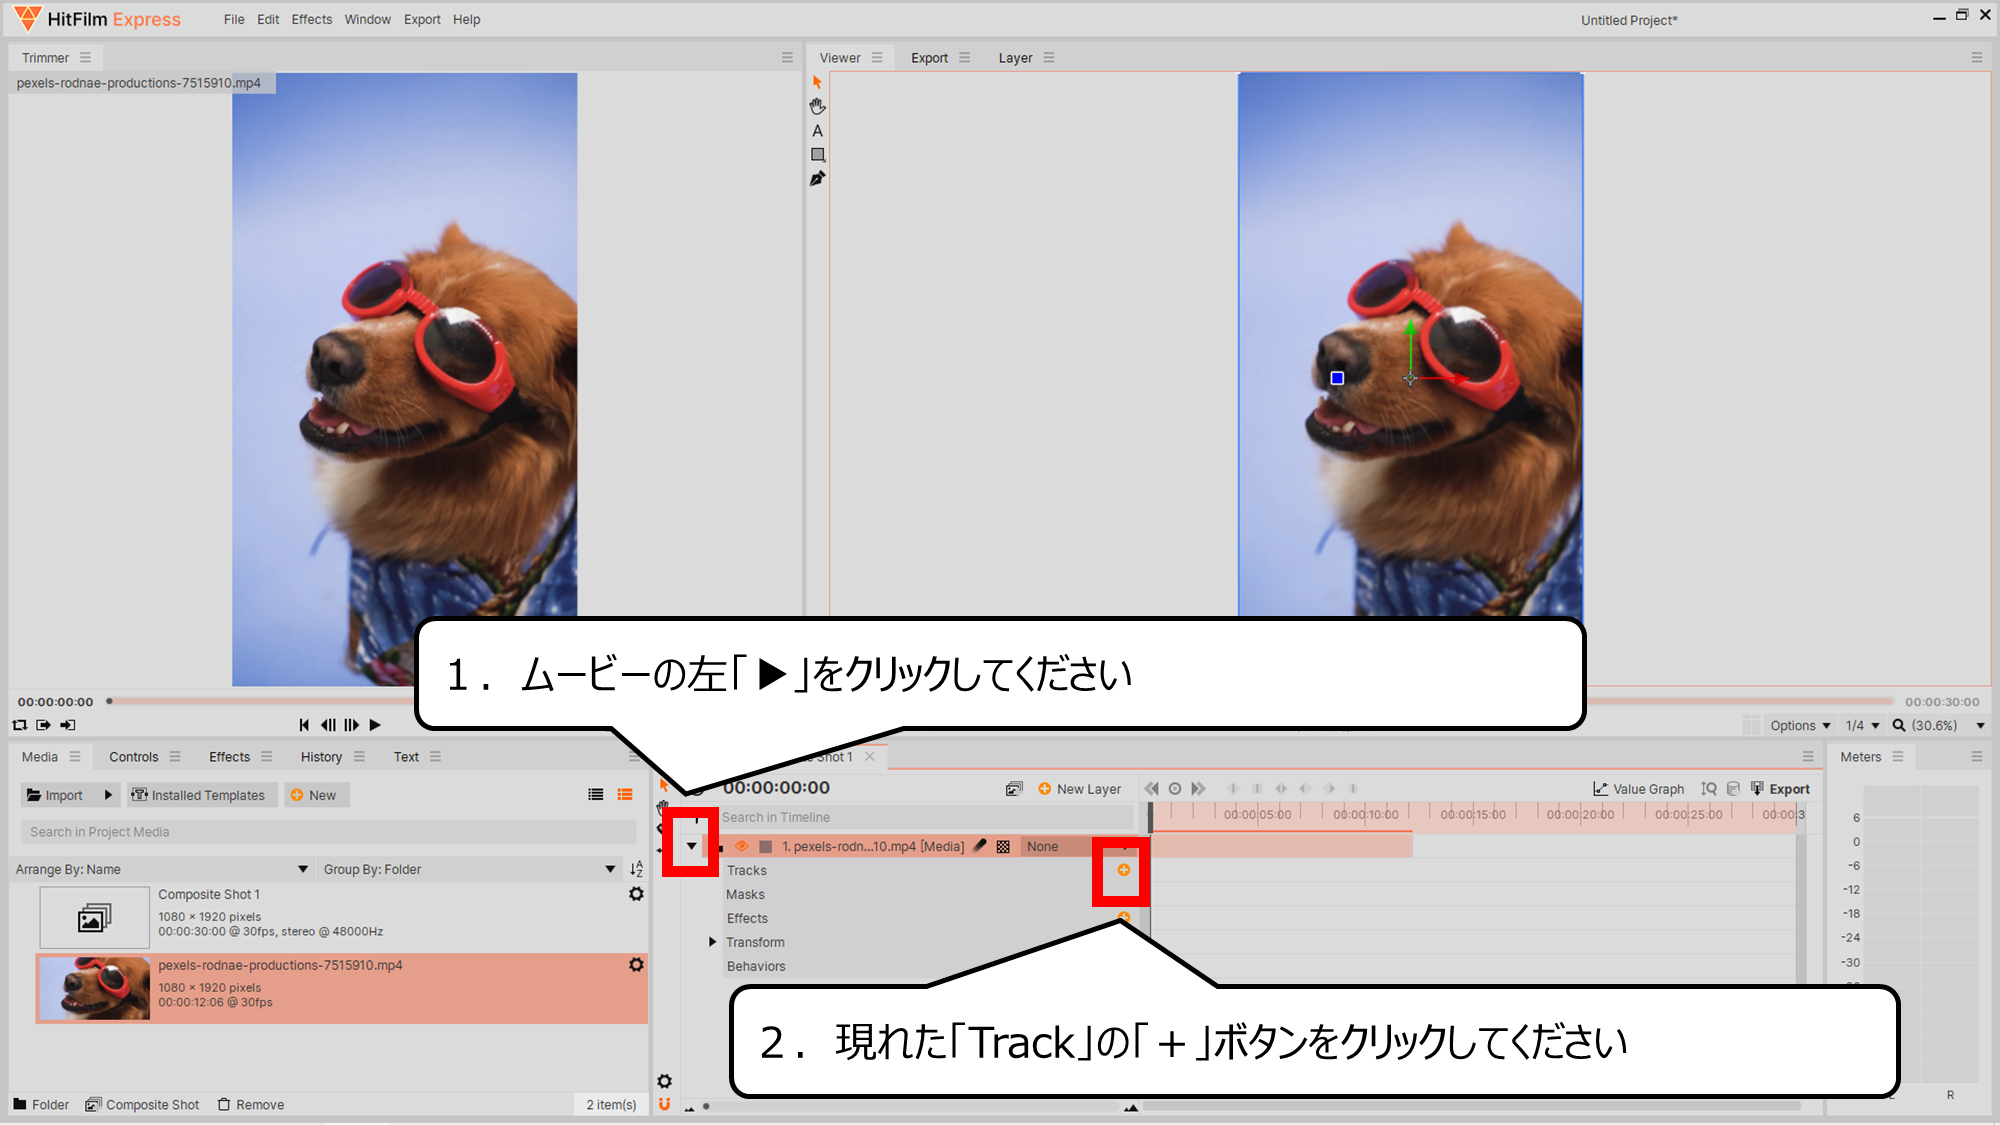
ムービーのサングラスの動きを追跡する「Track」をつかいます
1.ムービーの左「▶」をクリックしてください
2.現れた「Track」の「+」ボタンをクリックしてください
ついせきマークがあらわれました
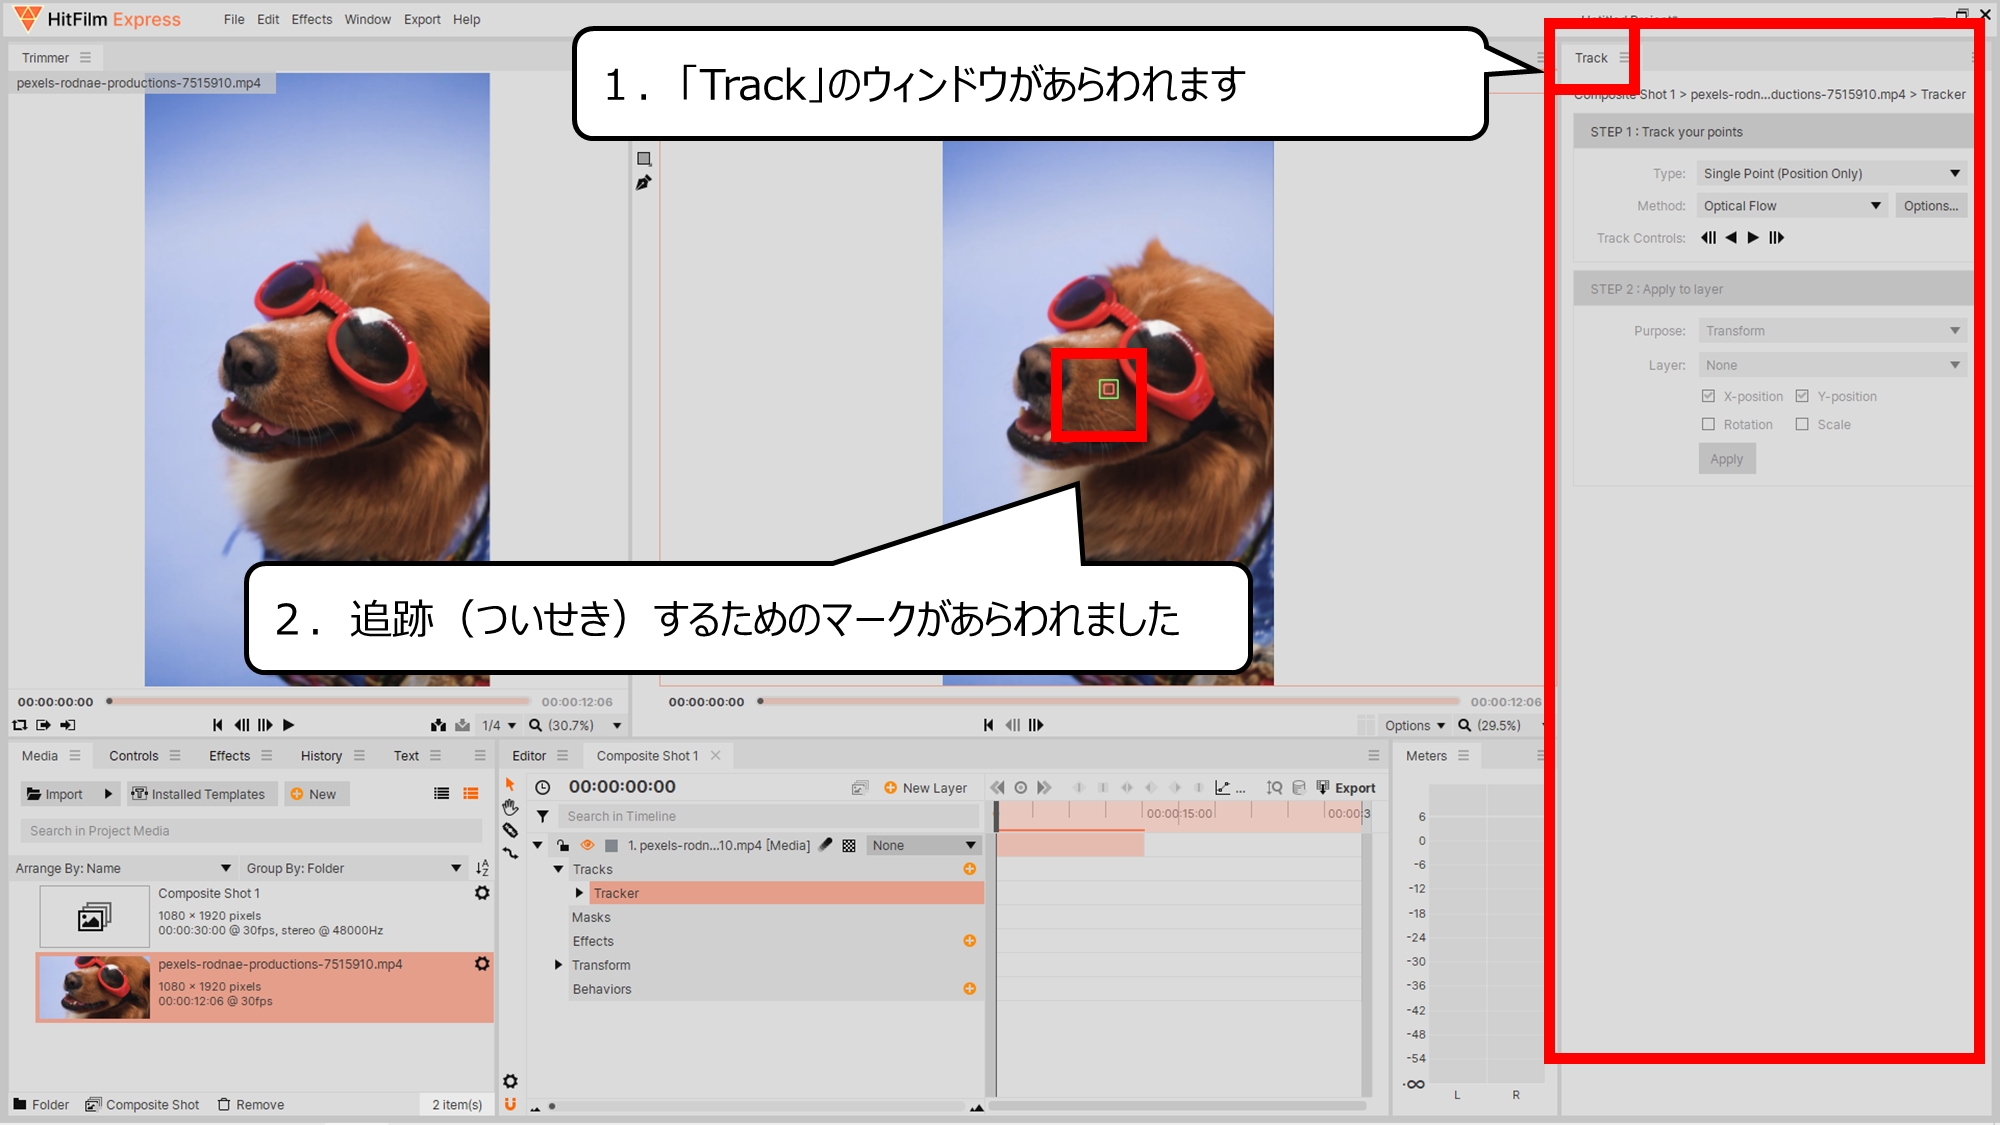
はじめは、手前の左目に光をくわえます
1.「Track」のウィンドウがあらわれます
2.追跡(ついせき)するためのマークがあらわれました
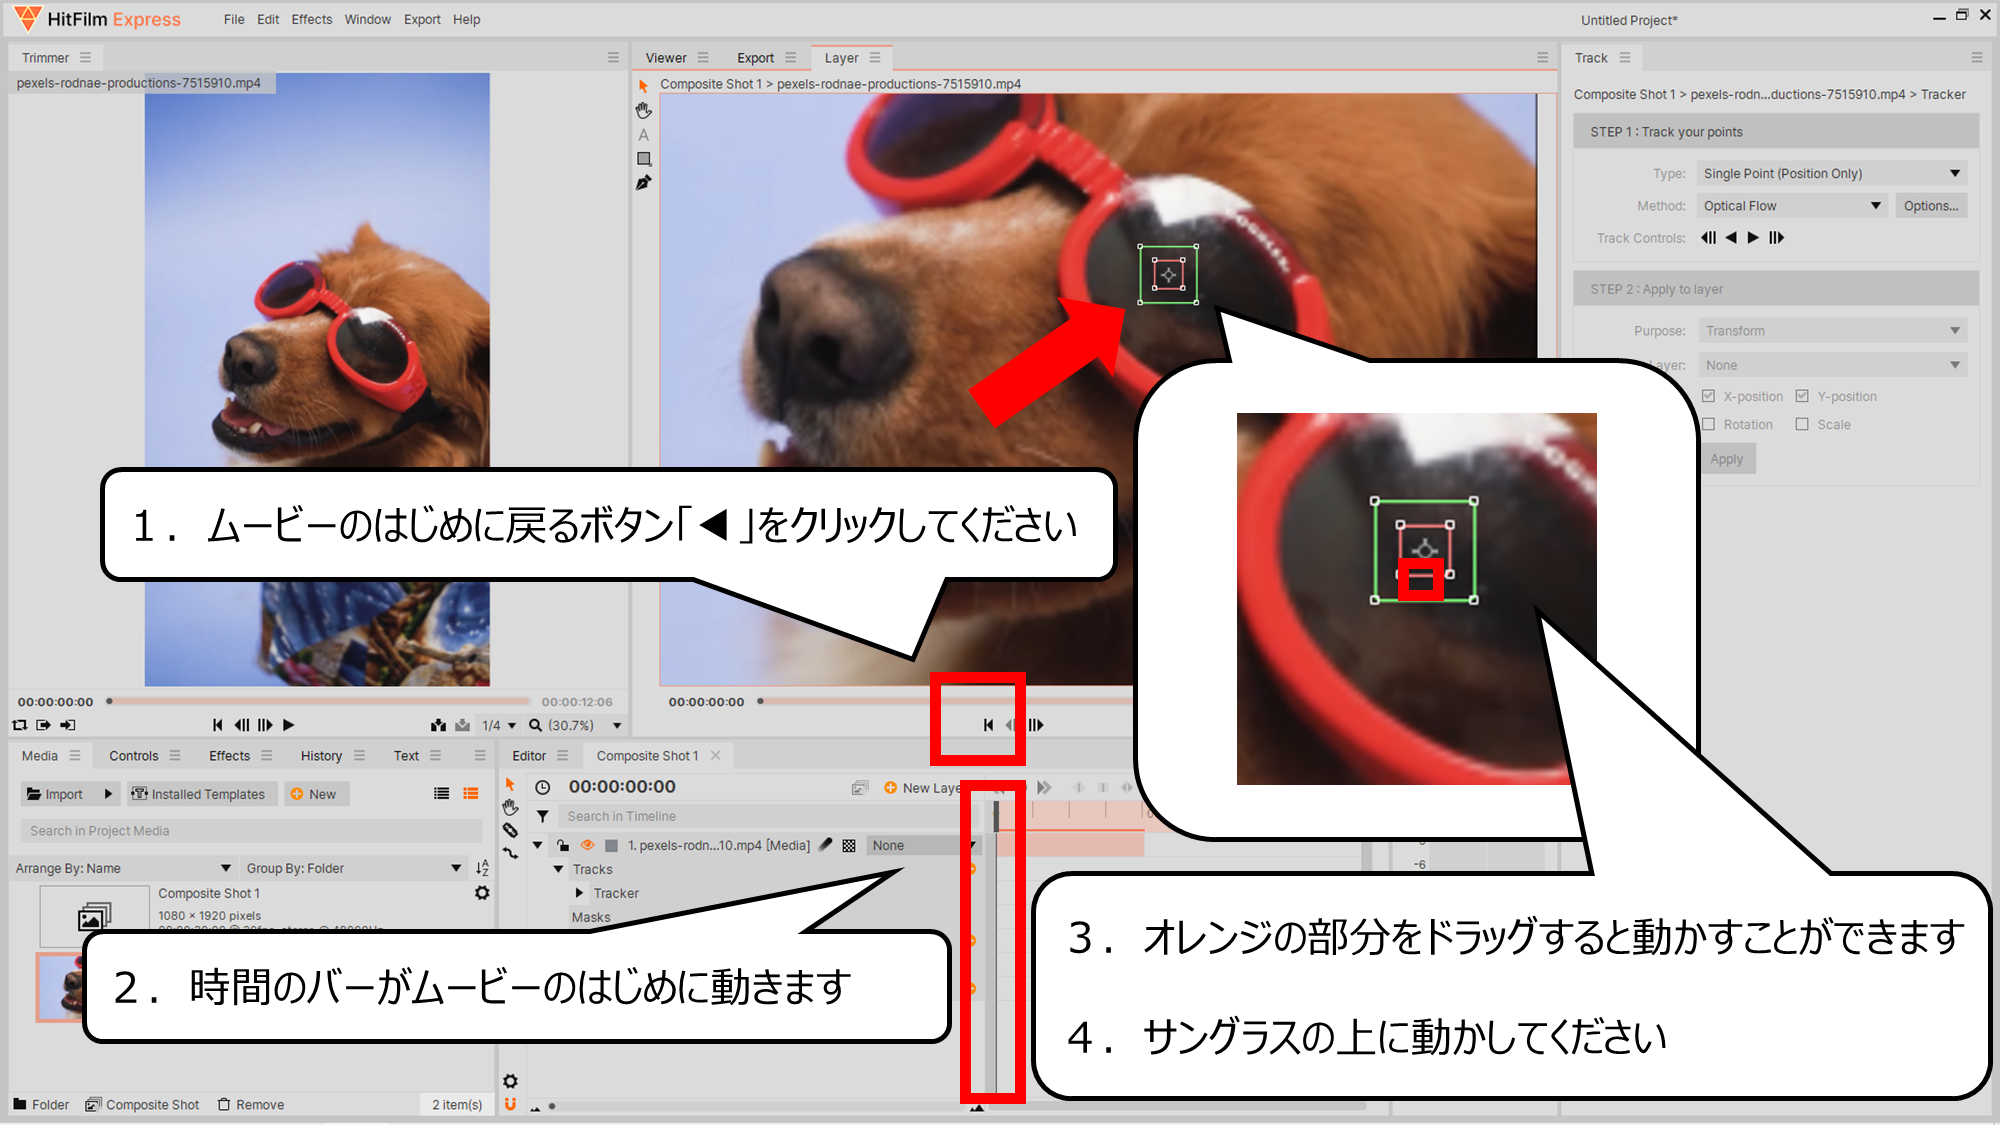
左目のサングラスに動きをついせきするマークを合わせます
1.ムービーのはじめに戻るボタン「◀」をクリックしてください
2.時間のバーがムービーのはじめに動きます
3.オレンジの部分をドラッグすると動かすことができます
4.サングラスの上に動かしてください
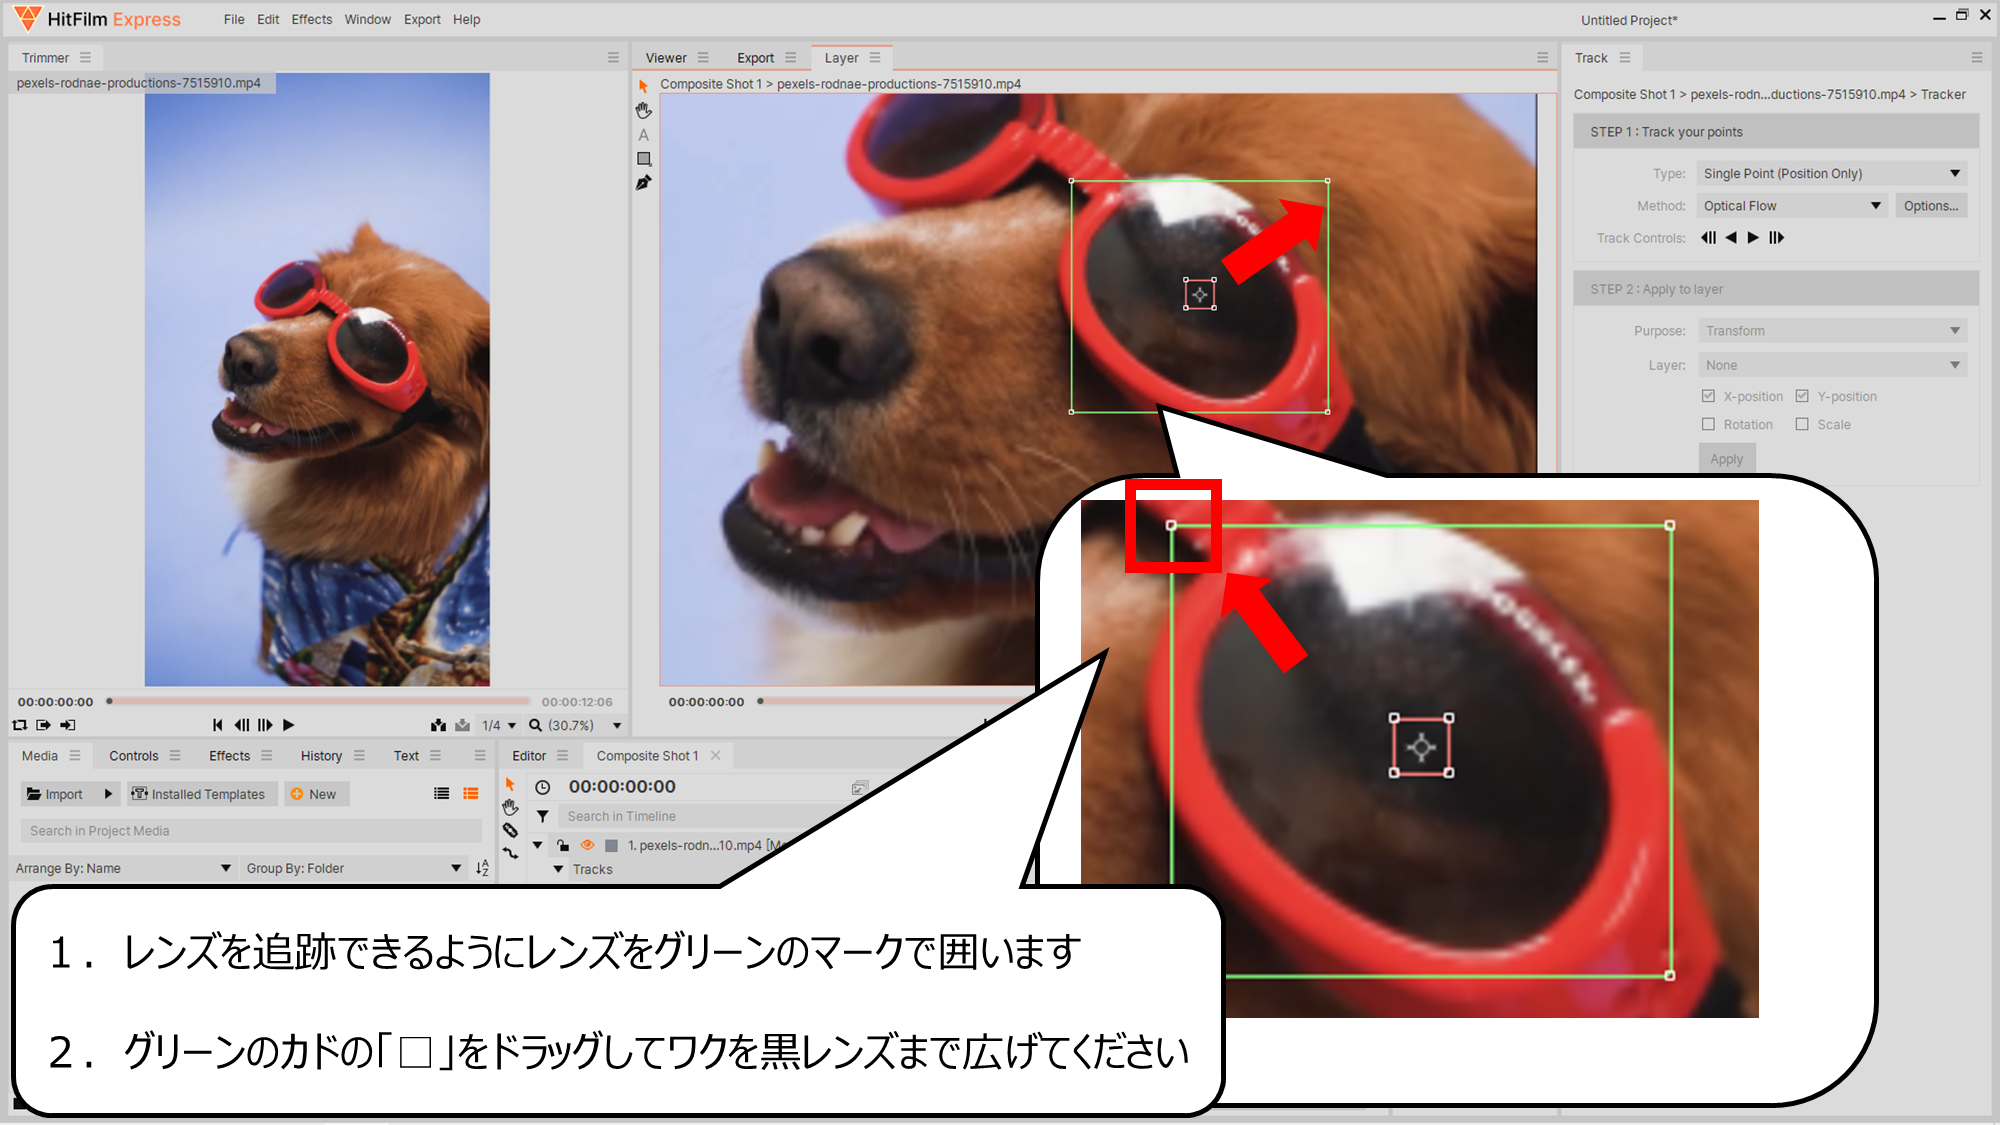
グリーンのカドをドラッグすると広げることができます
1.レンズを追跡できるようにレンズをグリーンのマークで囲います
2.グリーンのカドの「□」をドラッグしてワクを黒レンズまで広げてください
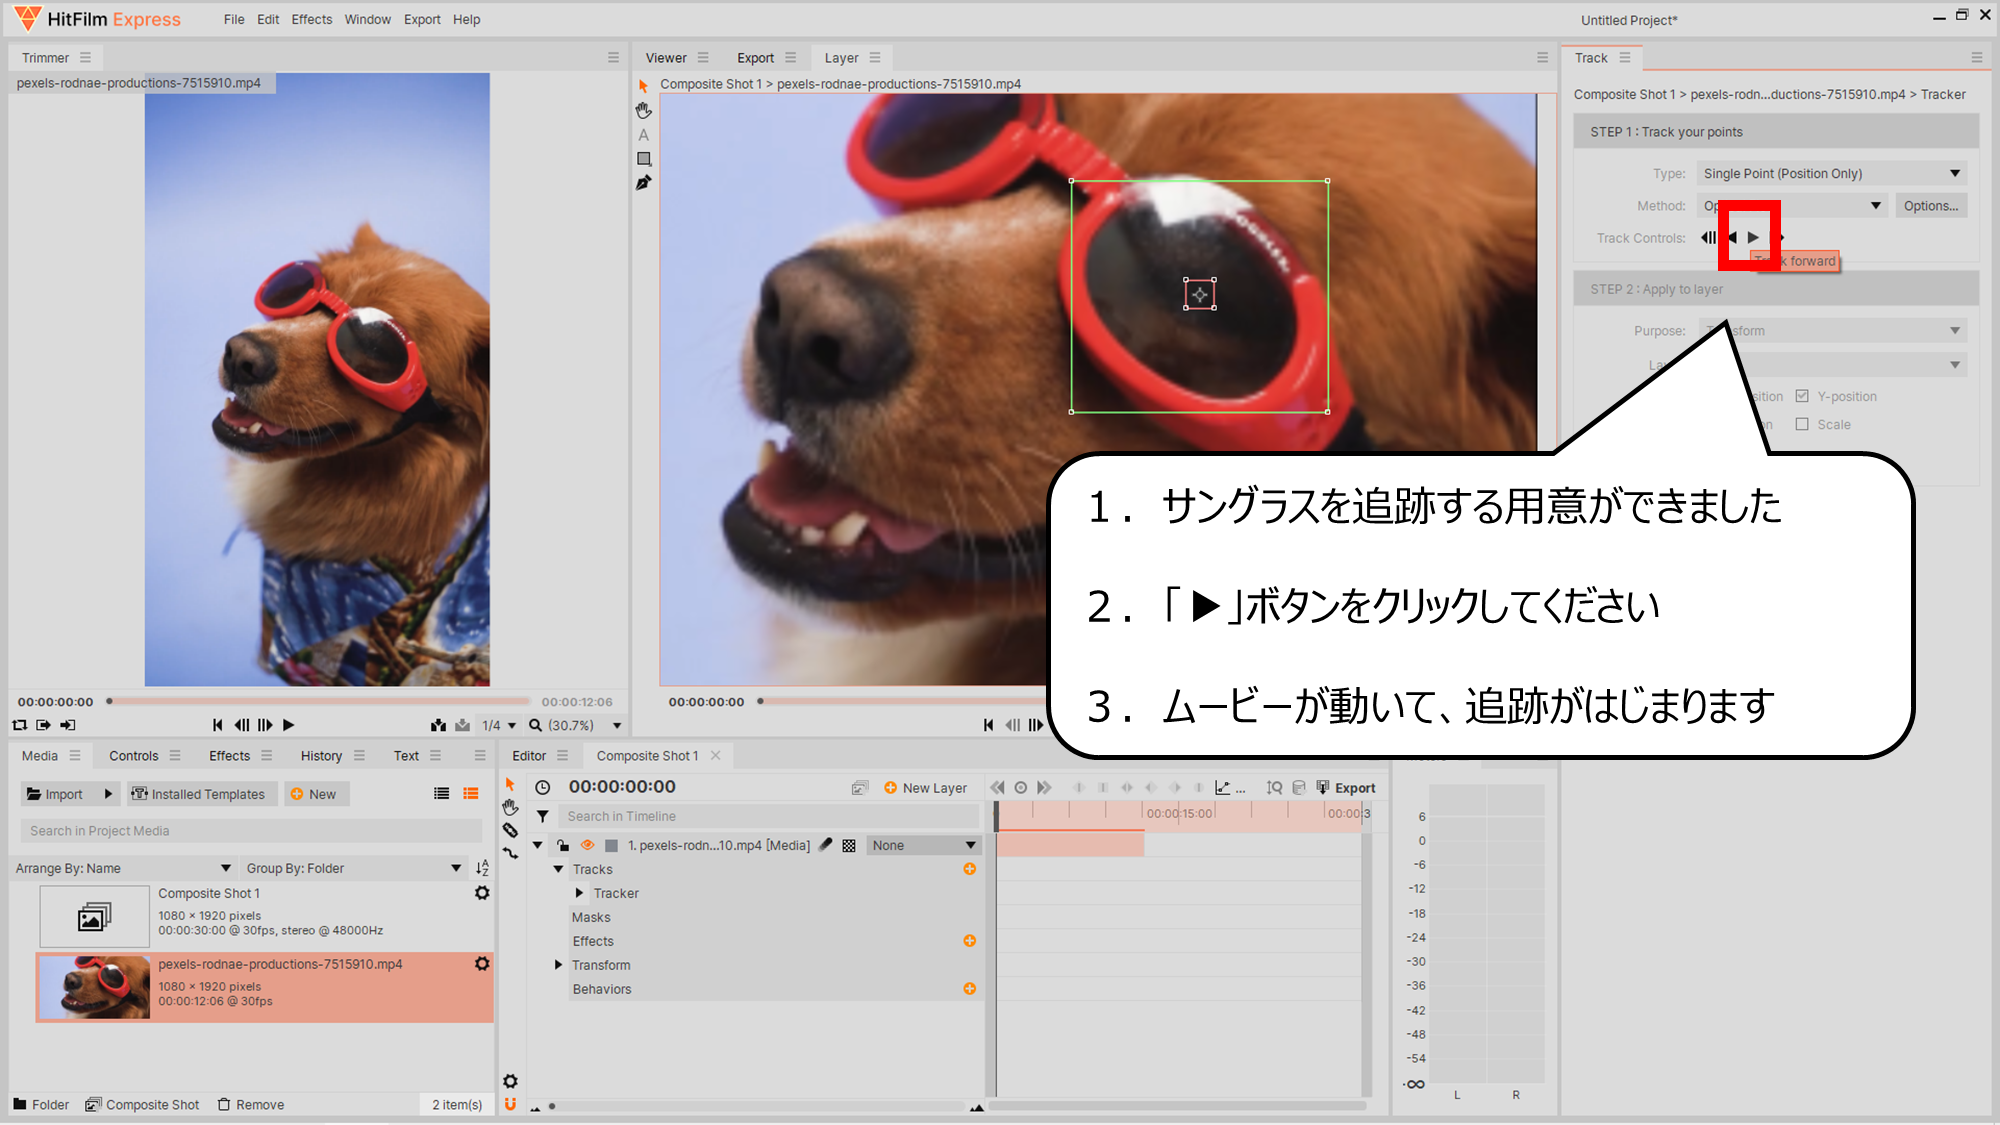
右の「Track」ウィンドの「▶」をクリックすると、追跡がはじまります
1.サングラスを追跡する用意ができました
2.「▶」ボタンをクリックしてください
3.ムービーが動いて、追跡がはじまります
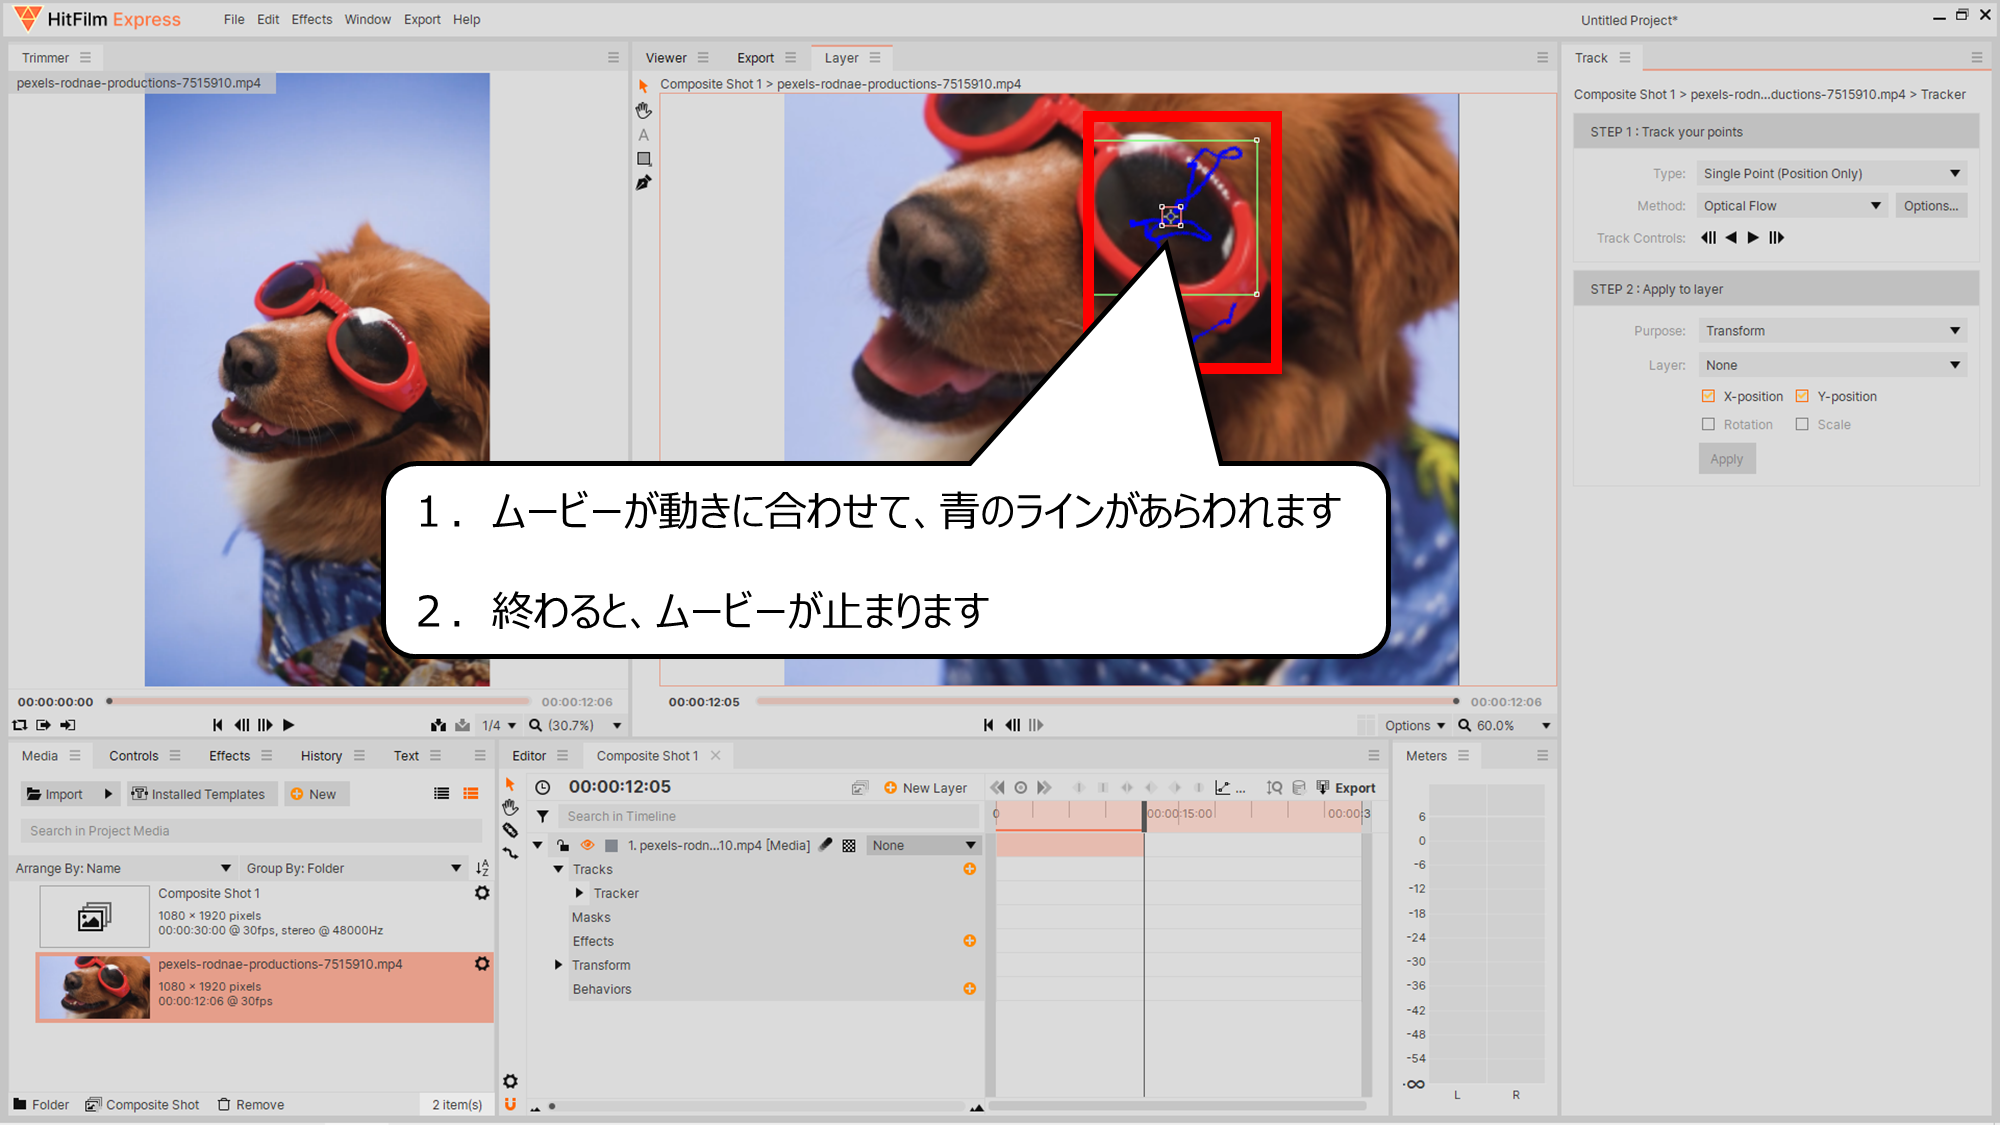
追跡できると青のラインがあらわれます
1.ムービーが動きに合わせて、青のラインがあらわれます
2.終わると、ムービーが止まります
・サングラスの動きに合わせる光をつくろう
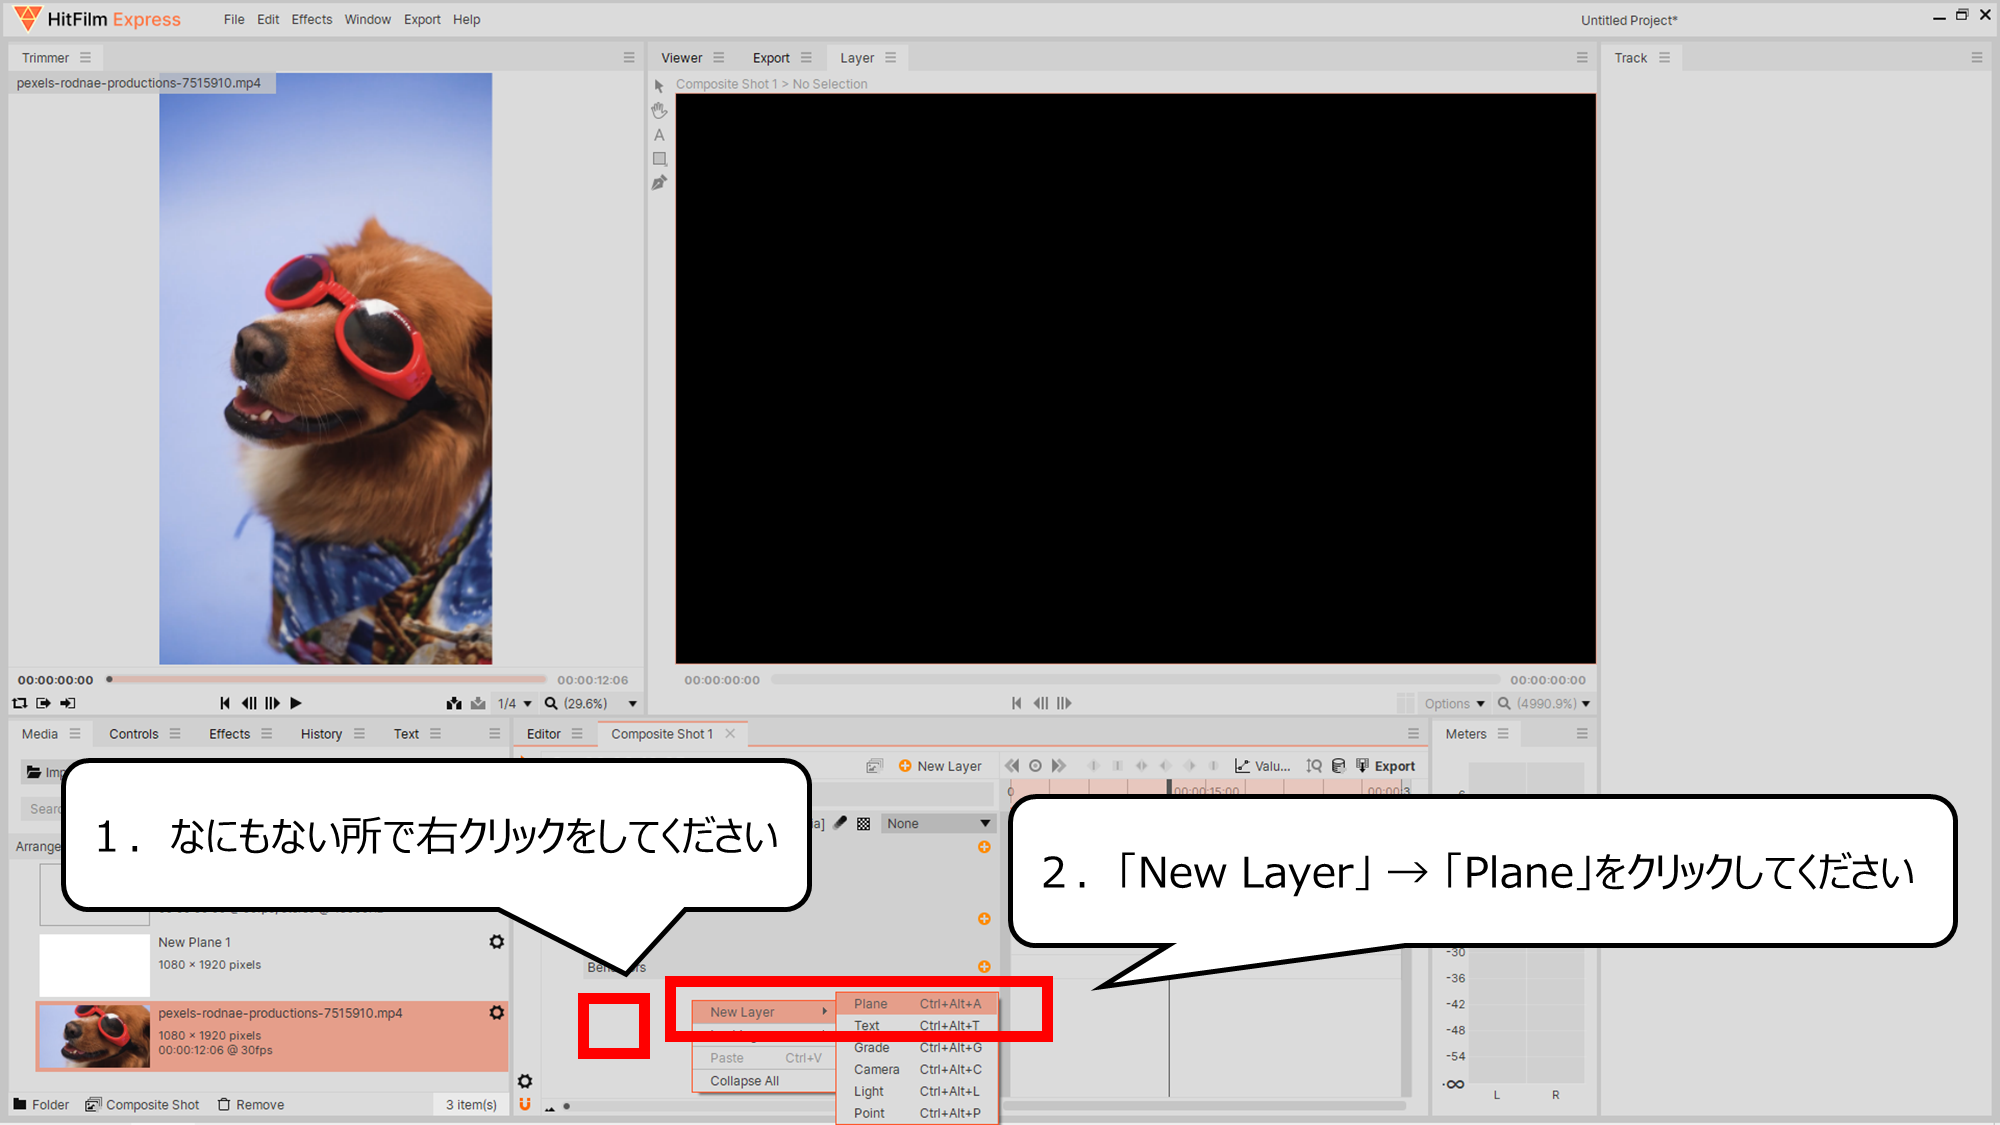
光をつくる用意をします
1.なにもない所で右クリックをしてください
2.「New Layer」 → 「Plane」をクリックしてください
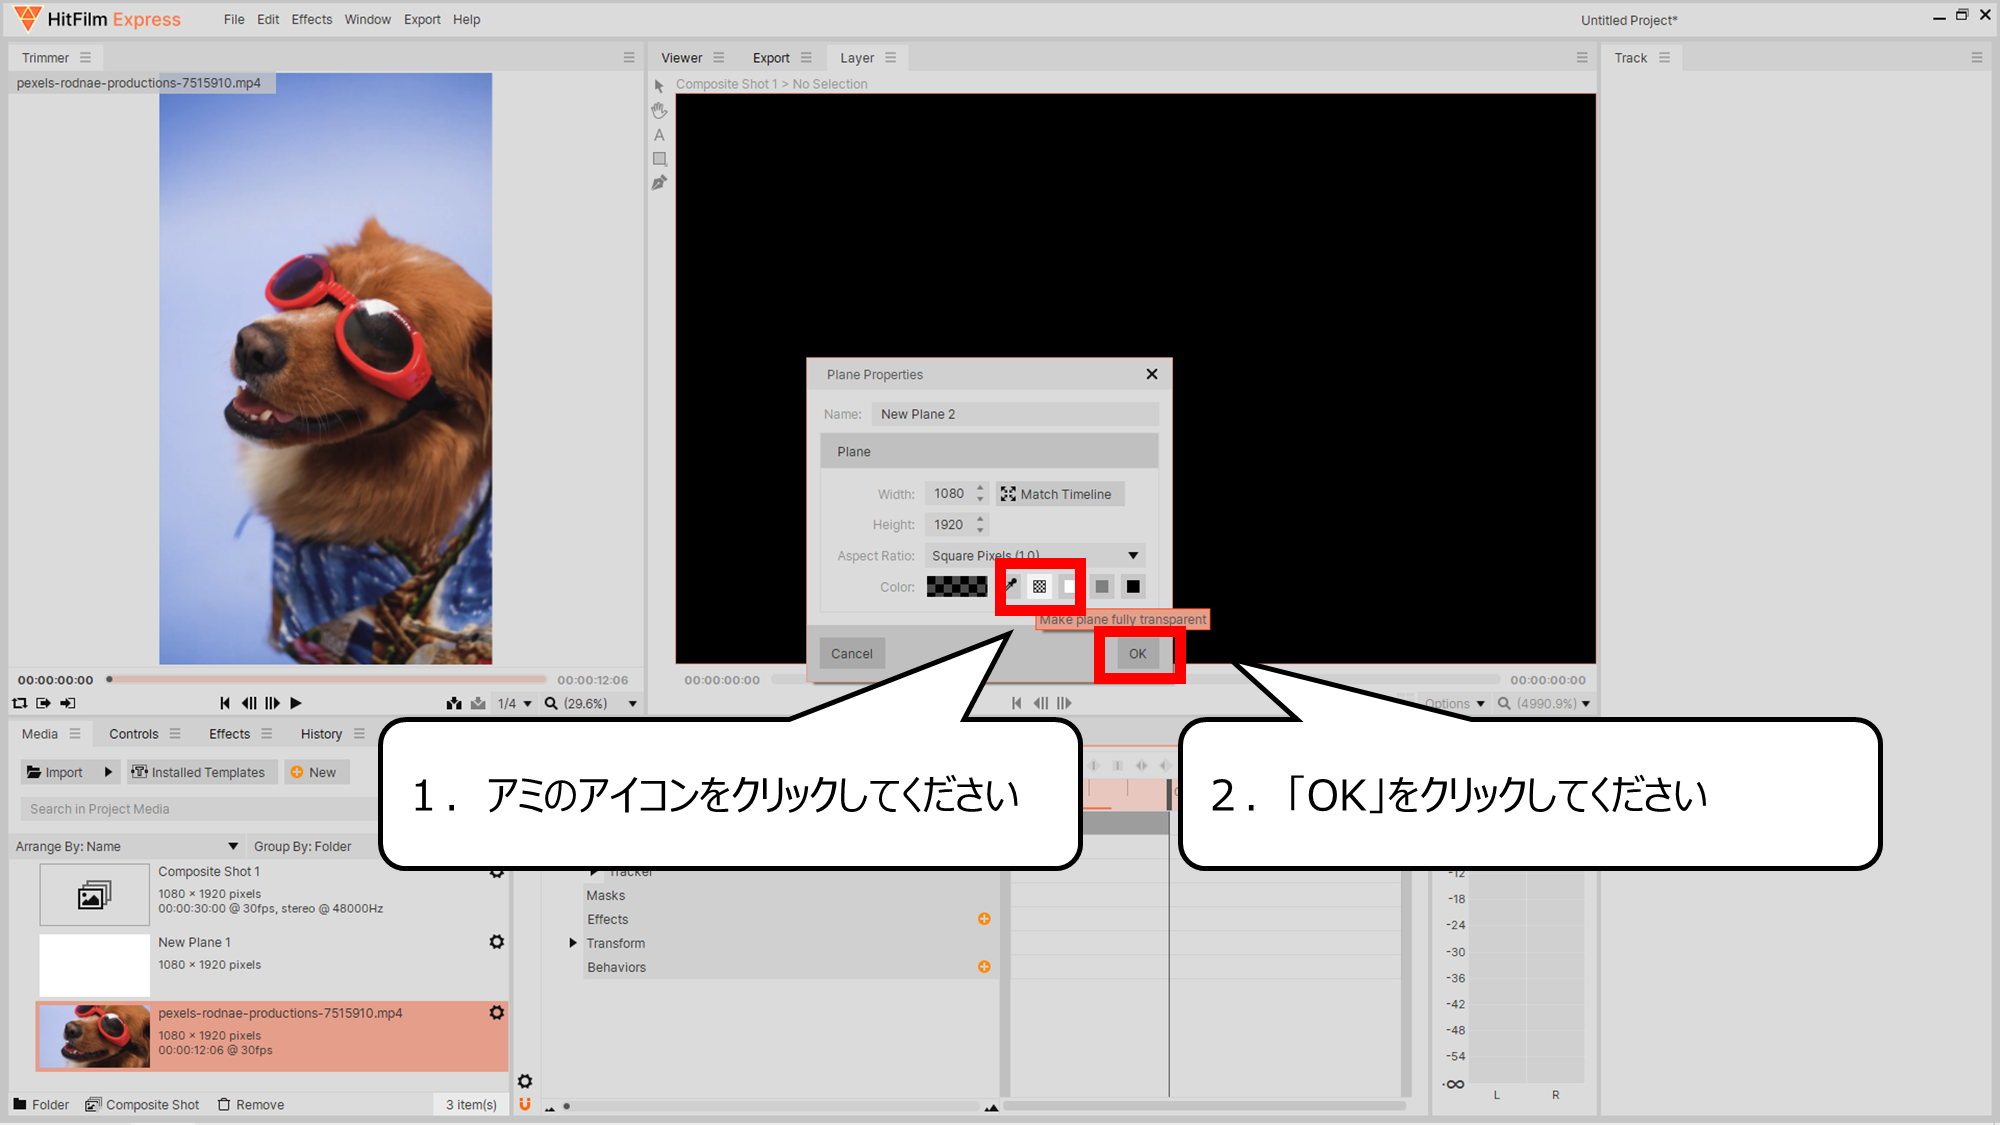
透明の平面をつくります
1.アミのアイコンをクリックしてください
2.「OK」をクリックしてください

光のエフェクトをくわえます
1.新しくできた「New Plane」をクリックしてください
2.「Effects」ボタンをクリックしてください
3.あらわれたボックスに「flare」を入れください
4.あらわれた「Light Flares」をクリックしてください
光のタイプを変えてください
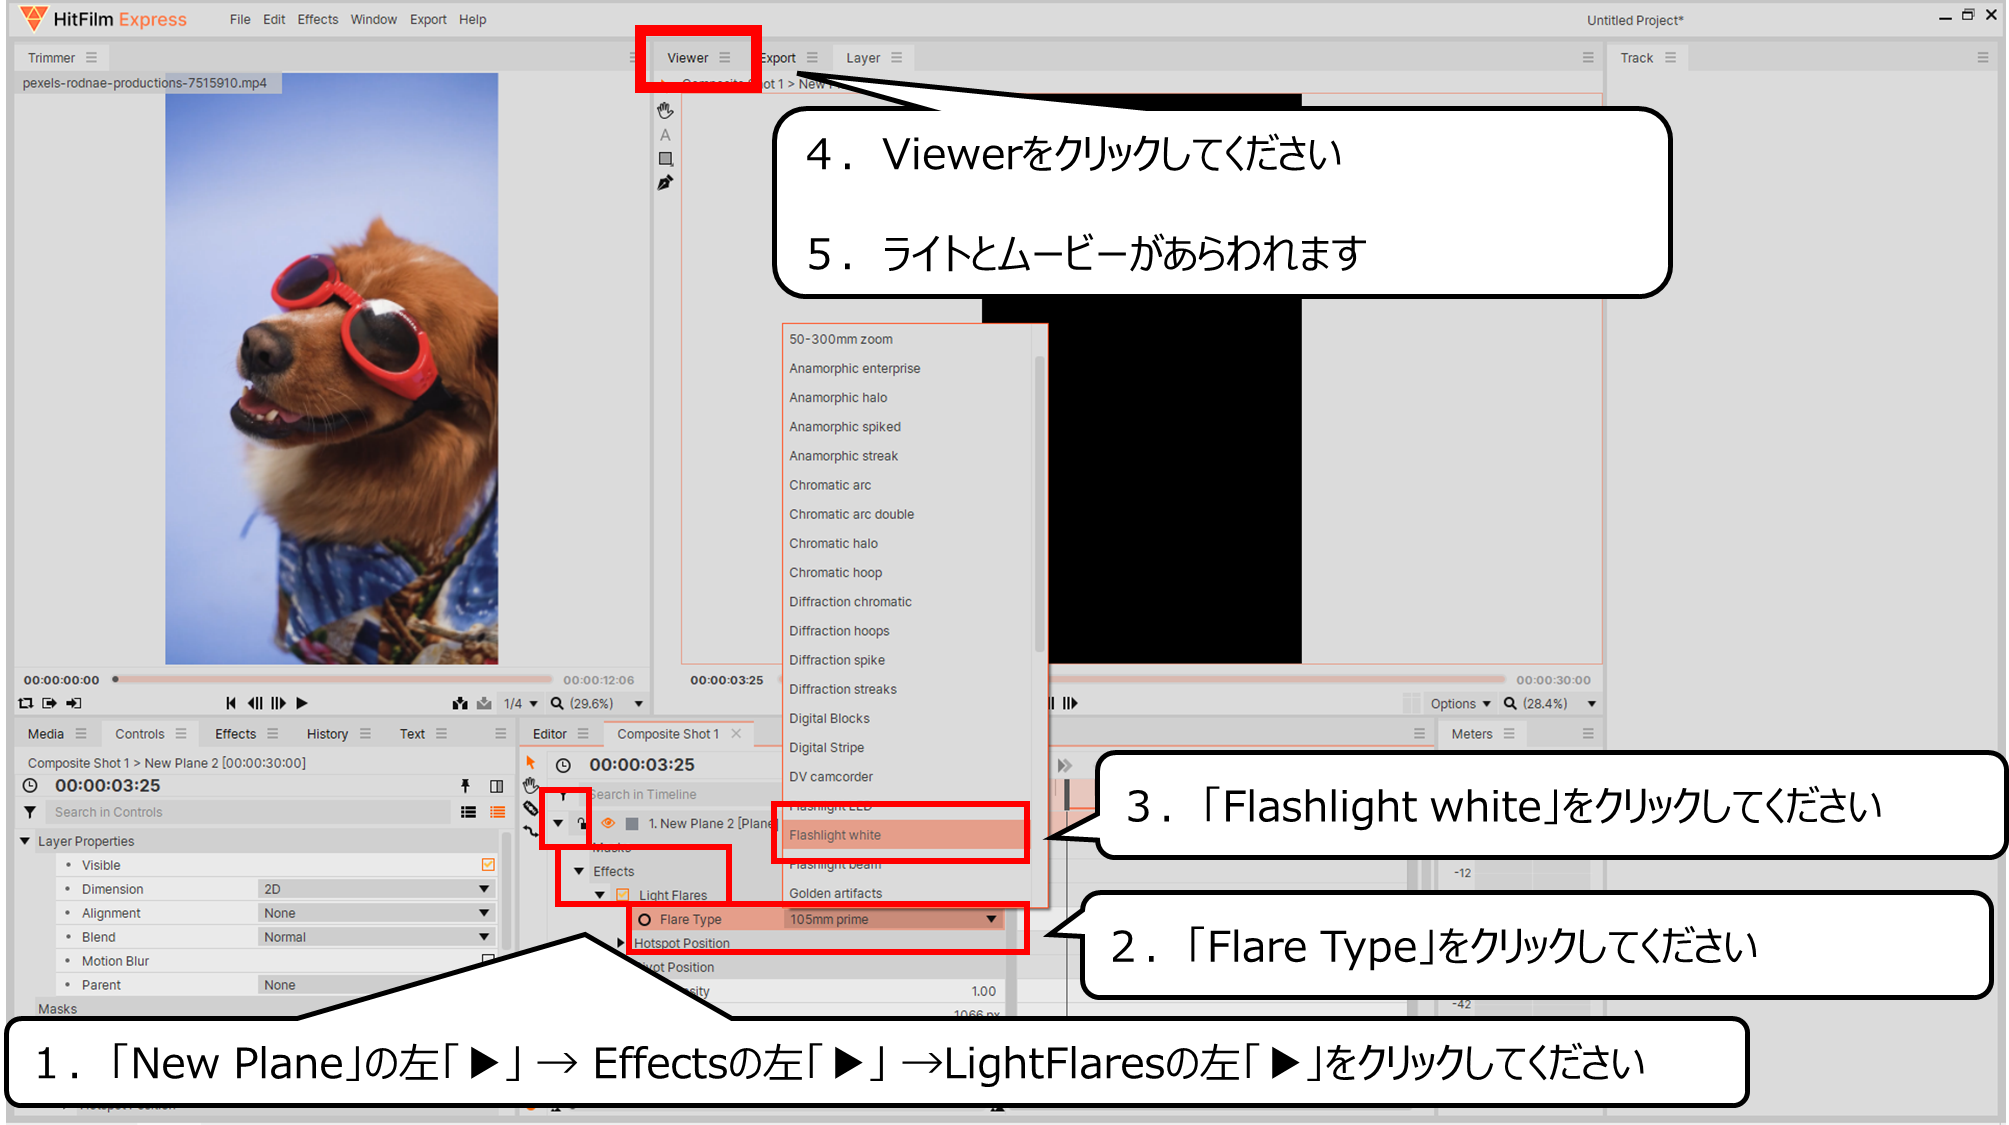
1.
「New Plane」の左「▶」 → Effectsの左「▶」 →LightFlaresの左「▶」をクリックしてください
2.「Flare Type」をクリックしてください
3.「Flashlight white」をクリックしてください
4.Viewerをクリックしてください
5.ライトとムービーがあらわれます
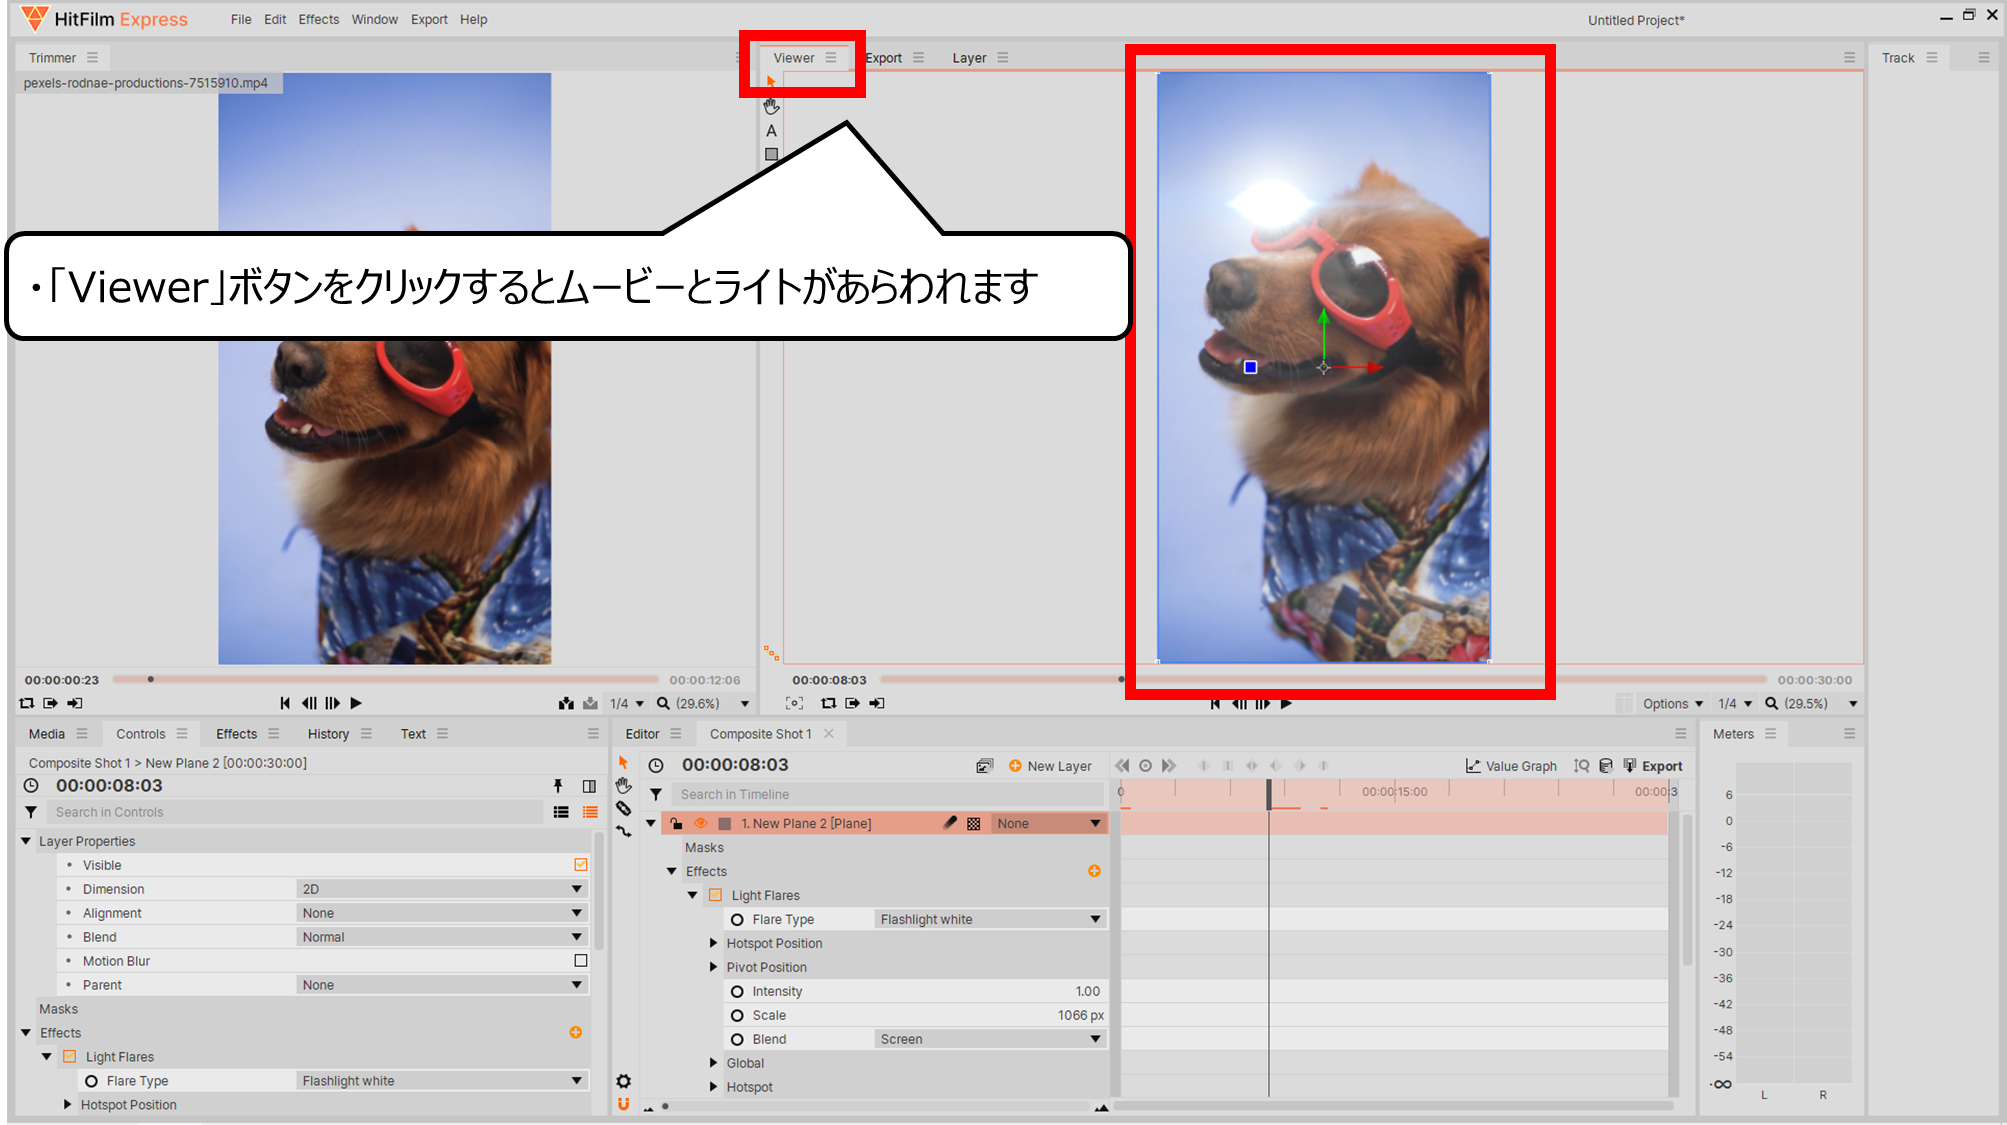
「Viewer」ボタンをクリックすると光とムービーがあらわれます
・「Viewer」ボタンをクリックするとムービーとライトがあらわれます
・サングラスに光を合わせて動かそう
ライトを小さくします
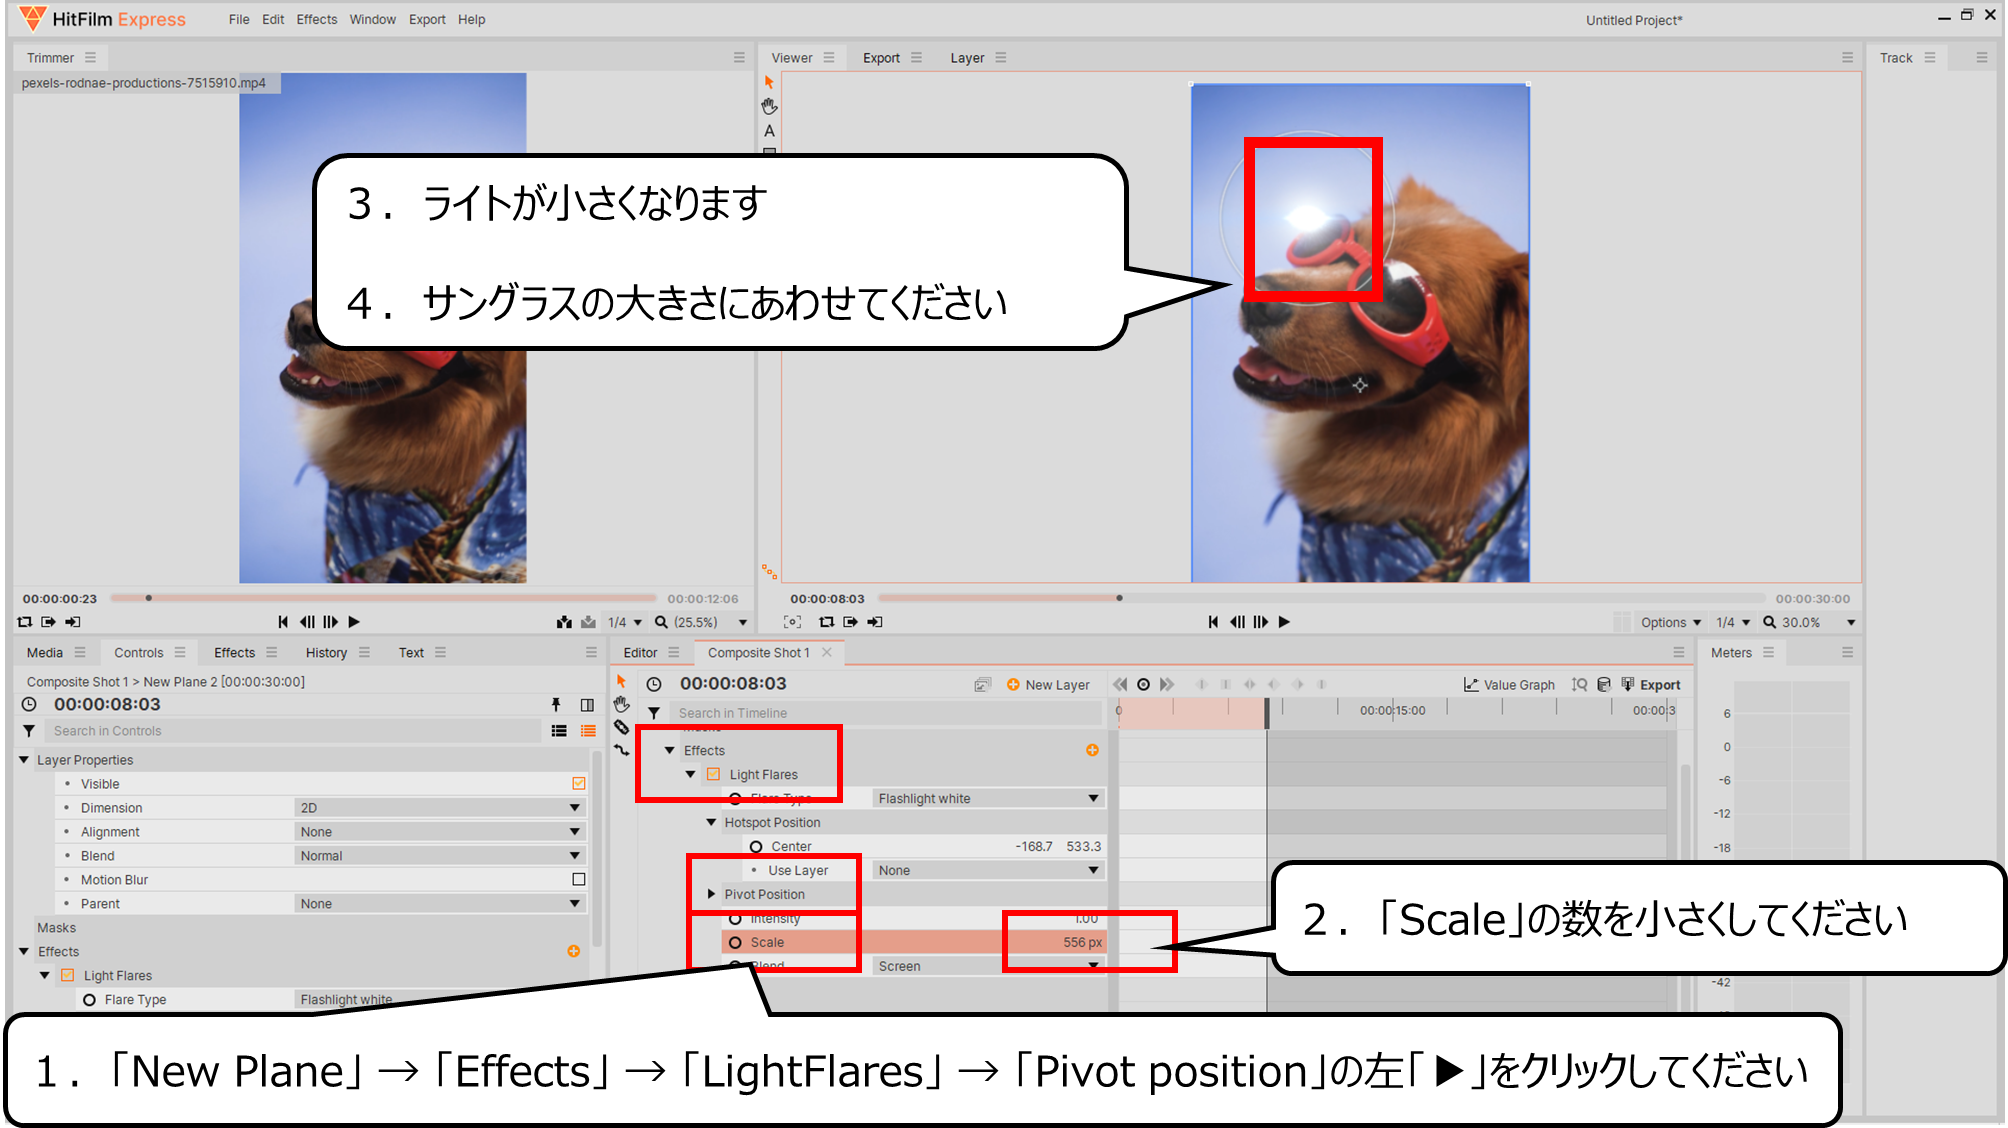
1.
「New Plane」 → 「Effects」 → 「LightFlares」 → 「Pivot position」の左「▶」をクリックしてください
2.「Scale」の数を小さくしてください
3.ライトが小さくなります
4.サングラスの大きさにあわせてください
ライトの向きを変えます
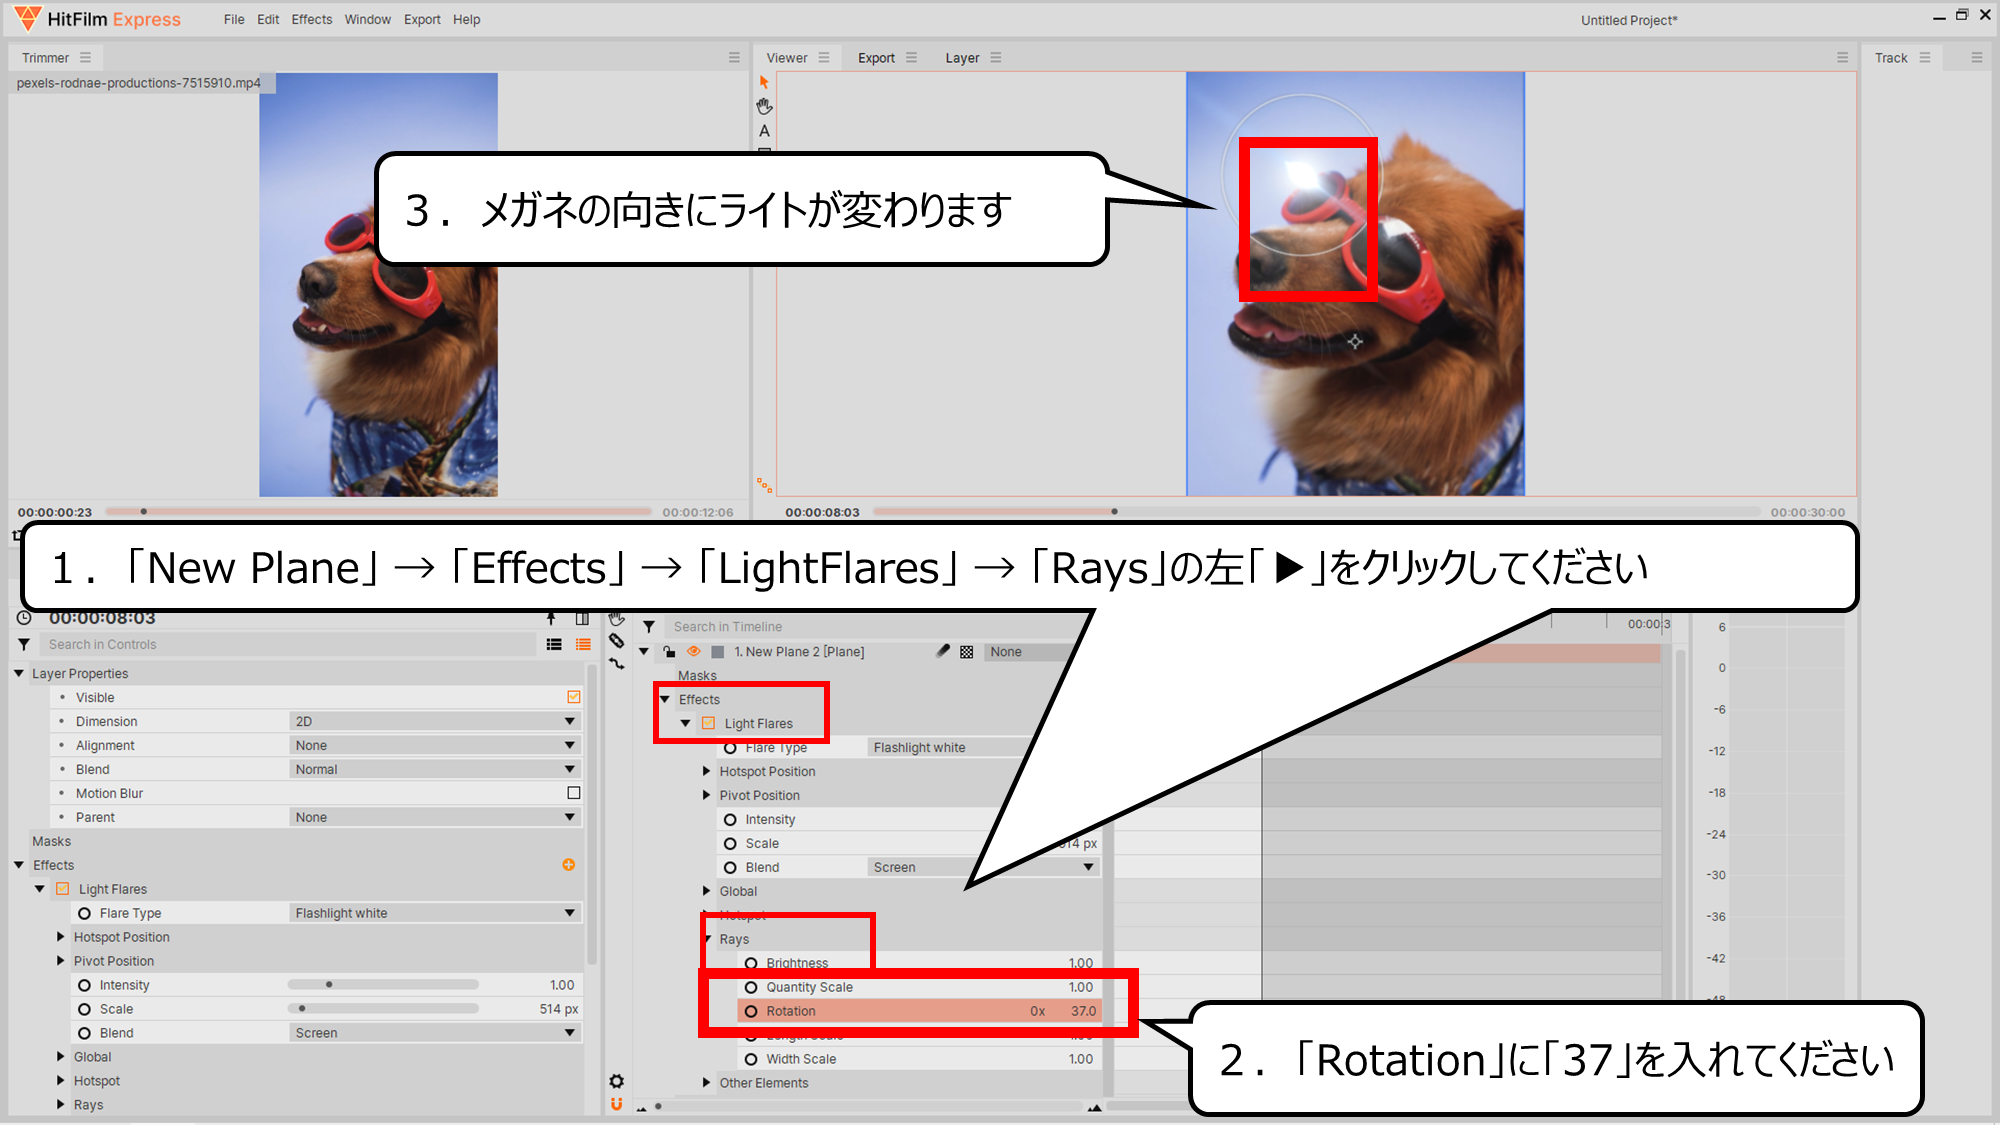
1.
「New Plane」 → 「Effects」 → 「LightFlares」 → 「Rays」の左「▶」をクリックしてください
2.「Rotation」に「37」を入れてください
3.メガネの向きにライトが変わります
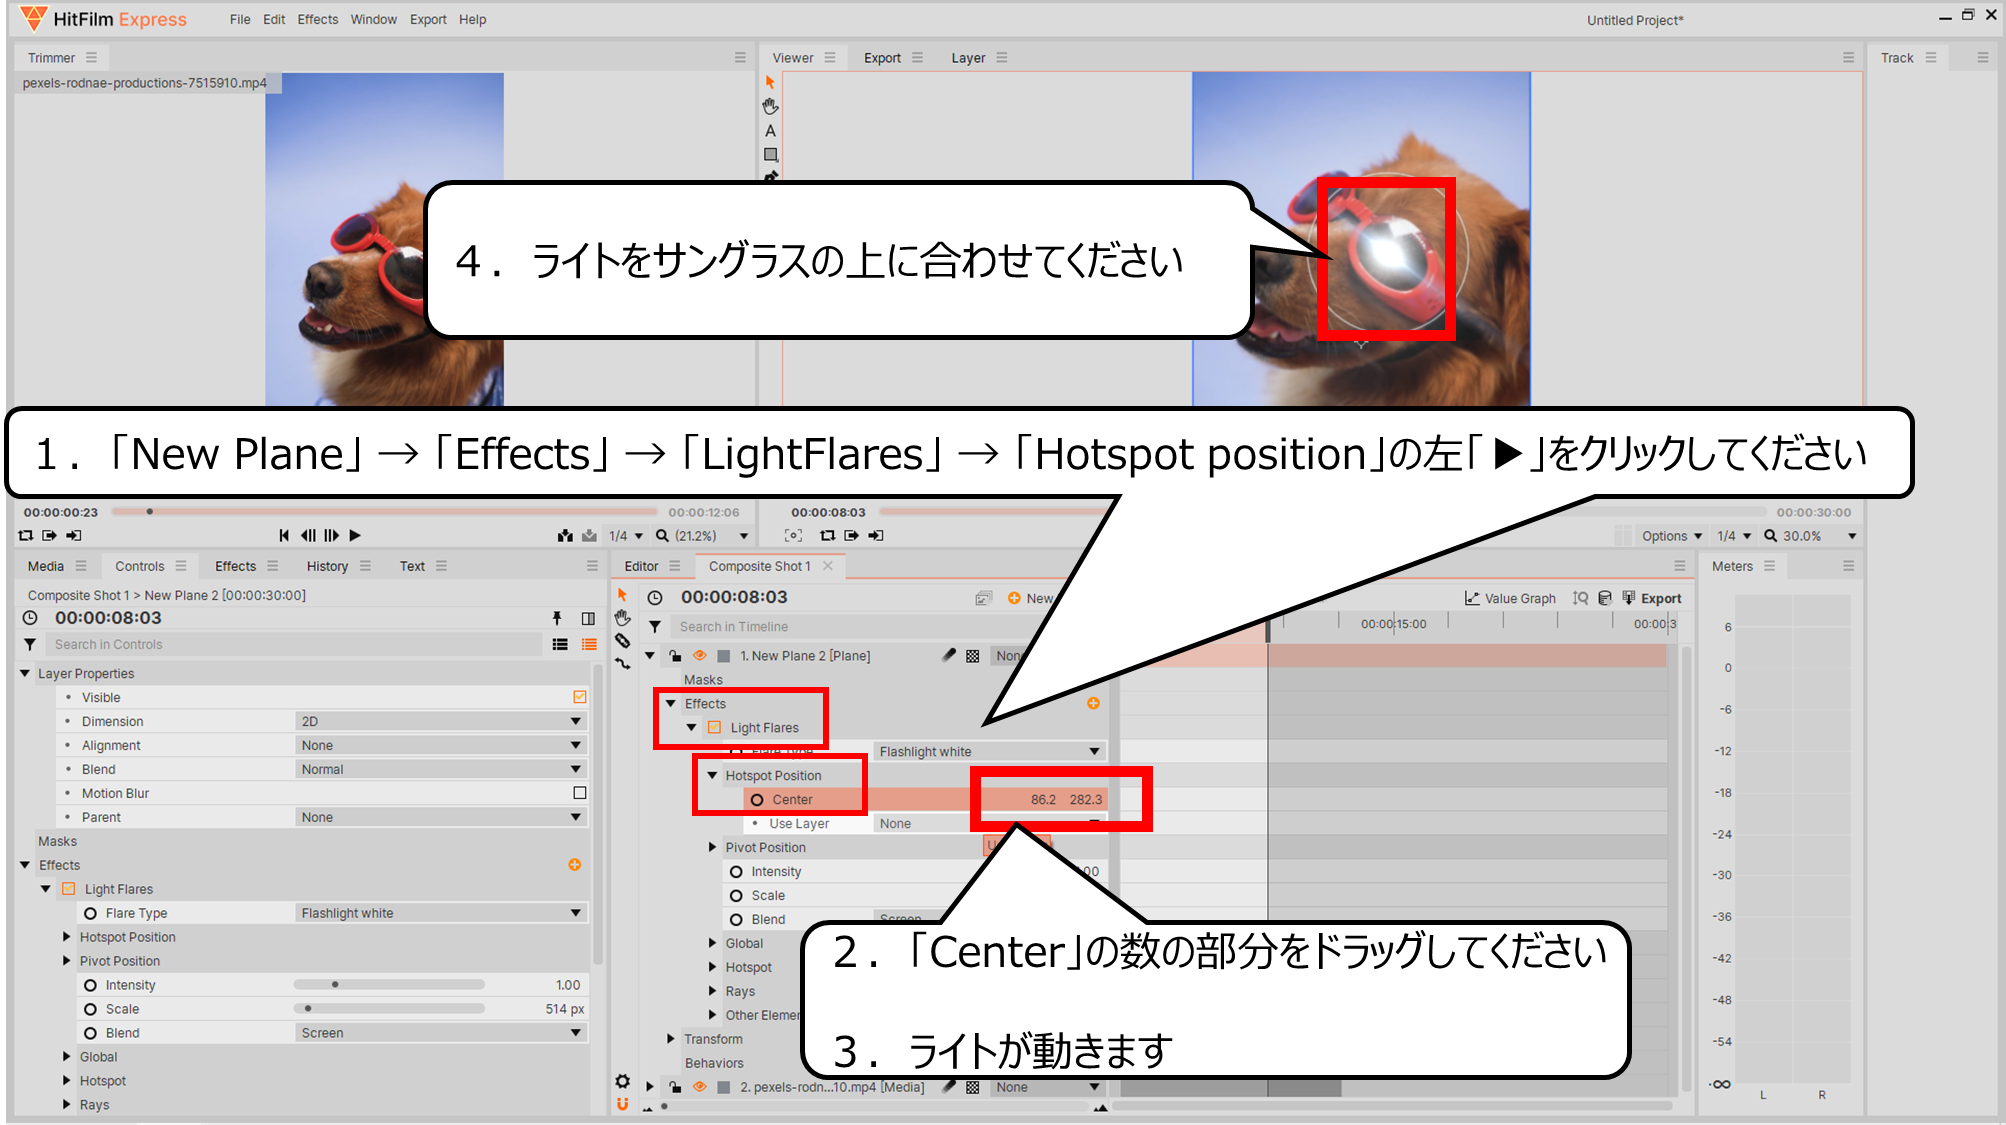
ライトをサングラスの上に合わせます
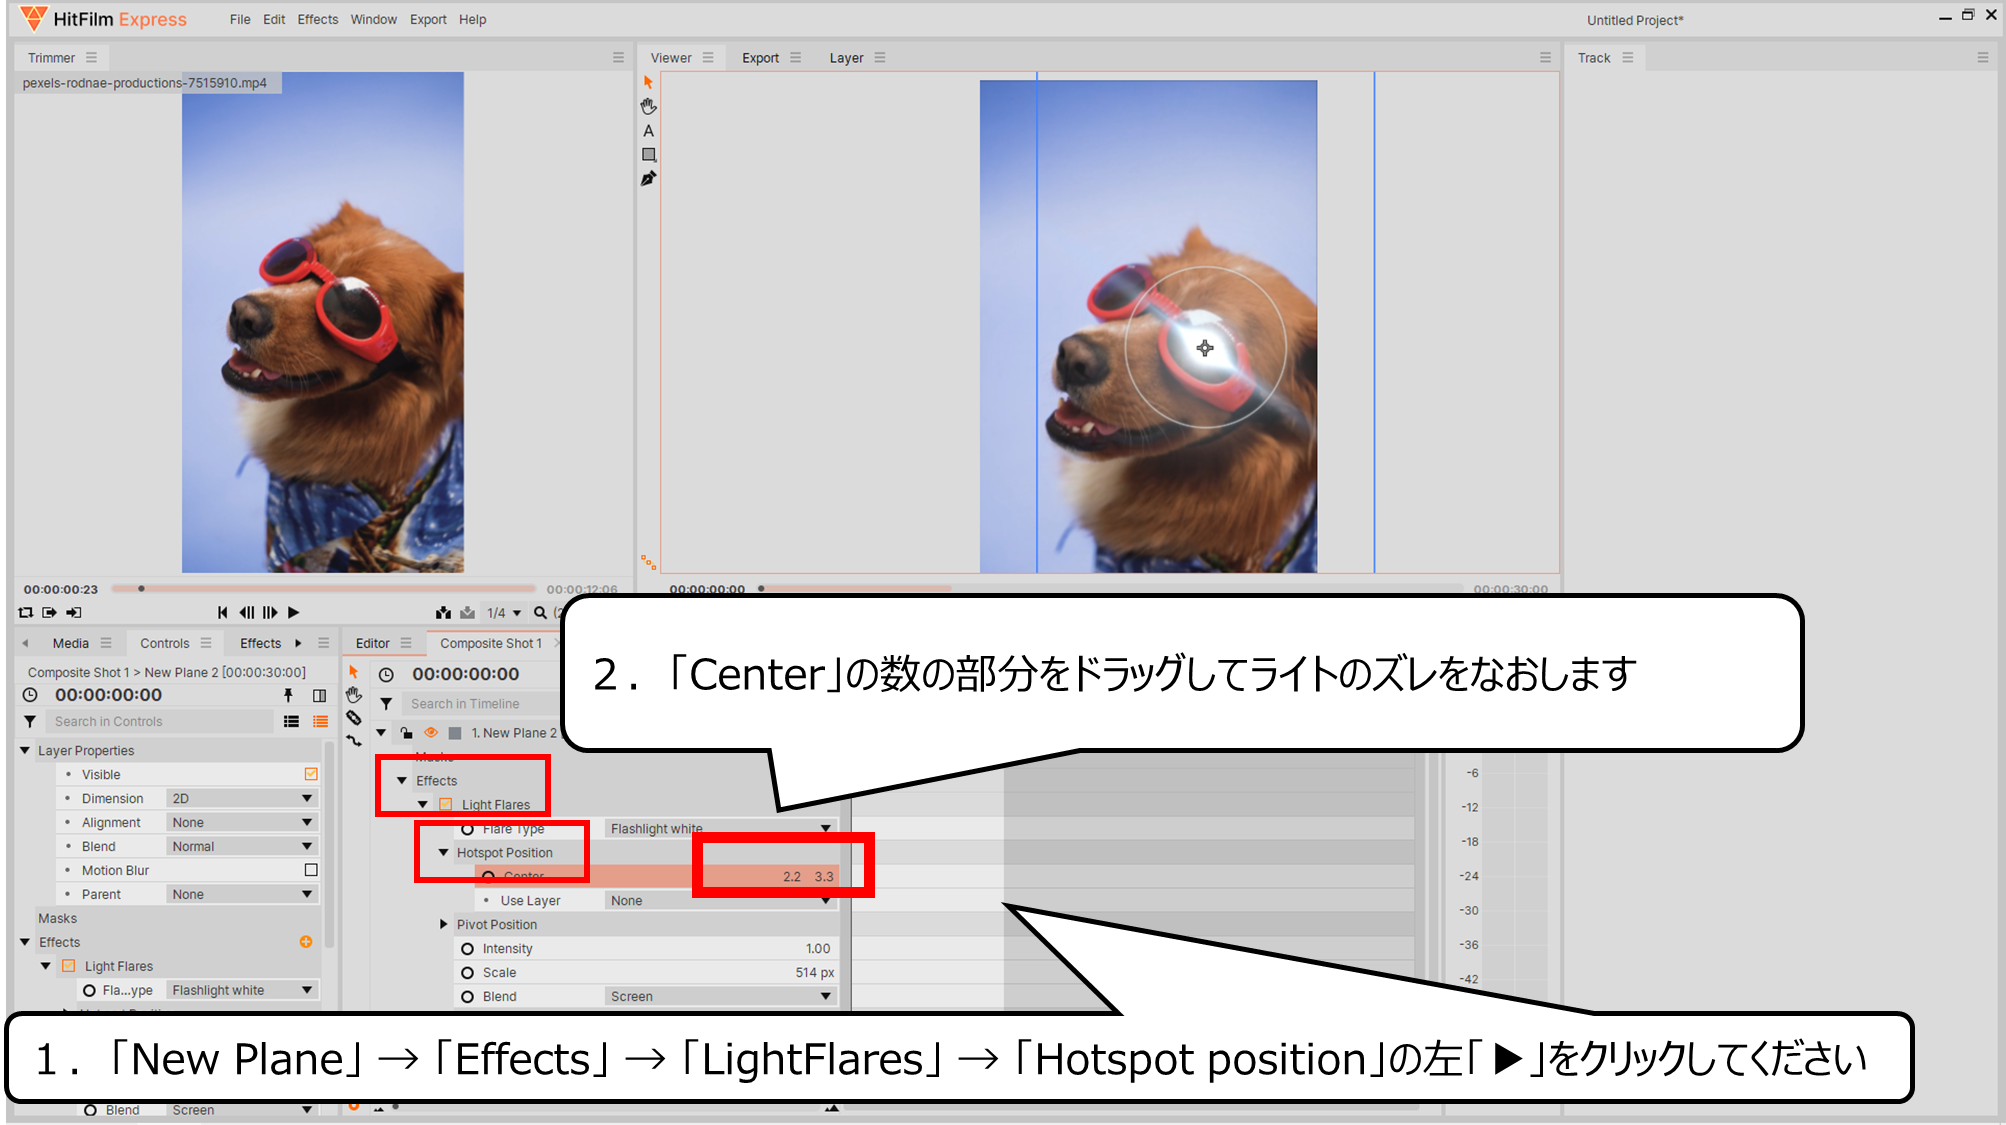
1.「New Plane」 → 「Effects」 → 「LightFlares」 → 「Hotspot position」の左「▶」をクリックしてください
2.「Center」の数の部分をドラッグしてください
3.ライトが動きます
4.ライトをサングラスの上に合わせてください
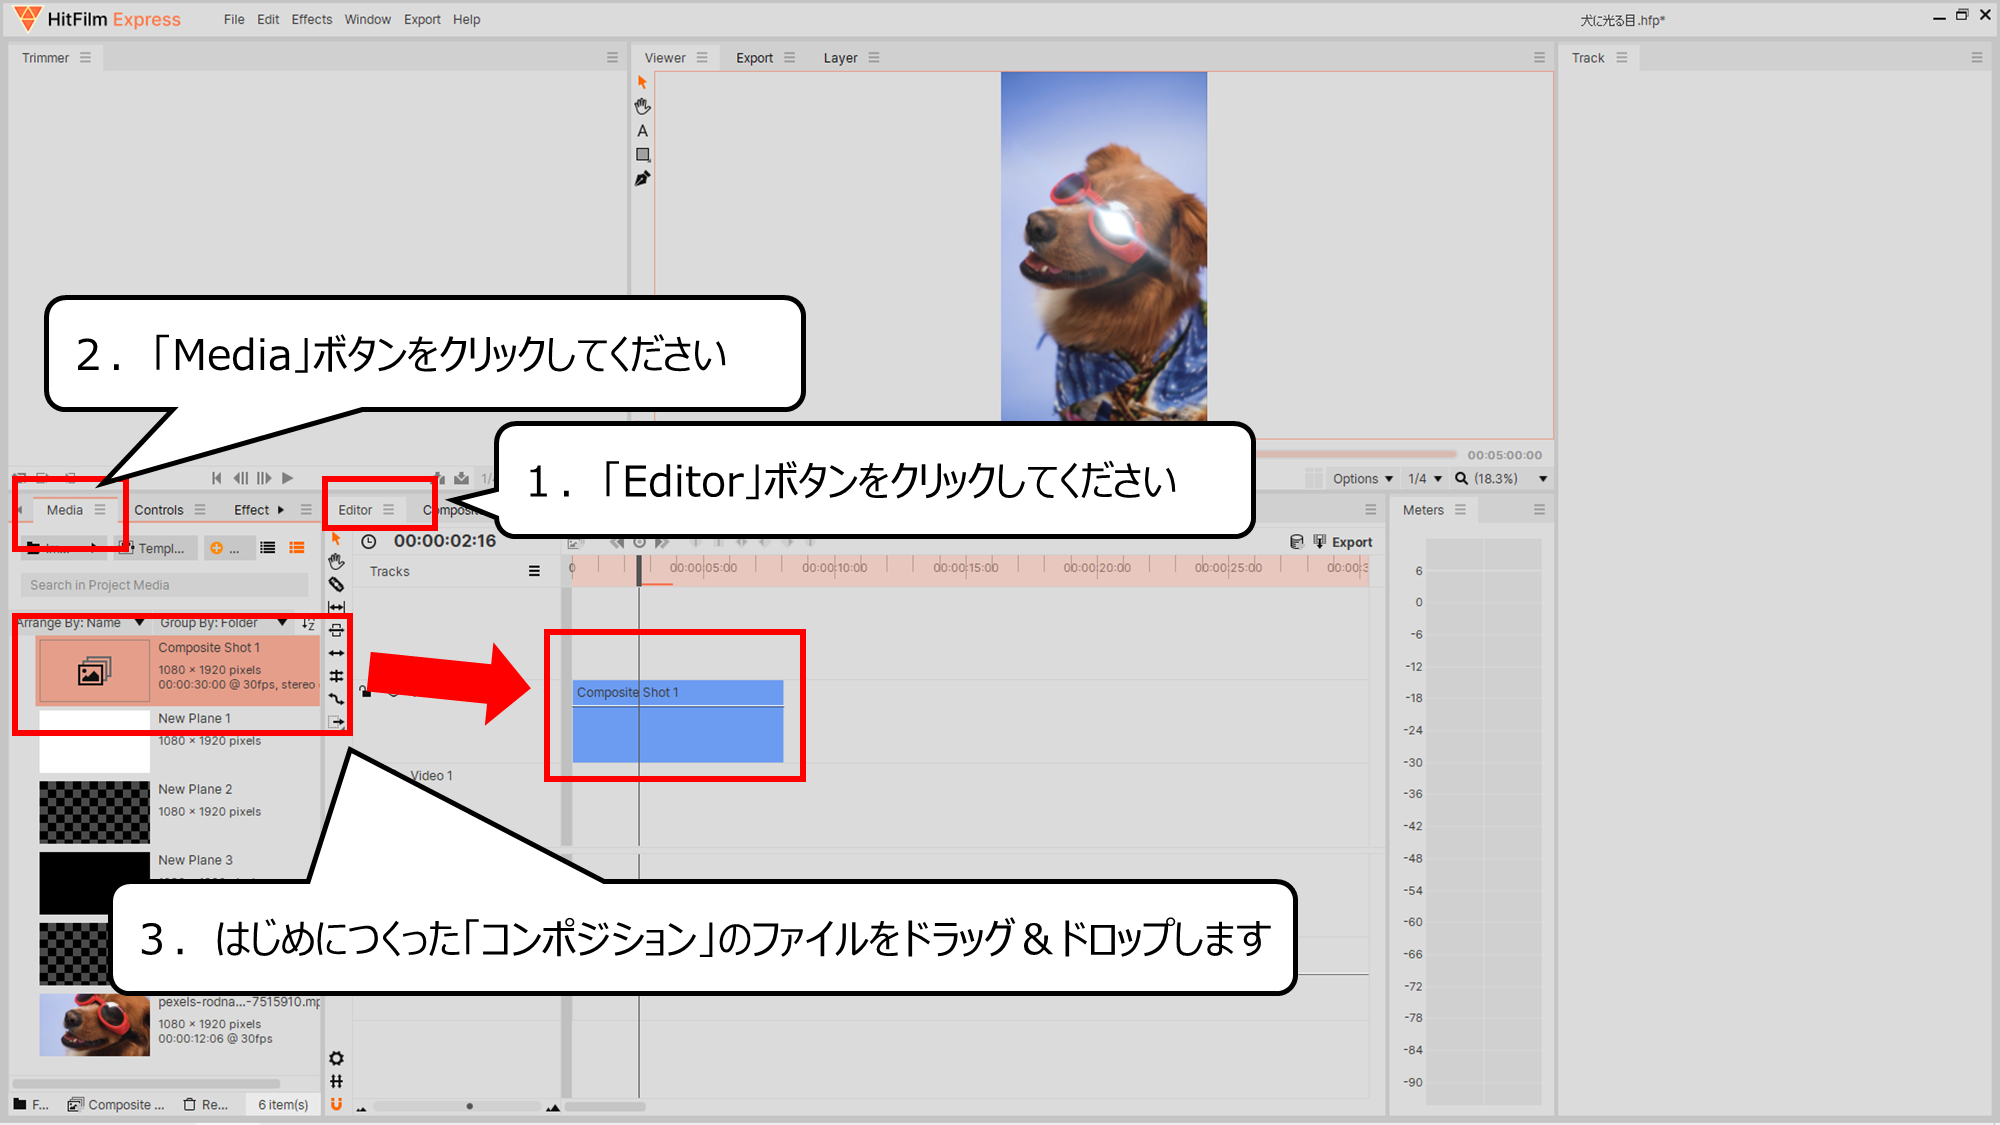
「Editor」ボタンをクリックすると、はじめのウィンドウにもどります
1.「Editor」ボタンをクリックしてください
2.「Media」ボタンをクリックしてください
3.はじめにつくった「コンポジション」のファイルをドラッグ&ドロップします
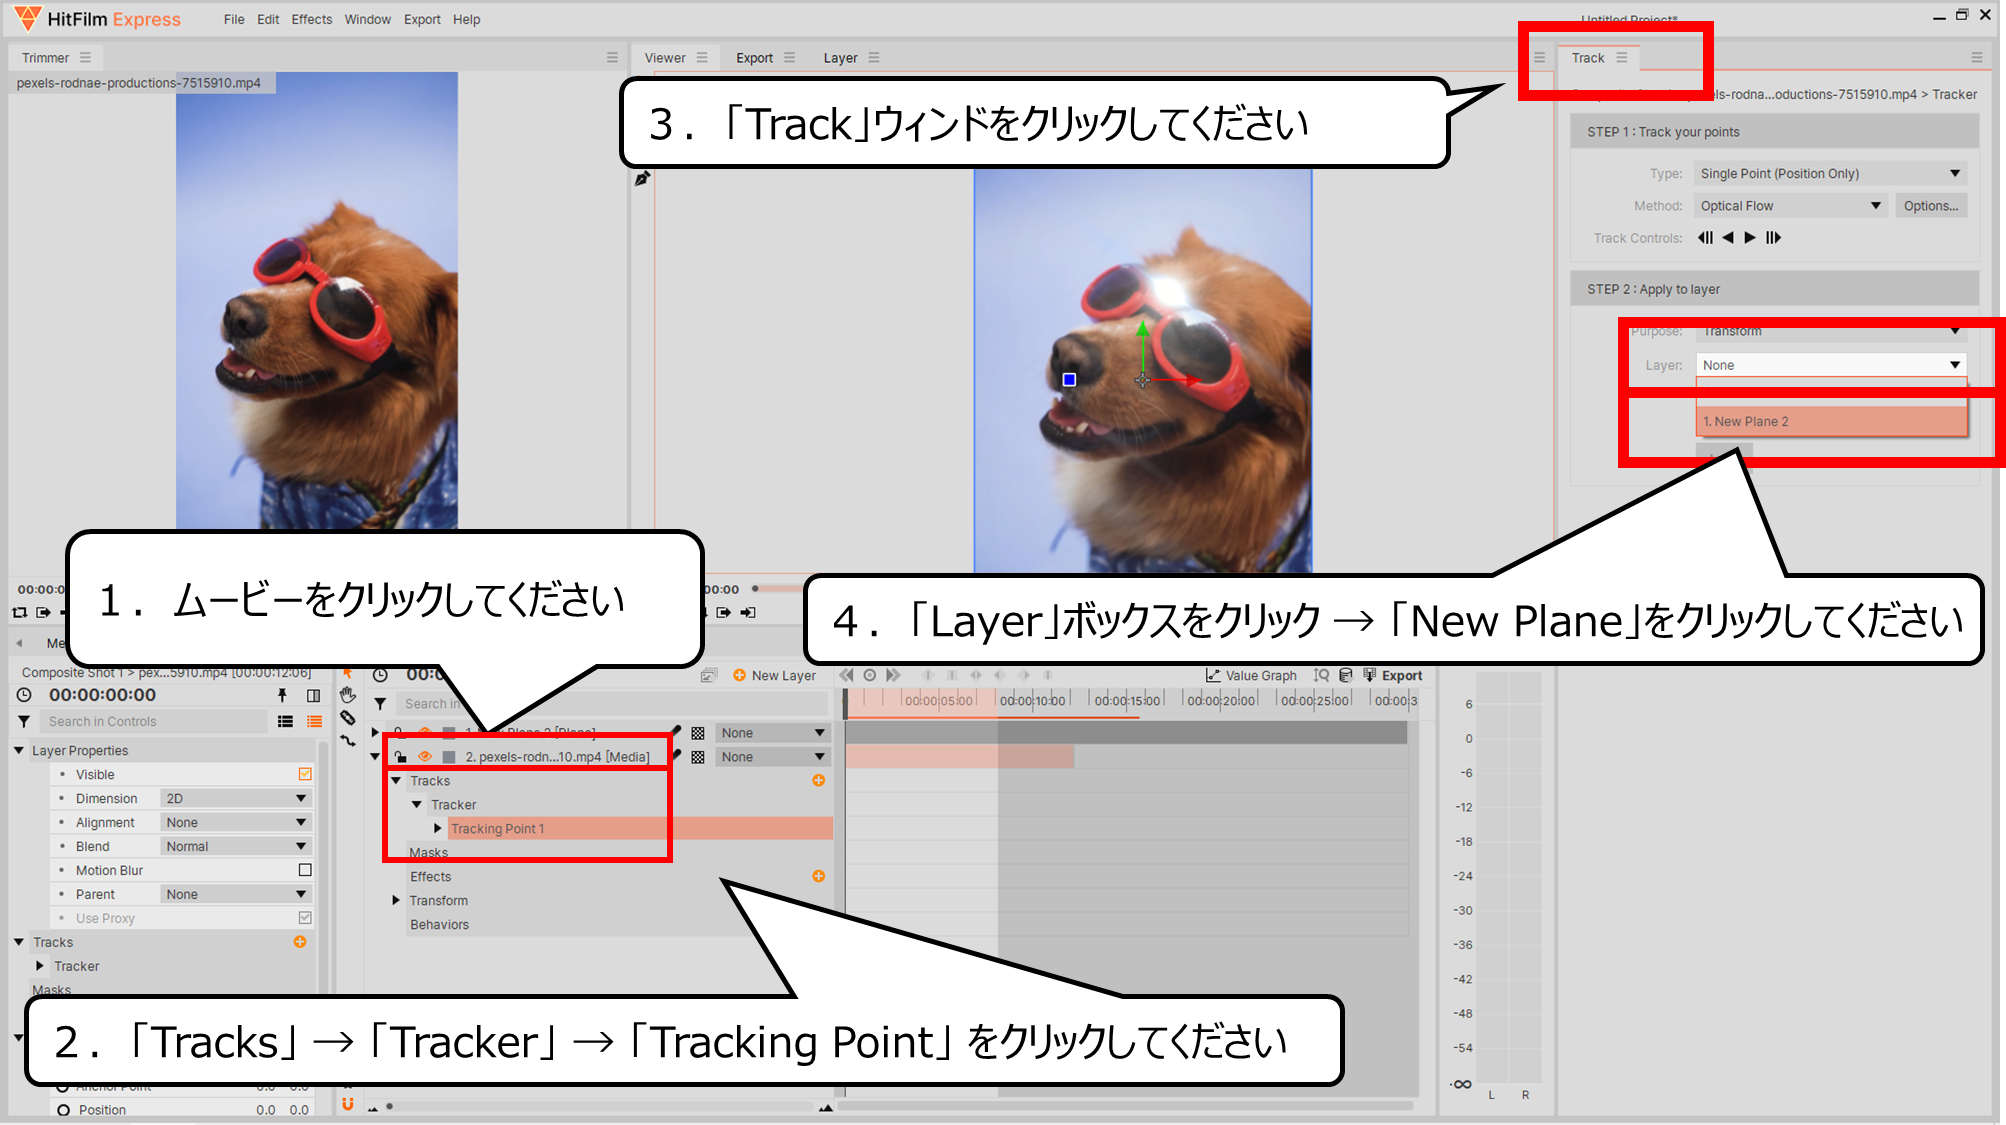
光と追跡した「Track」データをつなげます
1.ムービーをクリックしてください
2.「Tracks」 → 「Tracker」 → 「Tracking Point」 をクリックしてください
3.「Track」ウィンドをクリックしてください
4.「Layer」ボックスをクリック → 「New Plane」をクリックしてください
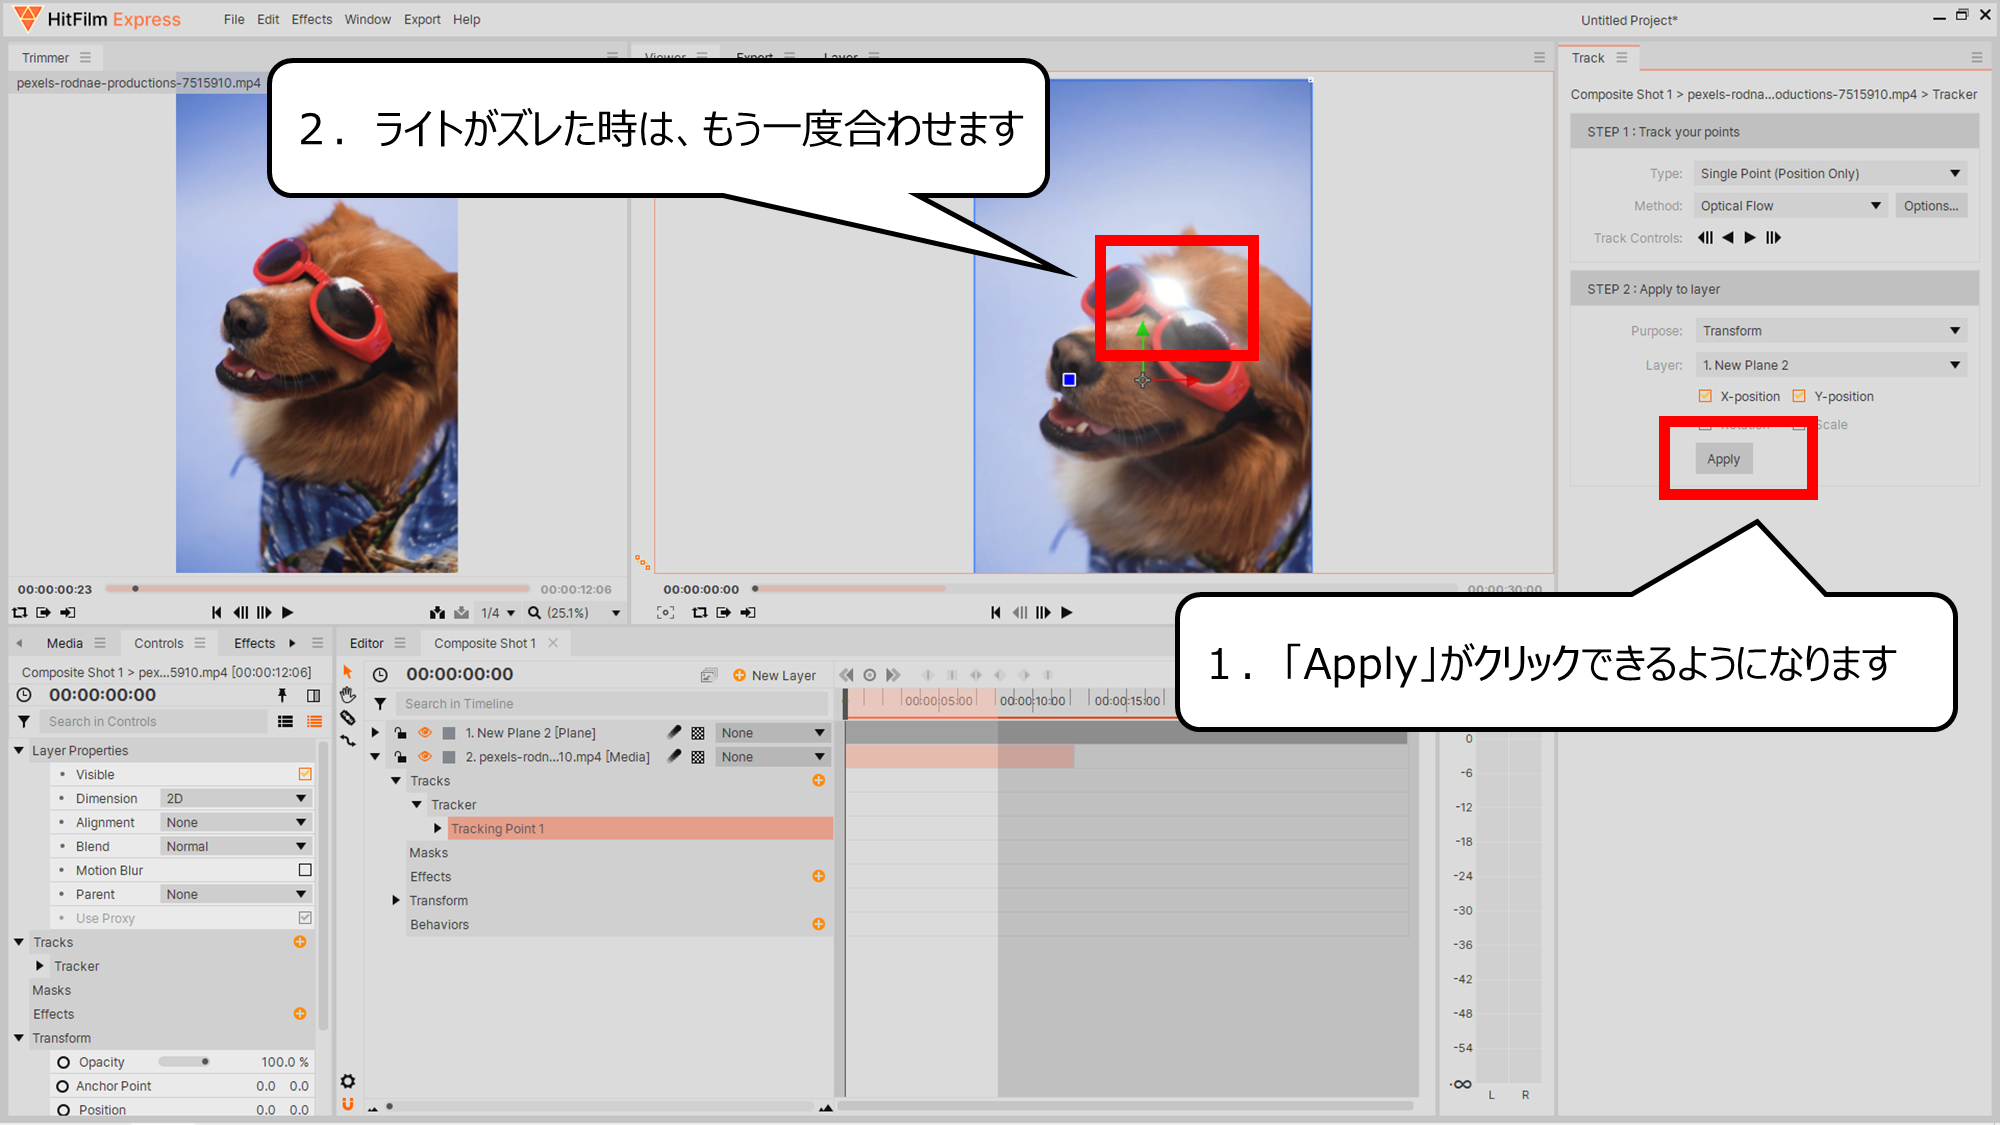
「Apply」がクリックできるようになります
1.「Apply」がクリックできるようになります
2.ライトがズレた時は、もう一度合わせます
ライトのズレをなおします
1.「New Plane」 → 「Effects」 → 「LightFlares」 → 「Hotspot position」の左「▶」をクリックしてください
2.「Center」の数の部分をドラッグしてライトのズレをなおします
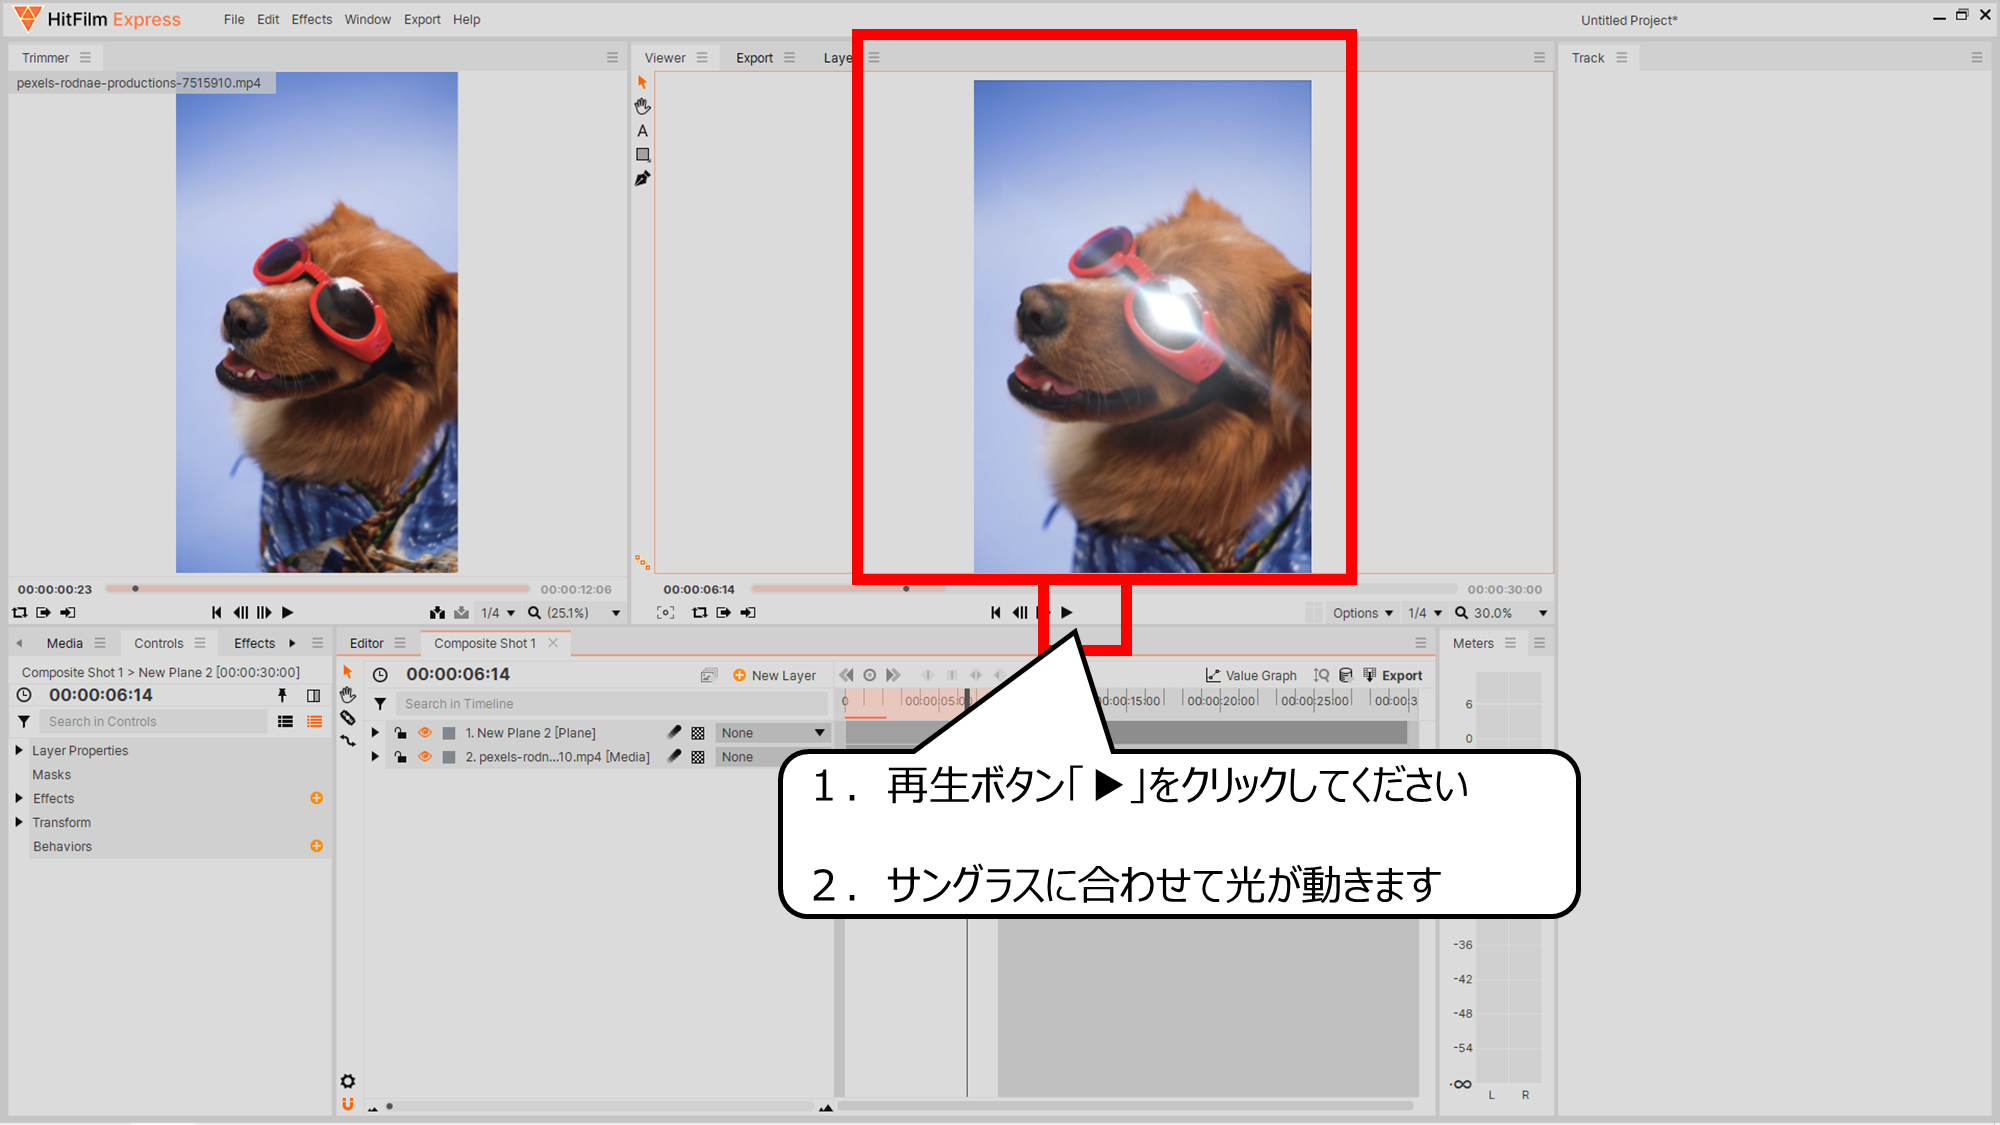
再生ボタンをクリックすると、サングラスに合わせて光が動きます
1.再生ボタン「▶」をクリックしてください
2.サングラスに合わせて光が動きます
・二つ目の光るエフェクトもつくろう
二つ目のついせきデータをつくる用意をします
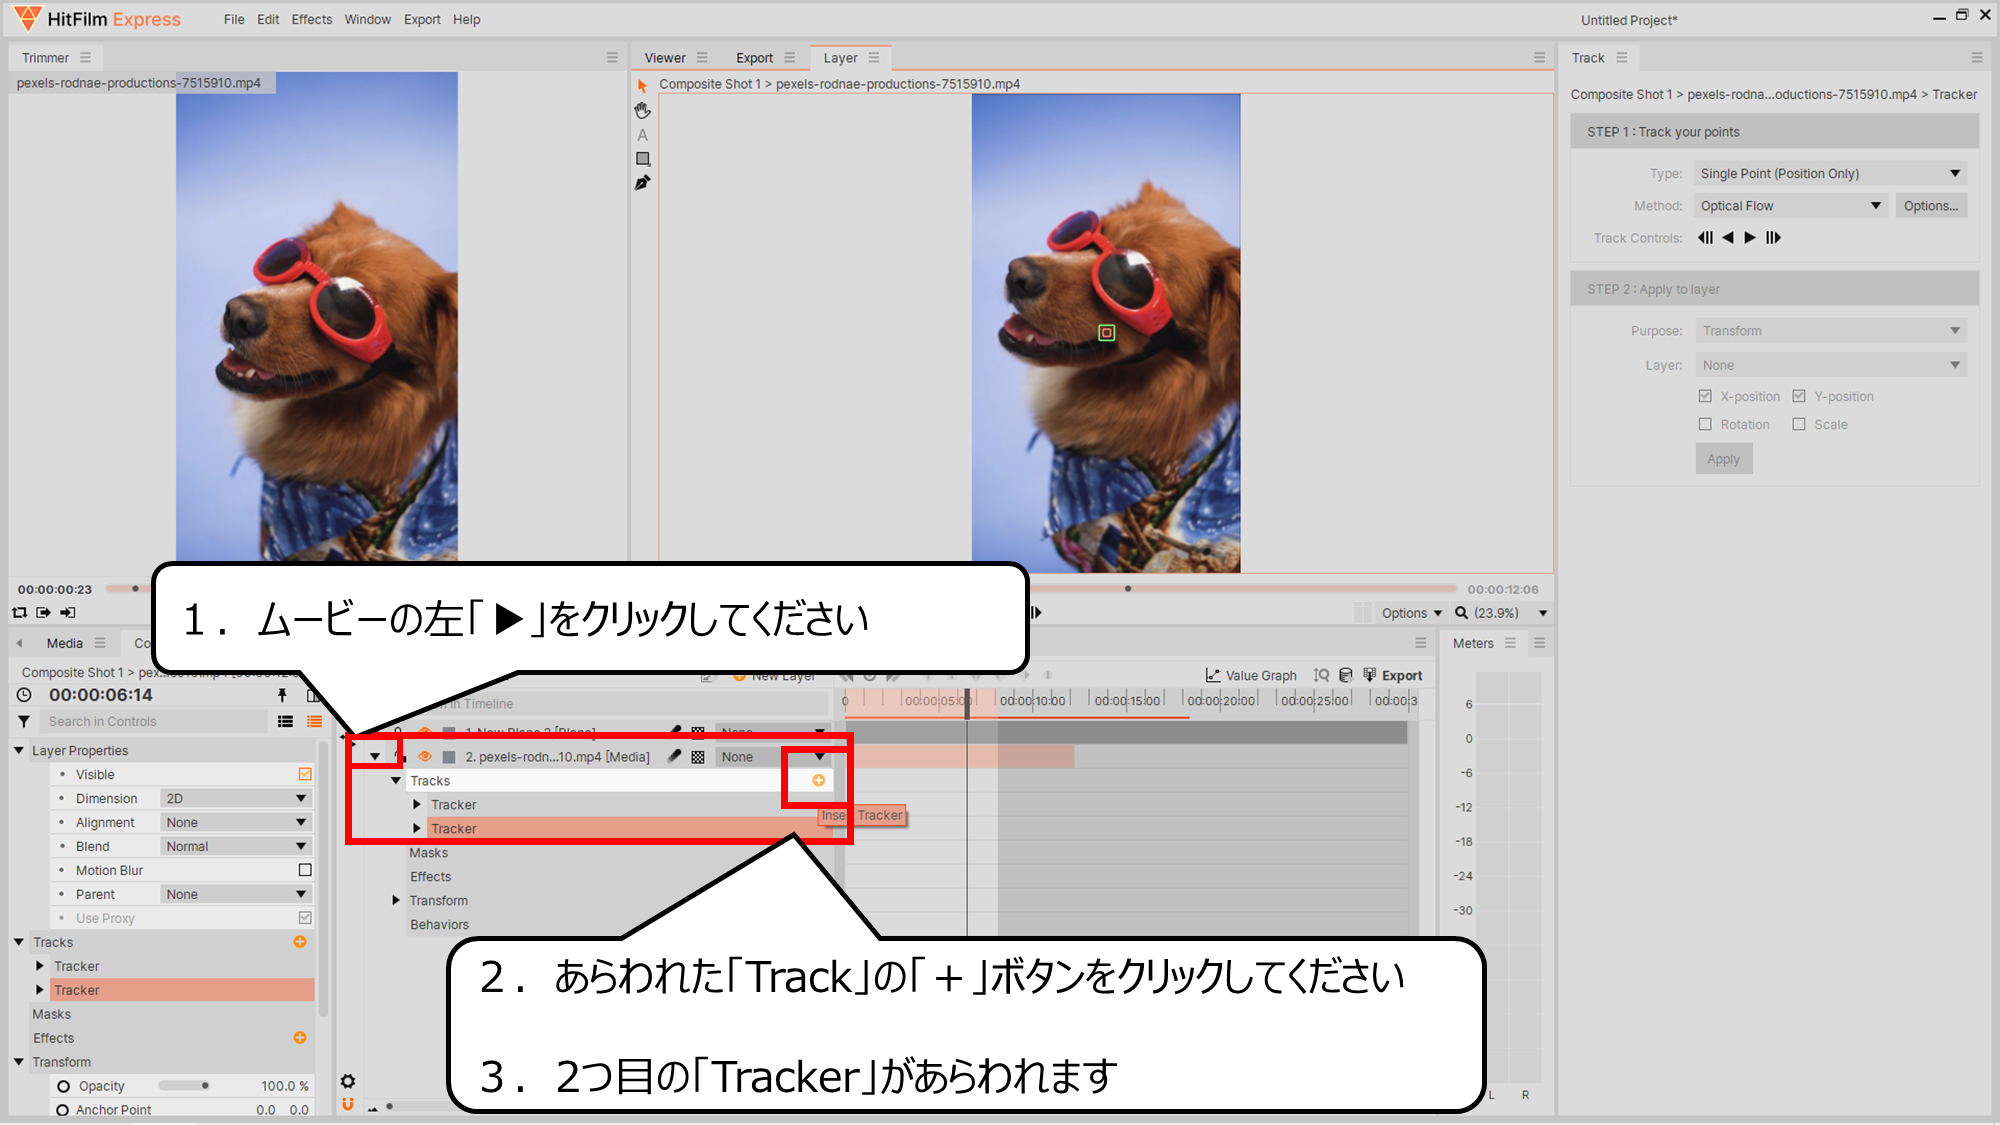
1.ムービーの左「▶」をクリックしてください
2.あらわれた「Track」の「+」ボタンをクリックしてください
3.2つ目の「Tracker」があらわれます
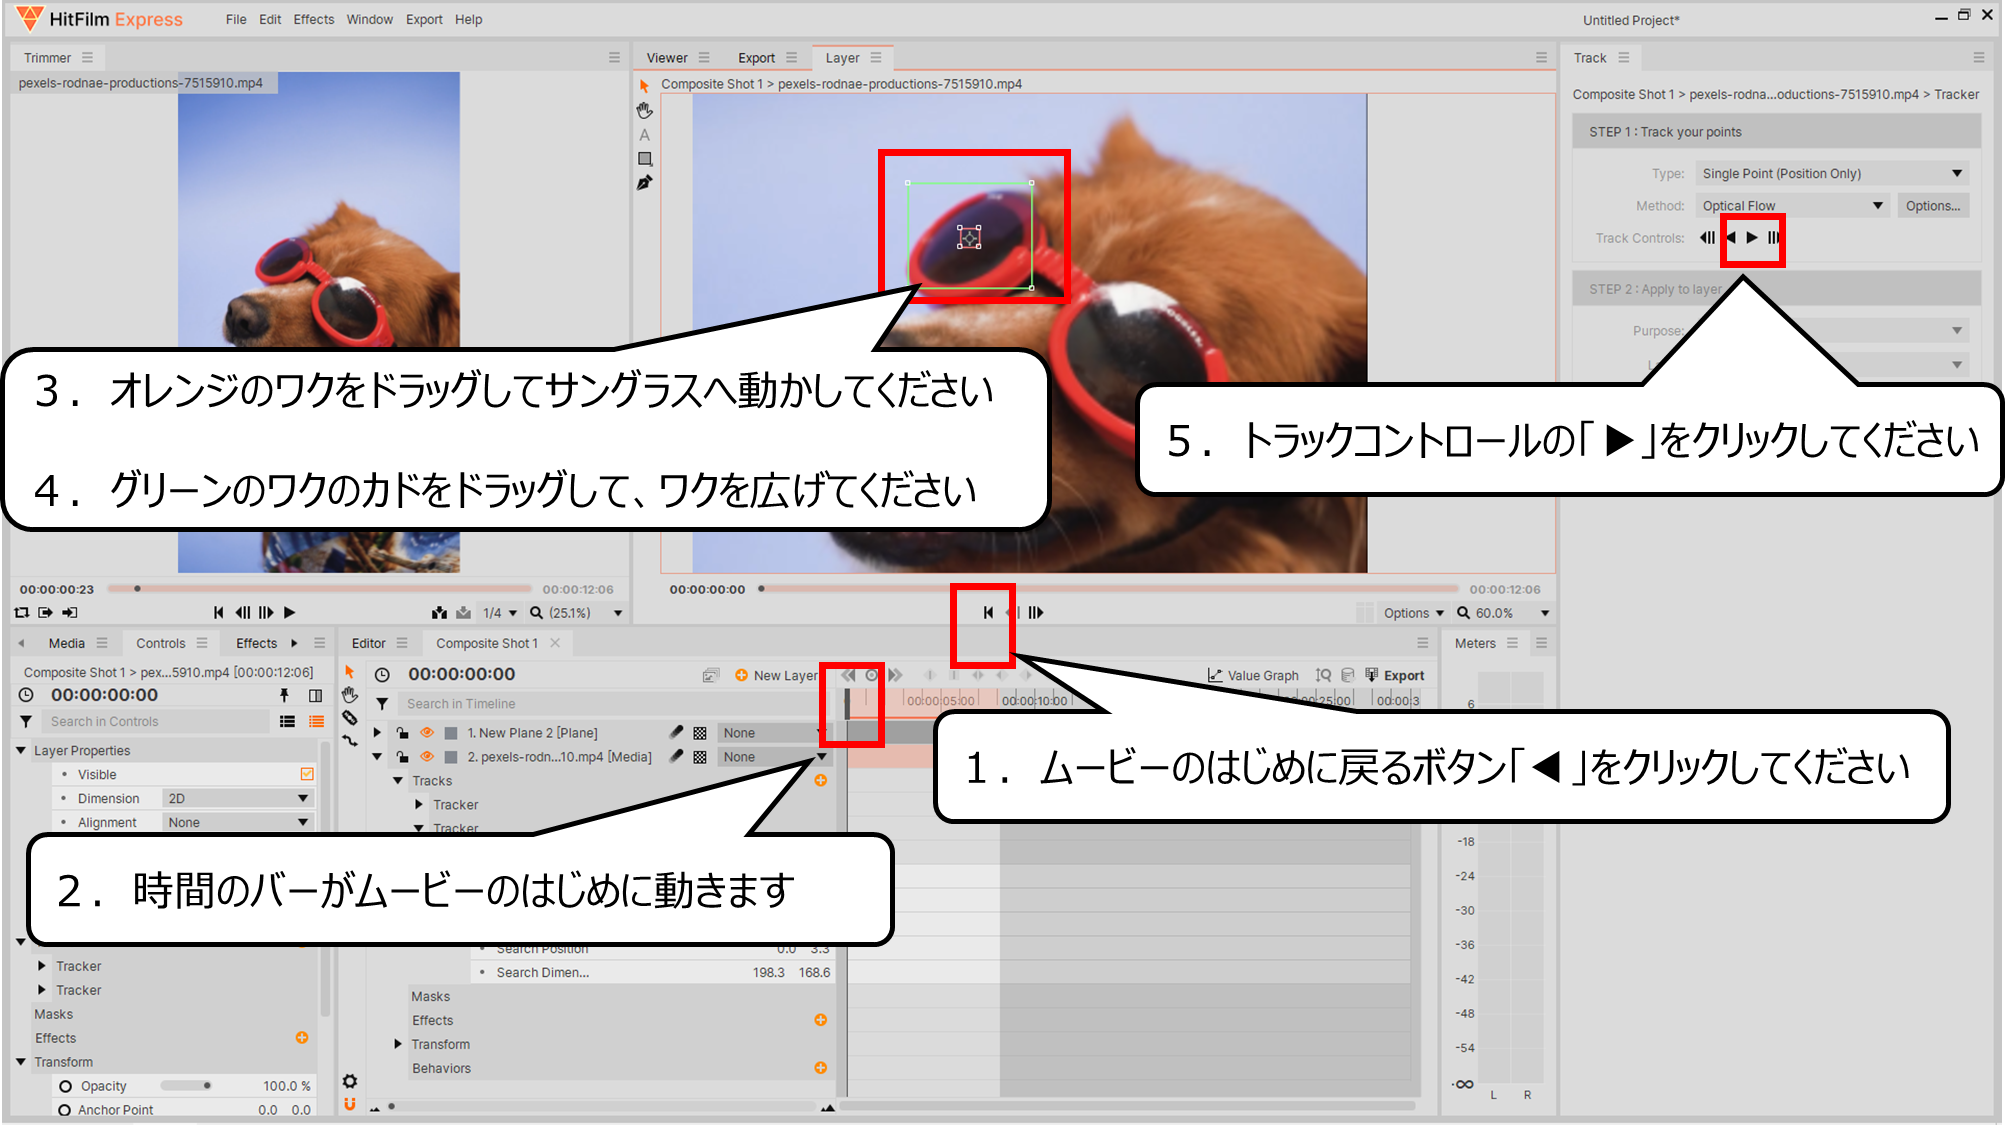
右目のサングラスの動きをデータにします
1.ムービーのはじめに戻るボタン「◀」をクリックしてください
2.時間のバーがムービーのはじめに動きます
3.オレンジのワクをドラッグしてサングラスへ動かしてください
4.グリーンのワクのカドをドラッグして、ワクを広げてください
5.トラックコントロールの「▶」をクリックしてください
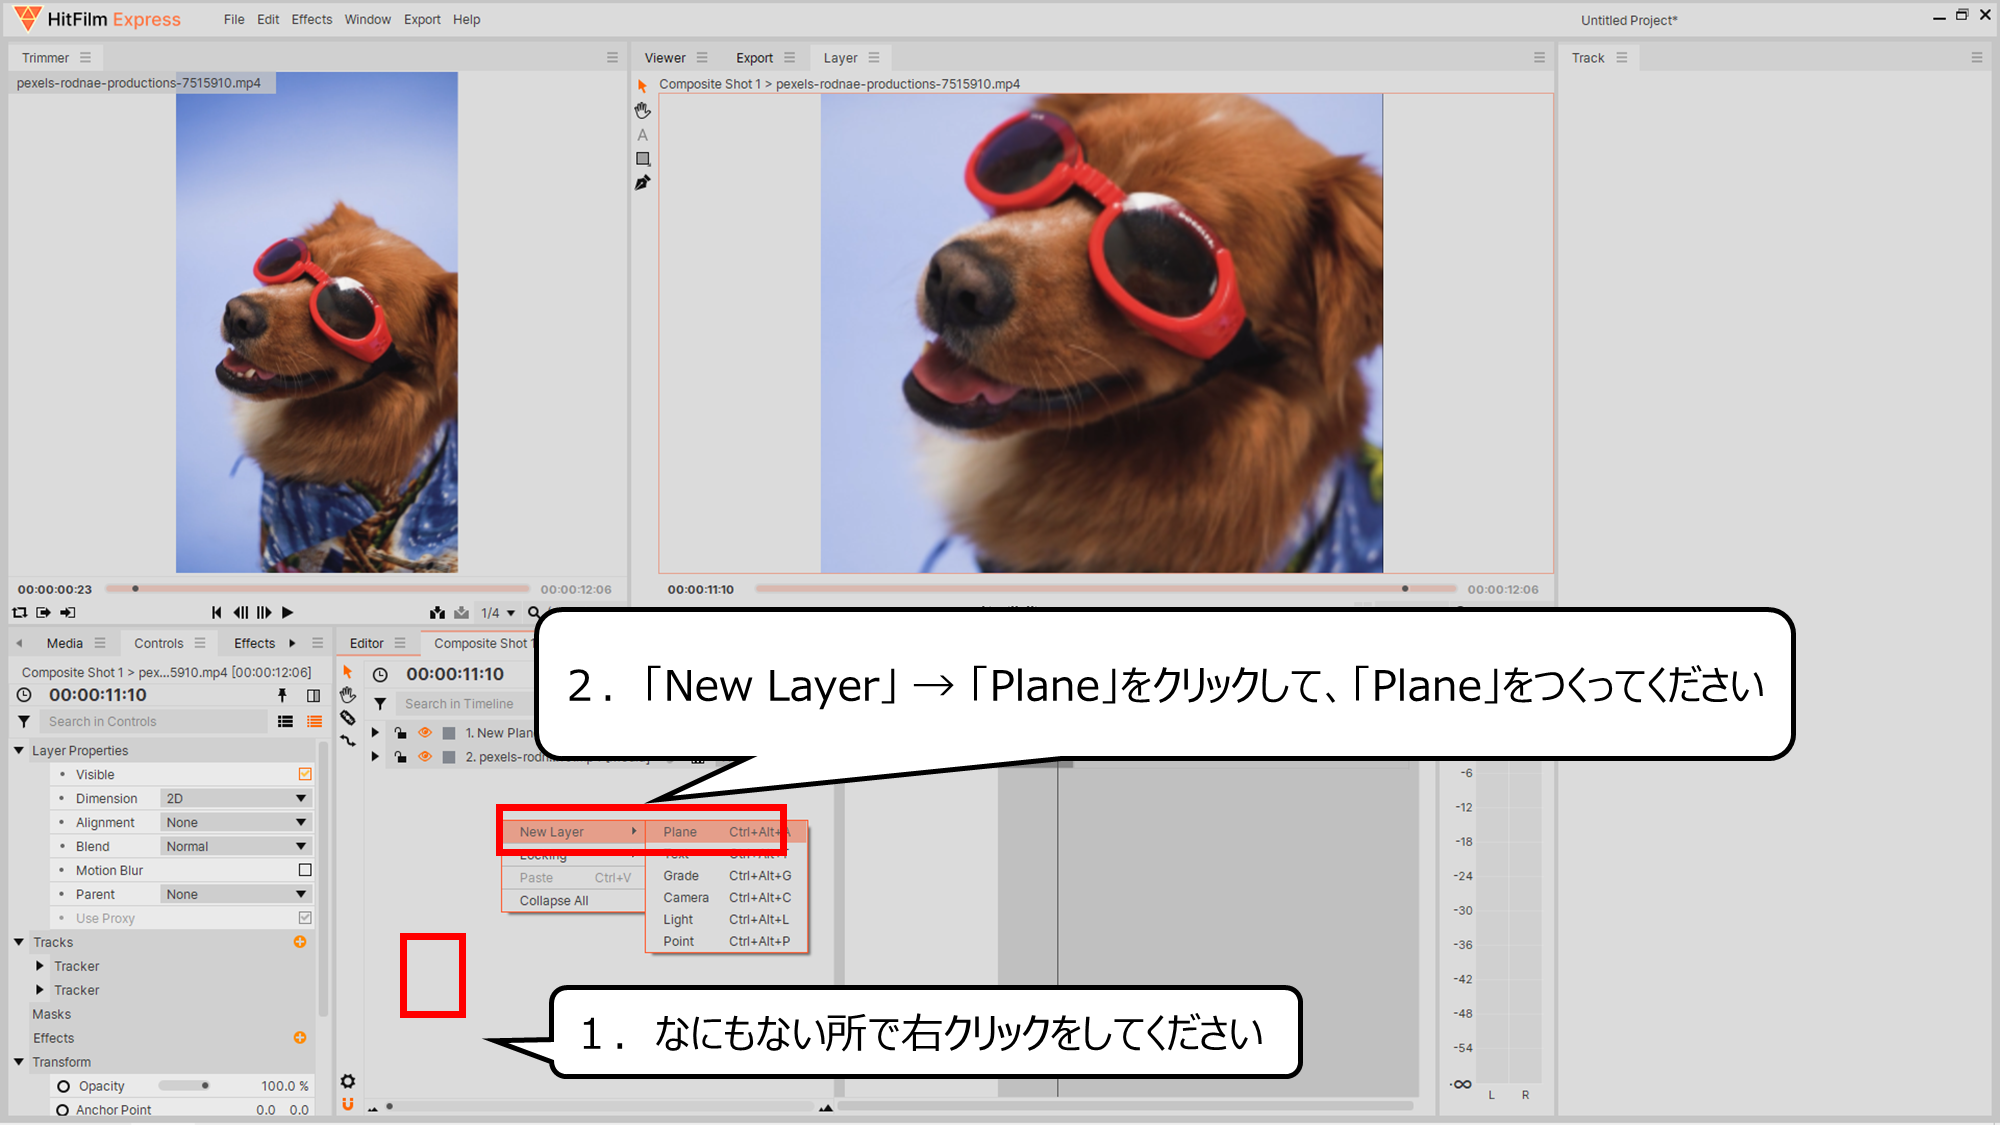
平面をつくり、光のエフェクトをくわえる用意をします
1.なにもない所で右クリックをしてください
2.「New Layer」 → 「Plane」をクリックして、「Plane」をつくってください
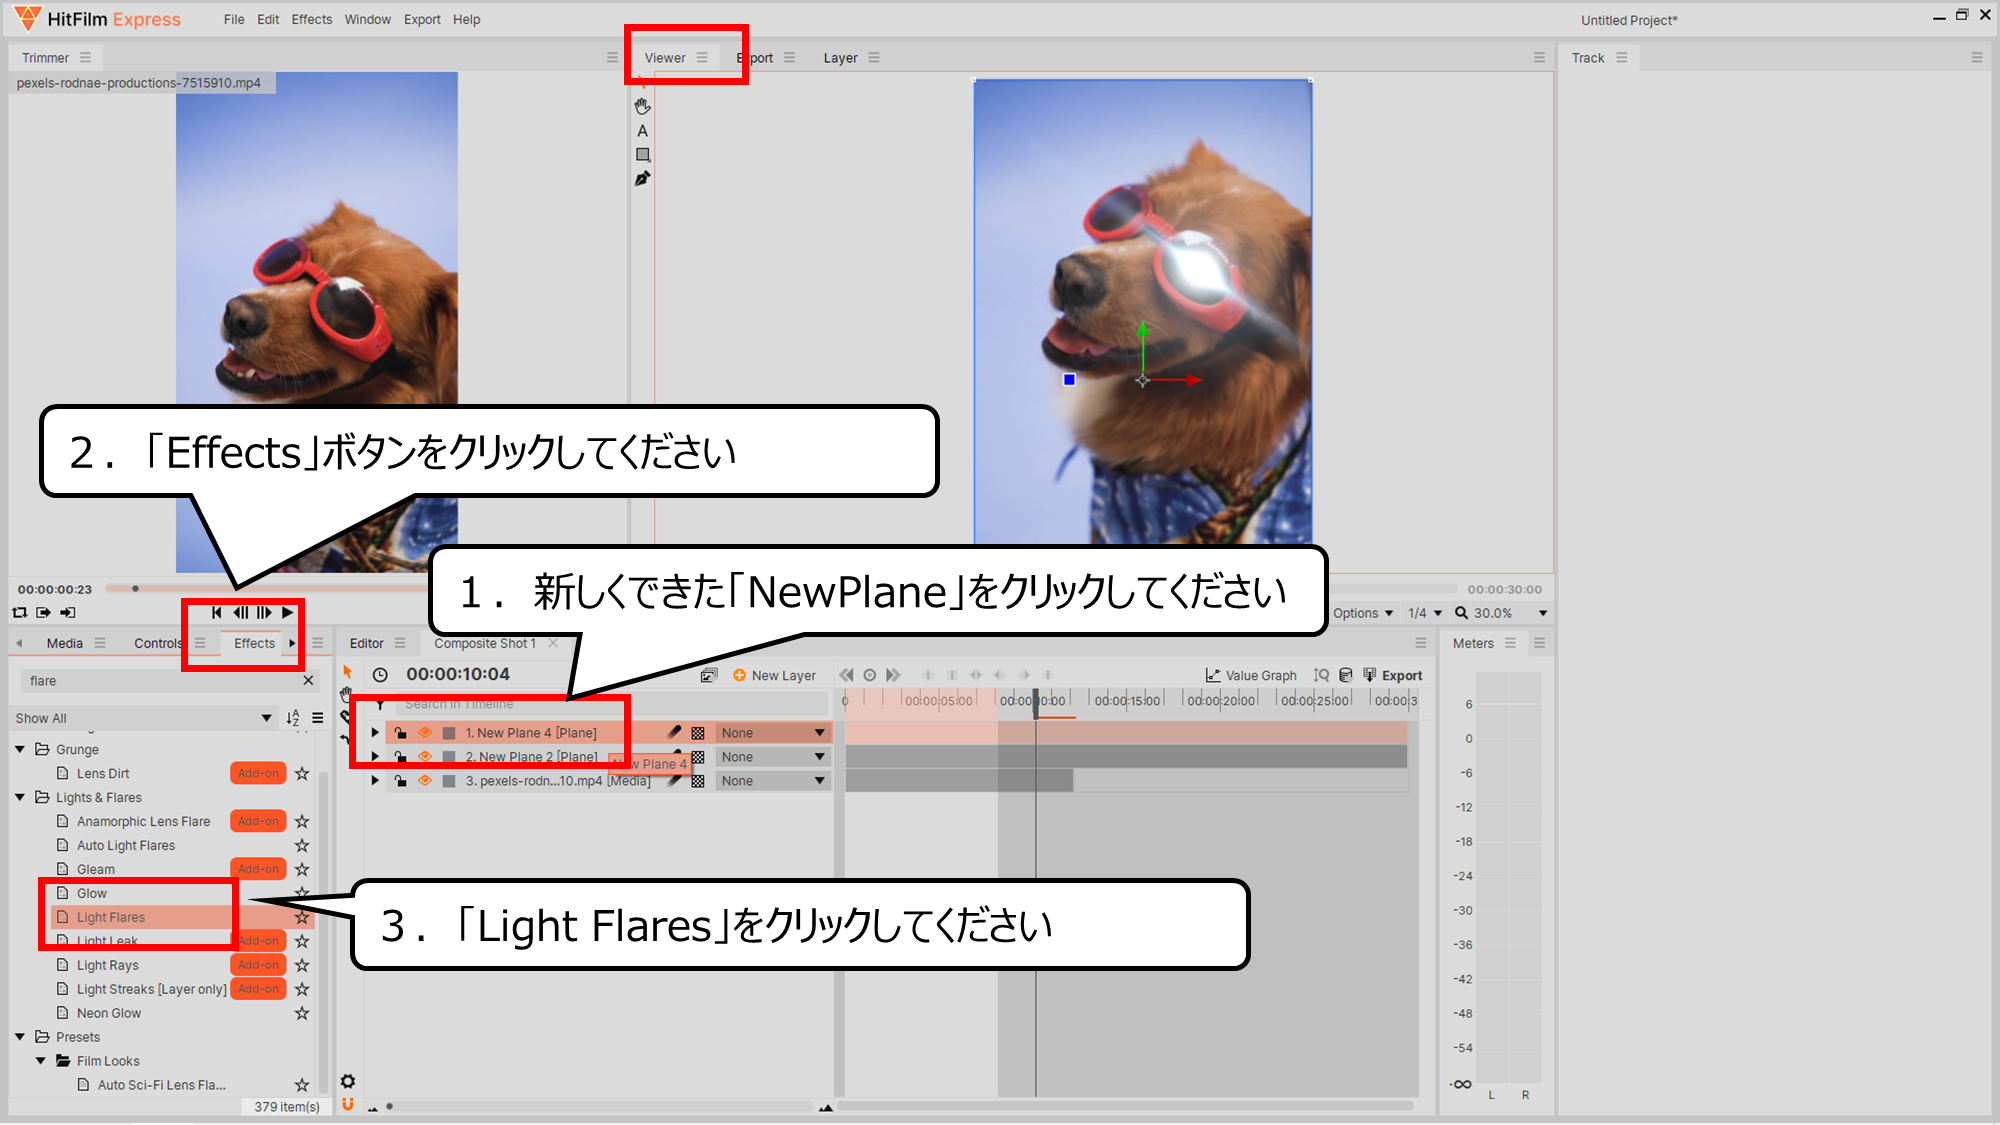
新しくできた平面に光をくわえます
1.新しくできた「NewPlane」をクリックしてください
2.「Effects」ボタンをクリックしてください
3.「Light Flares」をクリックしてください
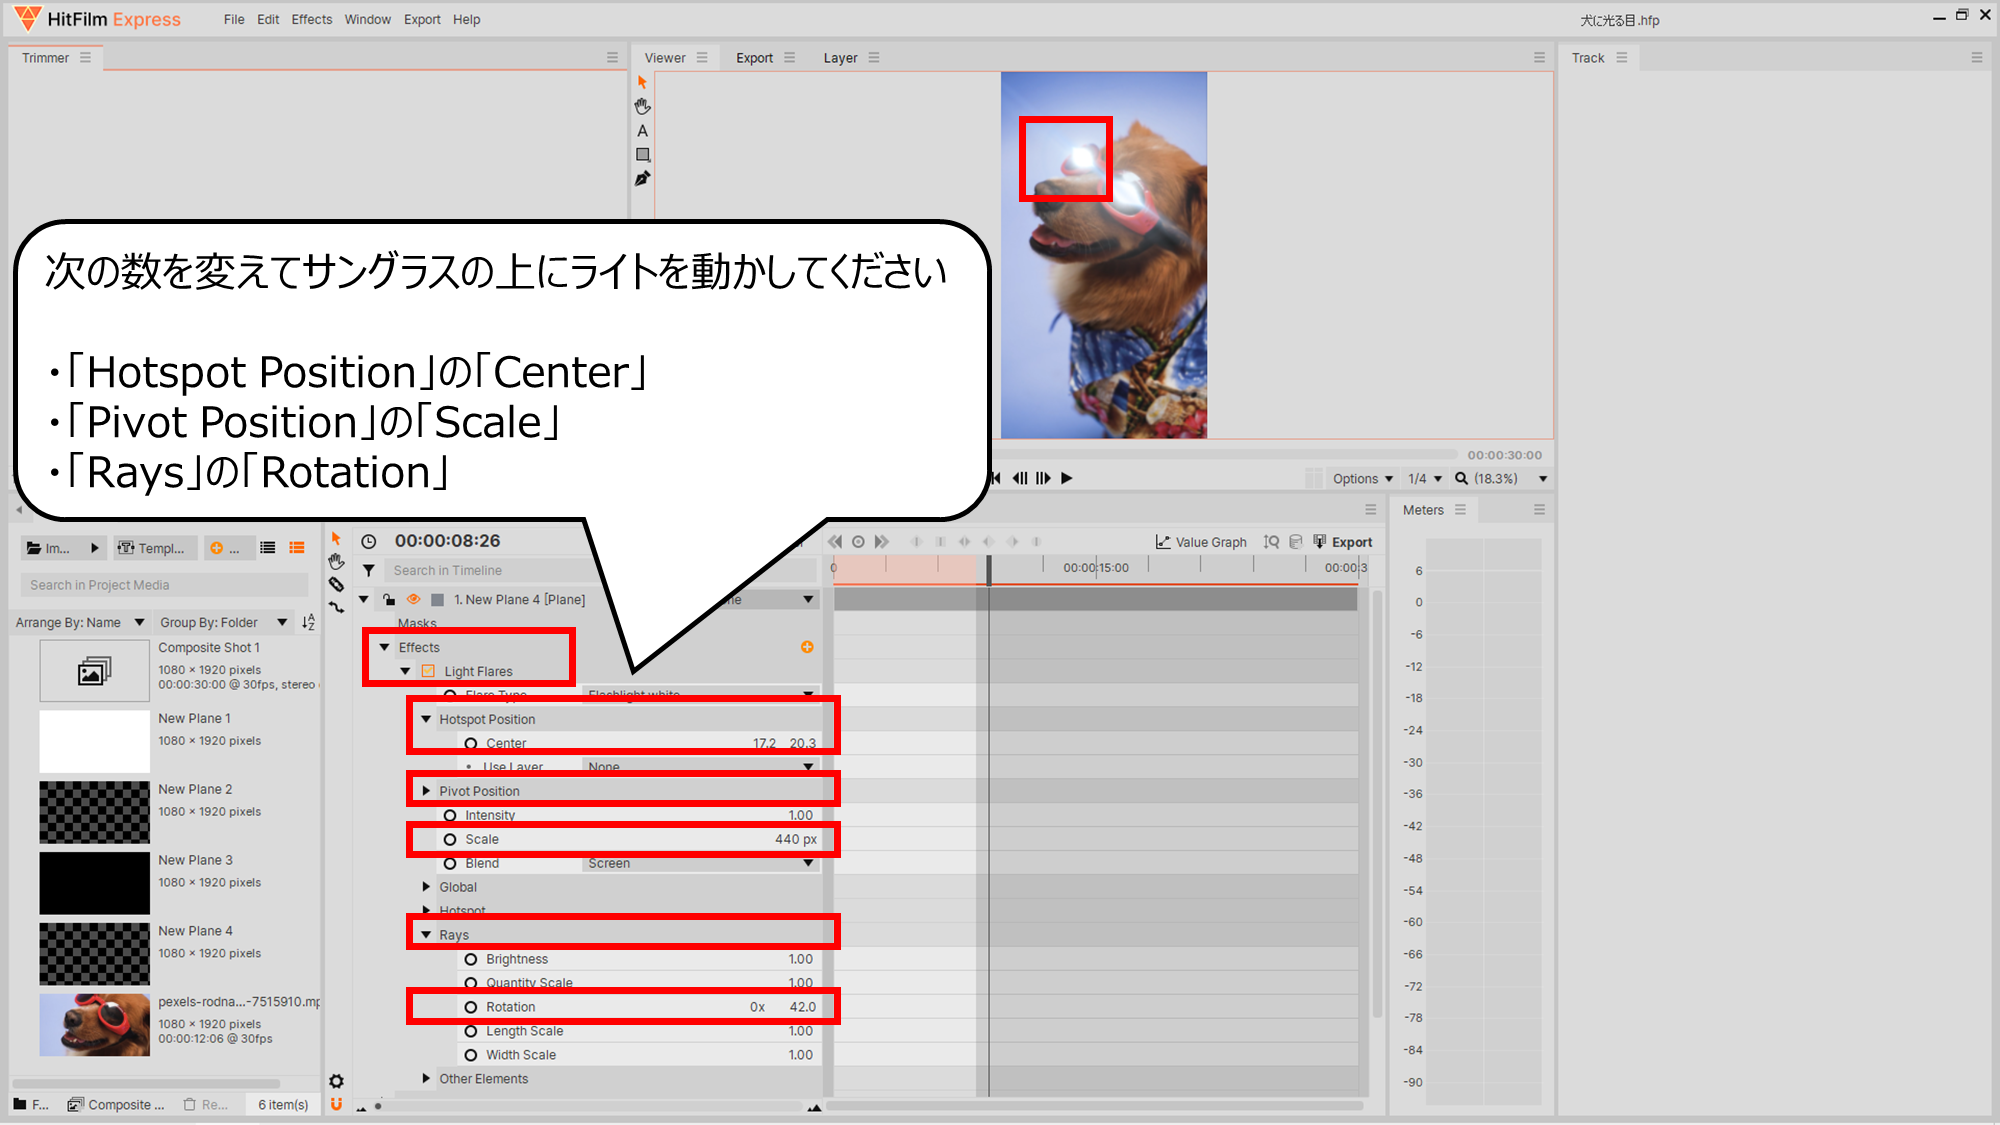
ライトをサングラスに合わせてください
次の数を変えてサングラスの上にライトを動かしてください
・「Hotspot Position」の「Center」
・「Pivot Position」の「Scale」
・「Rays」の「Rotation」
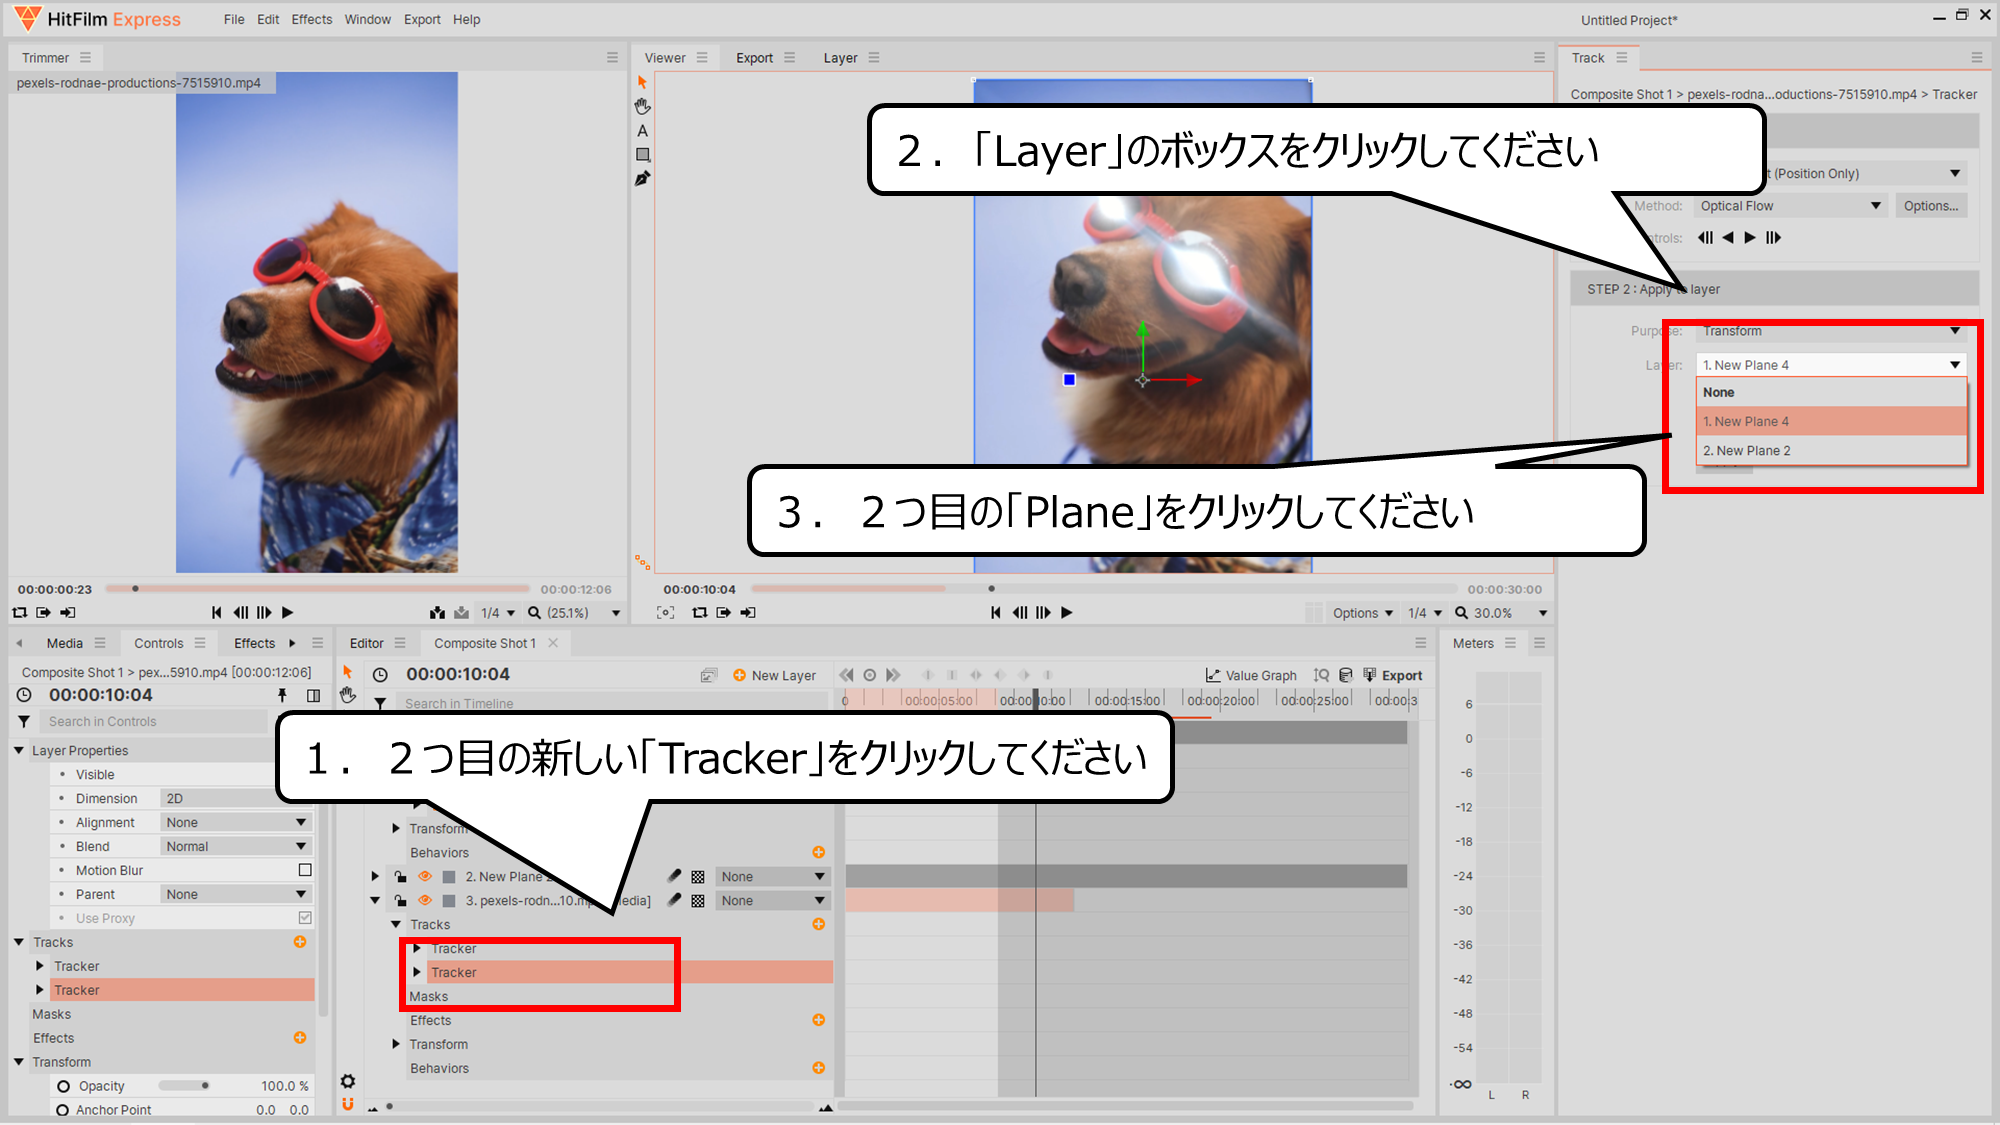
サングラスの動きのデータと光をつなげます
1.2つ目の新しい「Tracker」をクリックしてください
2.「Layer」のボックスをクリックしてください
3.2つ目の「Plane」をクリックしてください
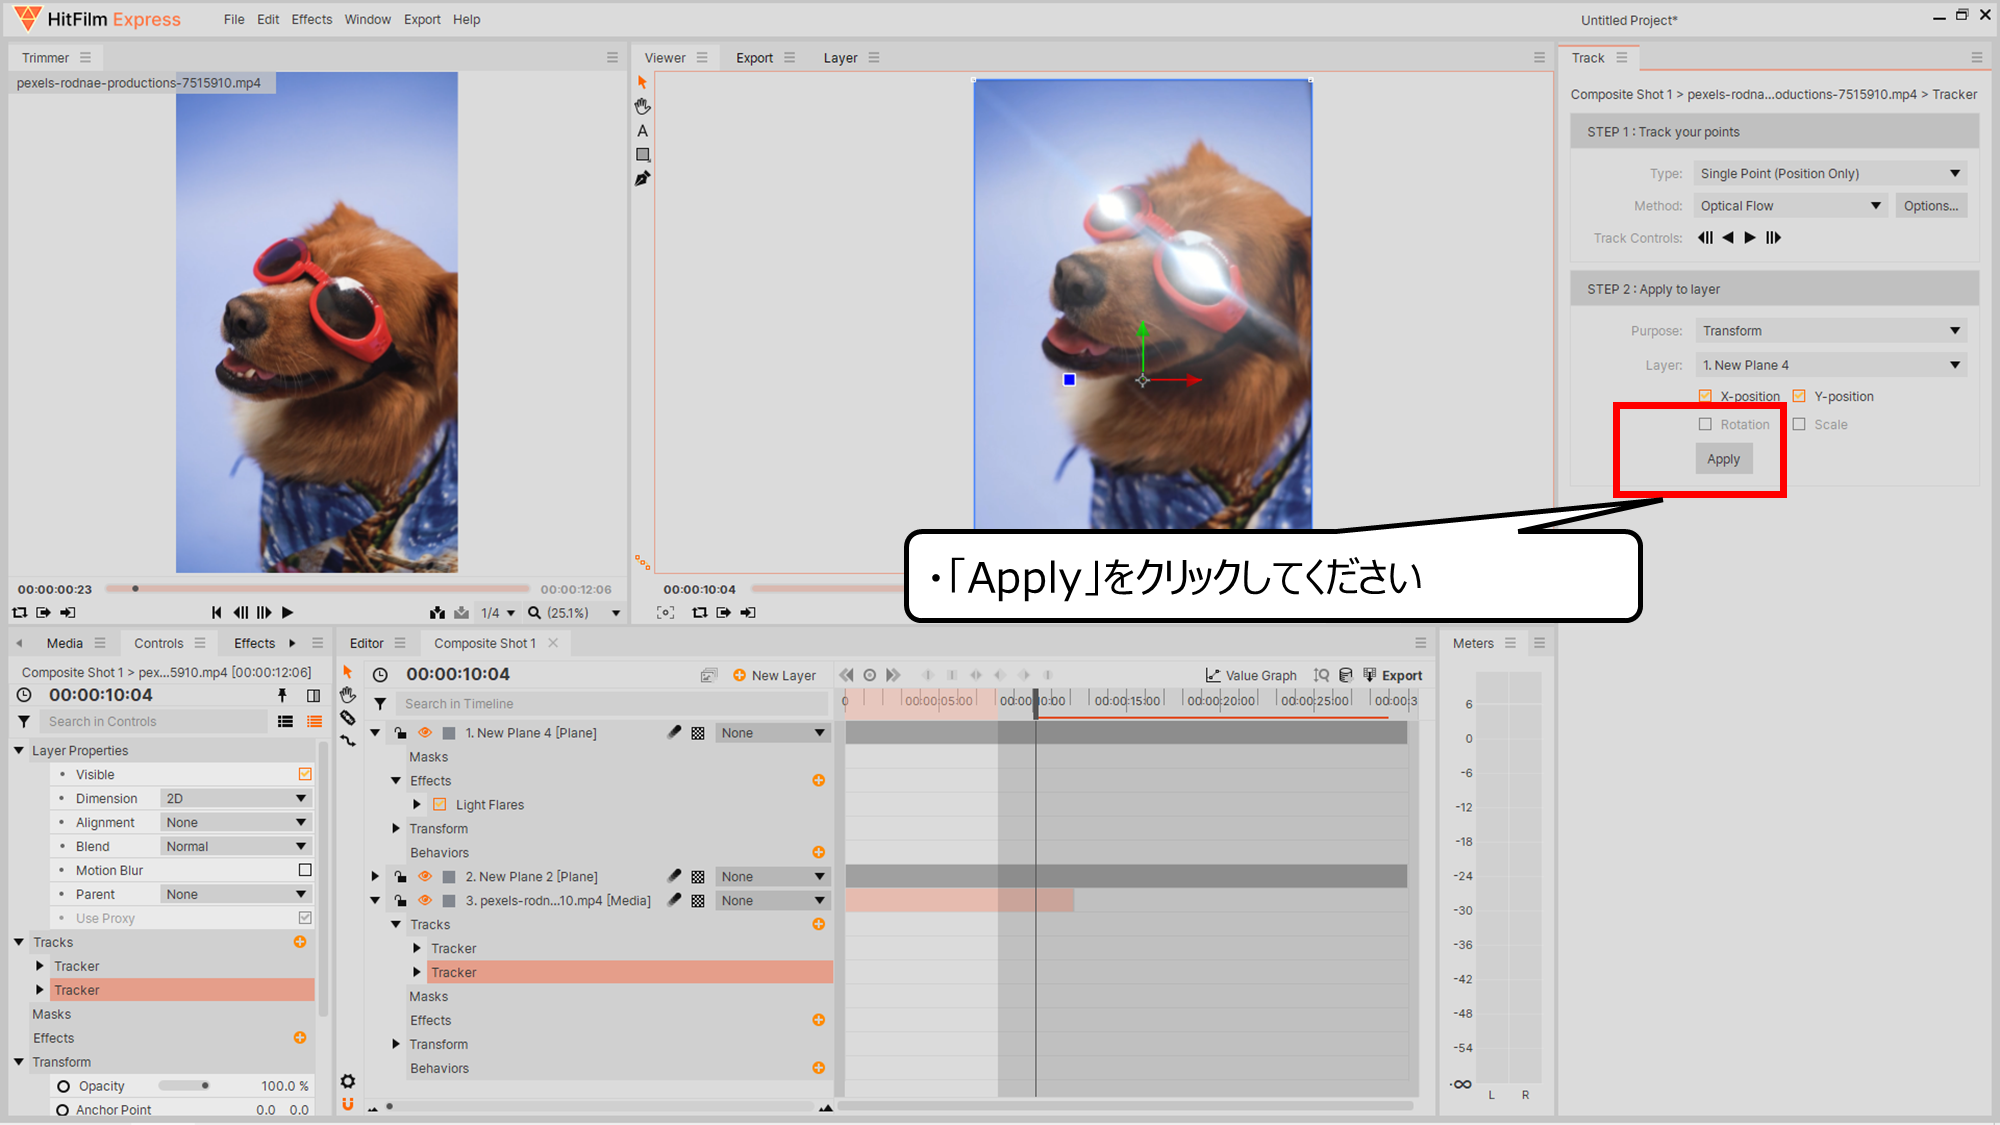
「Apply」がクリックできるようになります
・「Apply」をクリックしてください
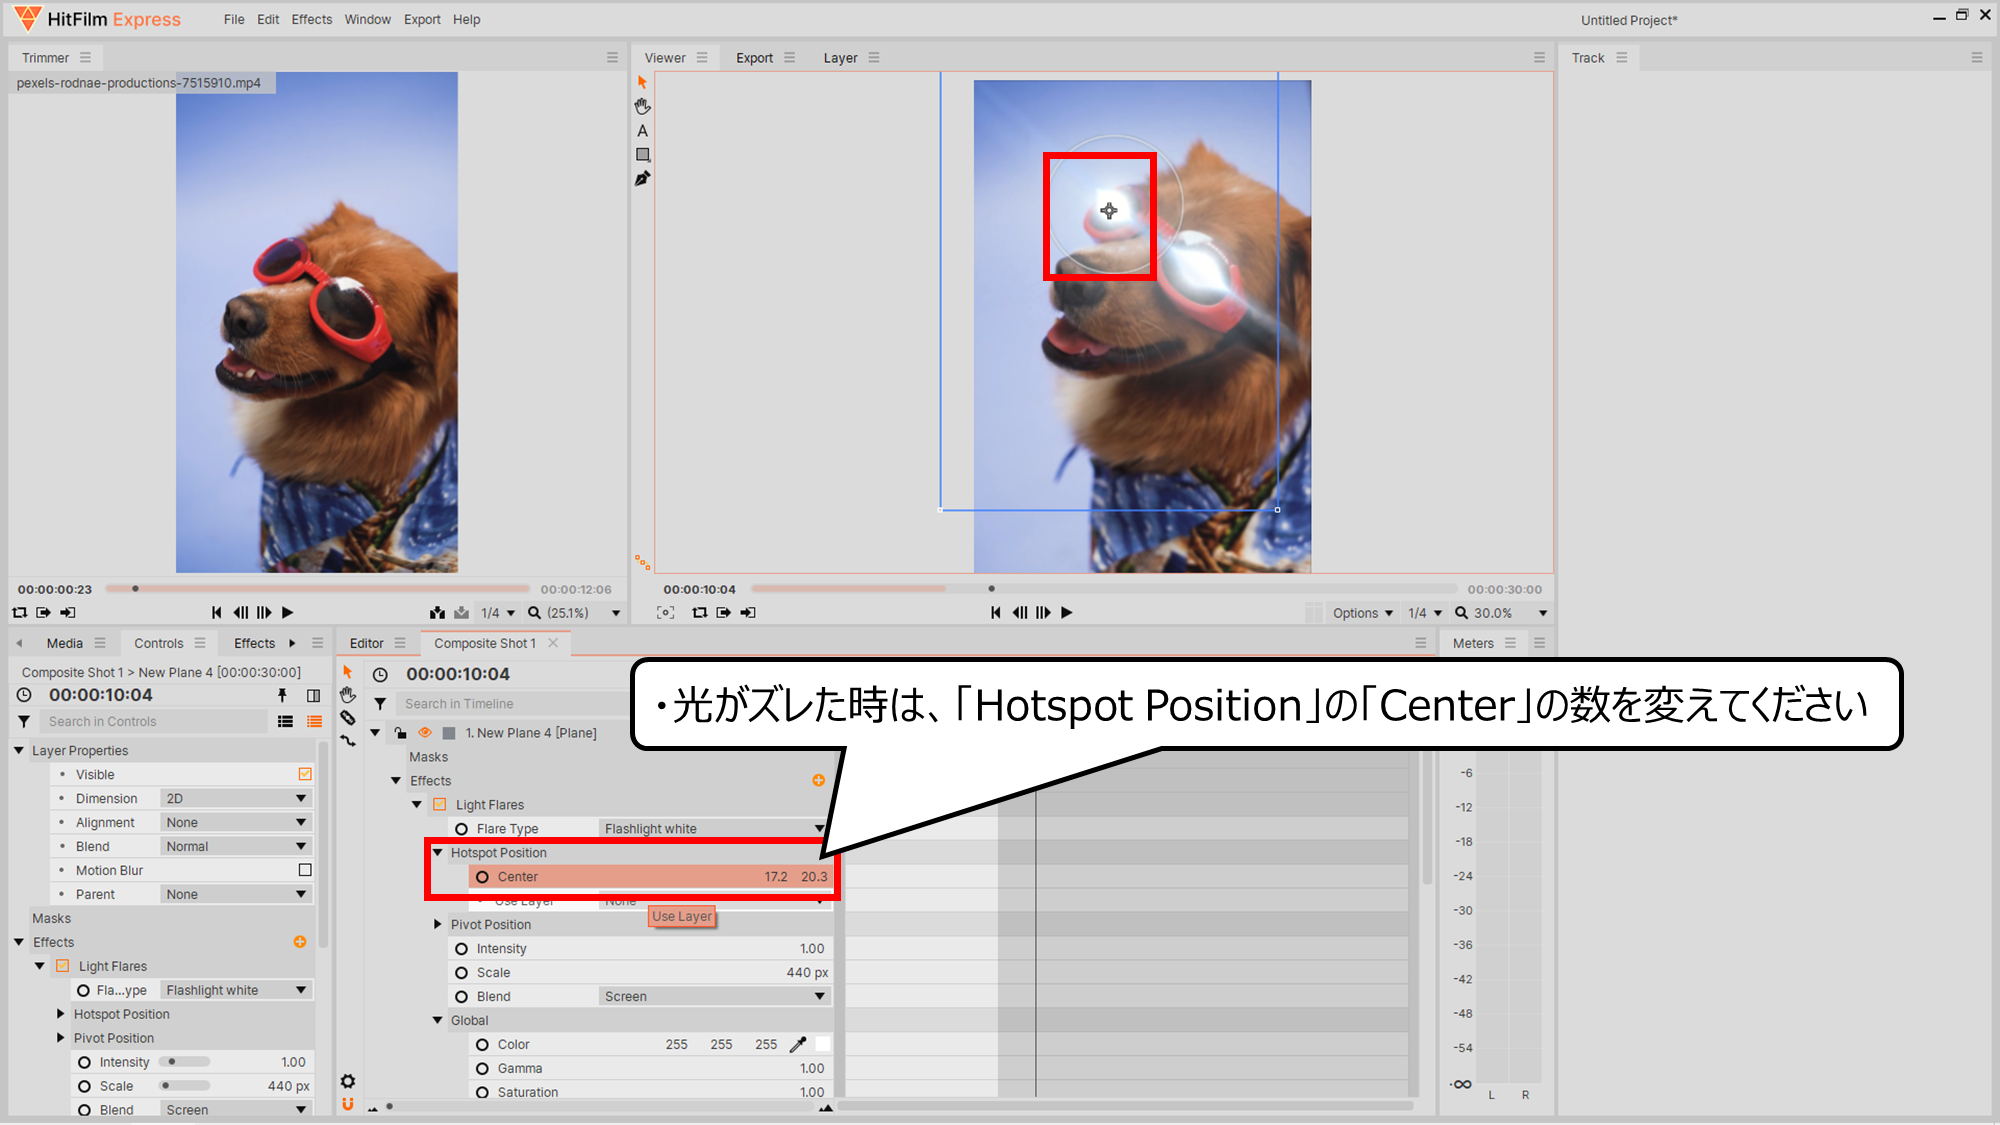
光がズレた時は、なおしてください
・光がズレた時は、「Hotspot Position」の「Center」の数を変えてください
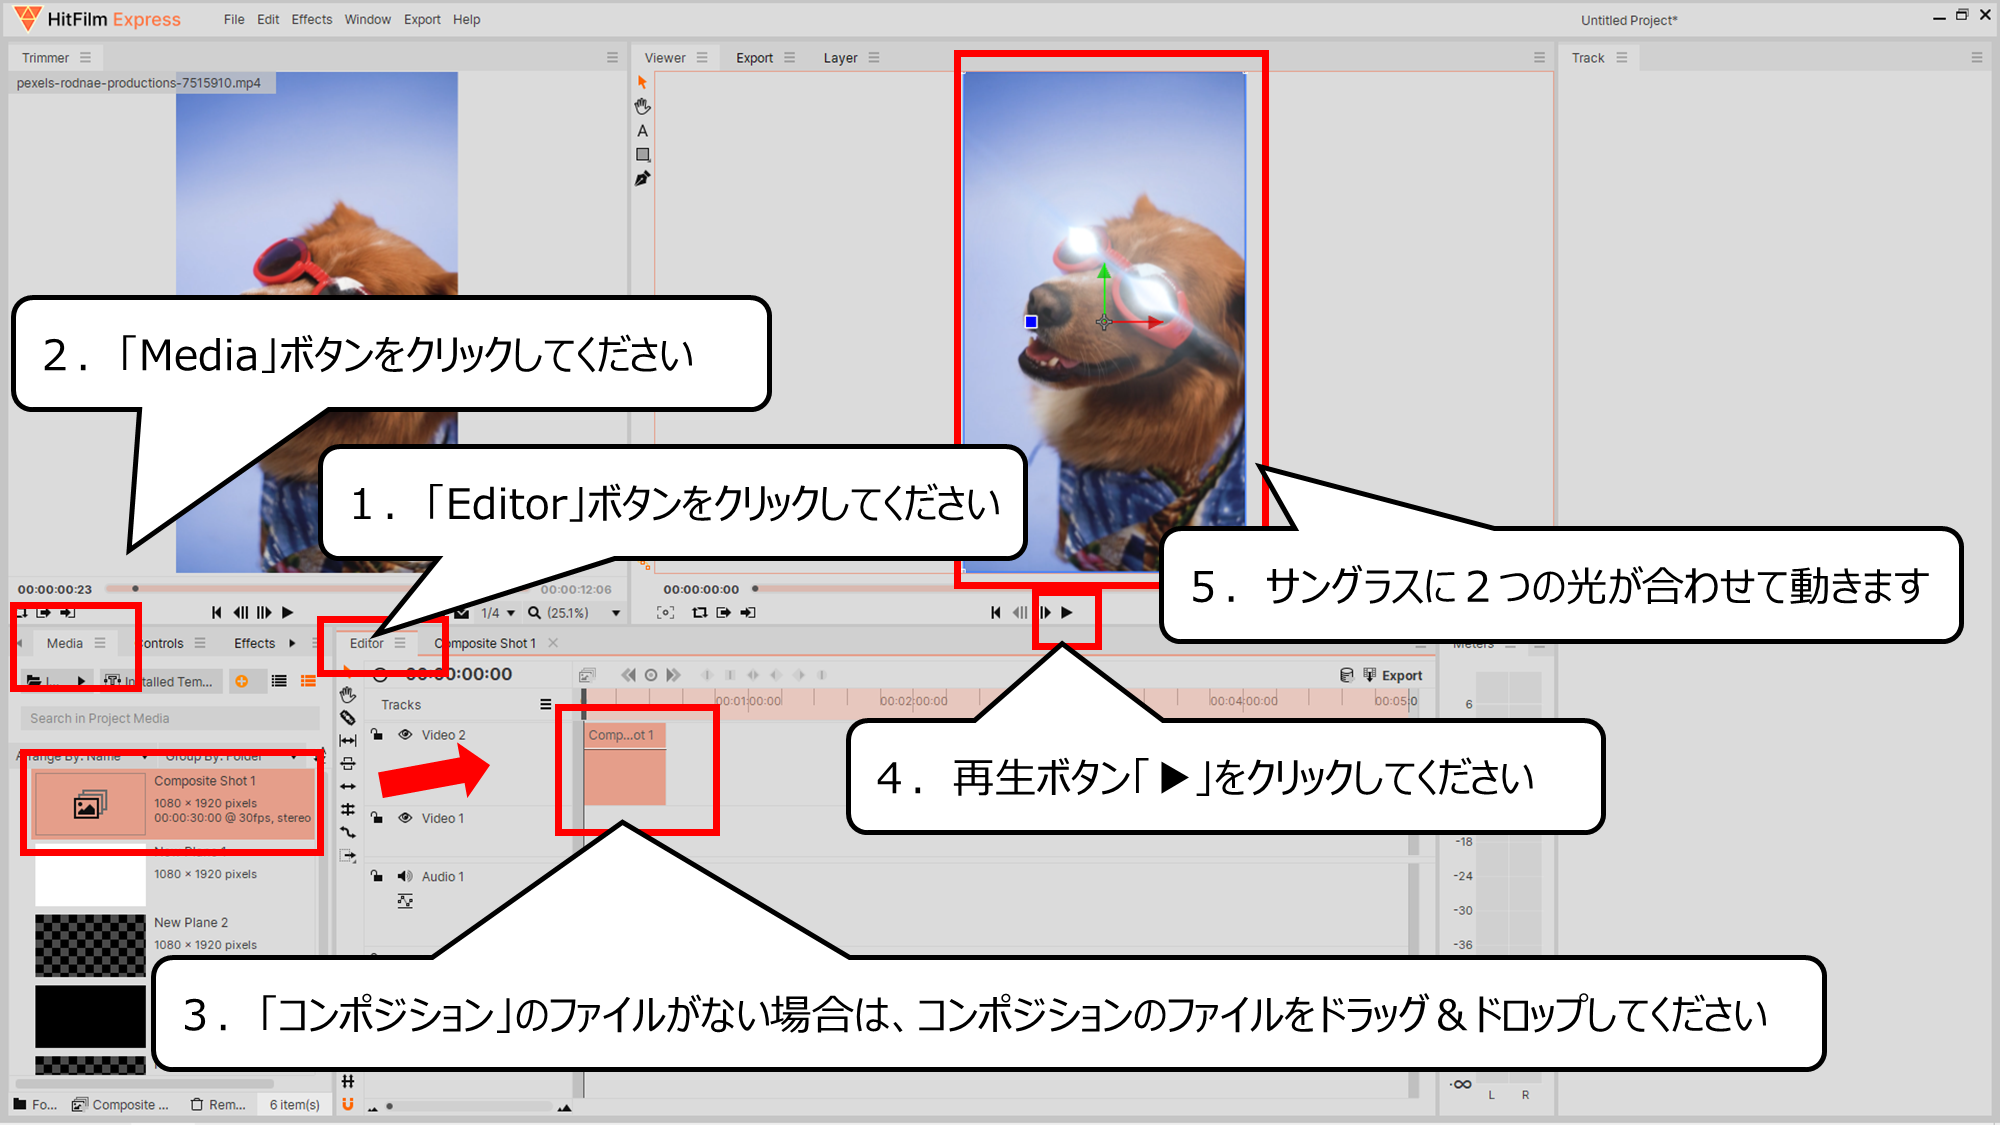
再生ボタンをクリックすると、サングラスに合わせて光が動きます
1.「Editor」ボタンをクリックしてください
2.「Media」ボタンをクリックしてください
3.「コンポジション」のファイルがない場合は、コンポジションのファイルをドラッグ&ドロップしてください
4.再生ボタン「▶」をクリックしてください
5.サングラスに2つの光が合わせて動きます
・まとめ
今回は、「Hitfilm express」をつかい、光る目のエフェクトを作り方とトラッキングを紹介しました
Youtubeでは、さらにくわしく絵のつくり方を紹介しています
また、他のページでもCG・映像のつくり方について紹介しています


コメント