
かっこいい動画を作ってみたい!
・・・と思っても
「動画編集ソフトは高い」
「無料ソフトだと、できなことが多い」
「無料でも動作が遅い」
と悩んでいませんか?
このページでは、そんな悩みに答えるために、HitFilm Expressを紹介します
HitFilmExpressは無料、でも高機能のソフトです
このため、使いこなせば、有料ソフトに負けない動画を作ることができます
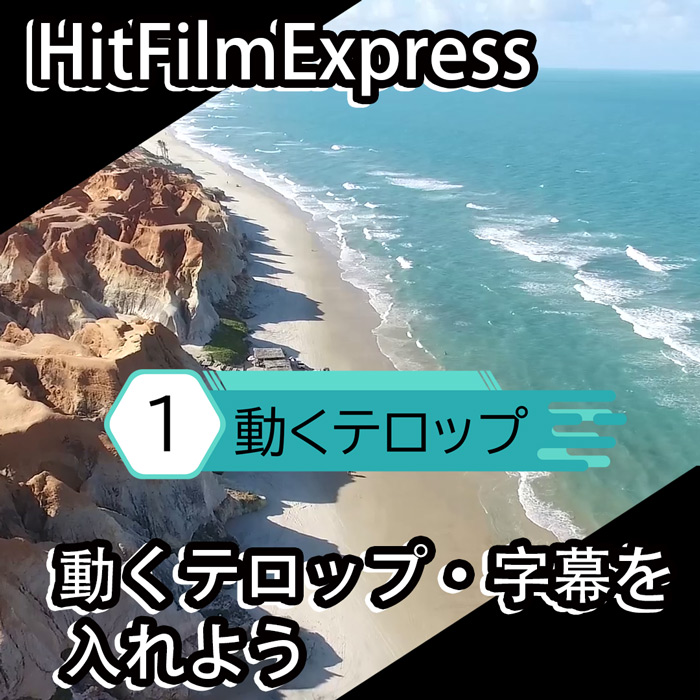
今回は、HitFilm Expressを使った
字幕・テロップの入れ方を紹介します
下の目次の流れにそって説明を進めさせていただきます
・HitFilm Expressの紹介とインストール
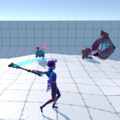
・HitFilm Expressはどんな動画が作れるの?
HitFilmExpressは、使いこなすとイロイロな動画を作ることができます
HitFilm Expressで、できることをまとめた動画を紹介します
いきなり、すべて使いこなすのはムズかしいですが
画面はシンプルなので、カンタンに使うことができます
・HitFilm Expressをインストールしよう
HitFilmExpressを使うためには、
公式サイトからダウンロードする必要があります
下に公式サイトのURLを紹介します
HitFilm Expressの公式サイト
https://fxhome.com/
このブログでは、下のページでインストールについて説明しています
ぜひ、インストールする時には、合わせてご覧ください
【無料&高機能】映像編集ソフトのHitFilm Expressを紹介-Tutrial-!
https://illust55.com/771/
インストールが終わりましたら、起動してください
次に、字幕・テロップの入れ方を紹介させていただきます
・HitFilm Expressを使って動画に字幕・テロップを入れよう
・字幕・テロップを入れる準備をしよう
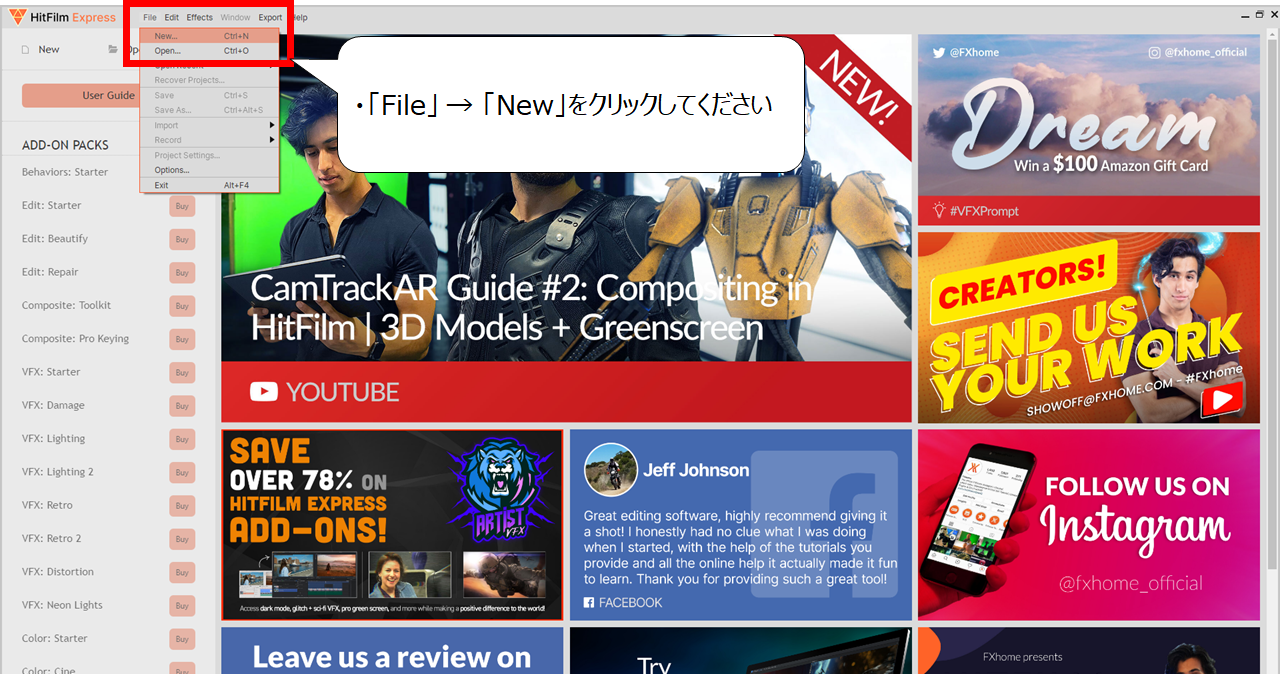
動画を新しく、つくり始めます
・「File」 → 「New」をクリックしてください
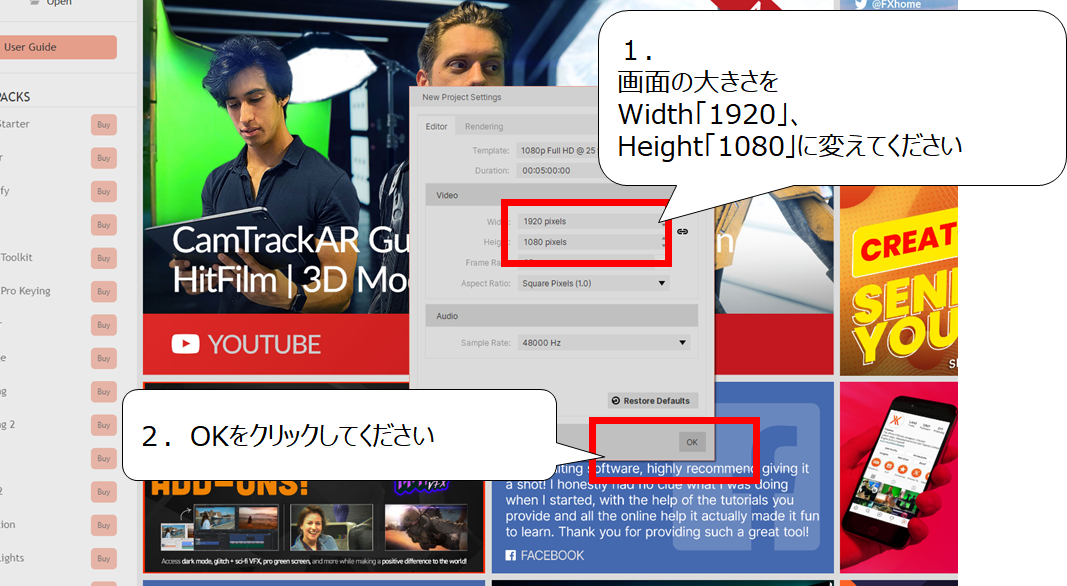
画面の大きさを決めます
1.画面の大きさを、Width「1920」、Height「1080」に変えてください
2.OKをクリックしてください
・映像に使う、動画と背景画像を読み込もう
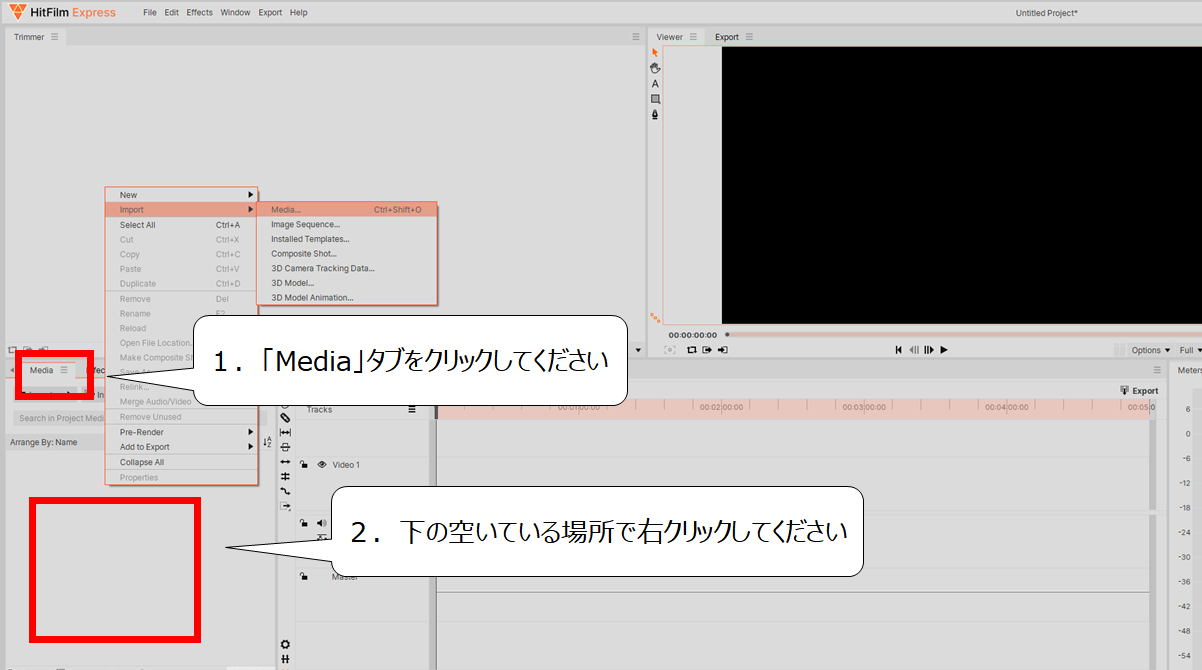
映像に使う、動画と画像を読みこんでください
1.「Media」タブをクリックしてください
2.下の空いている場所で右クリックしてください
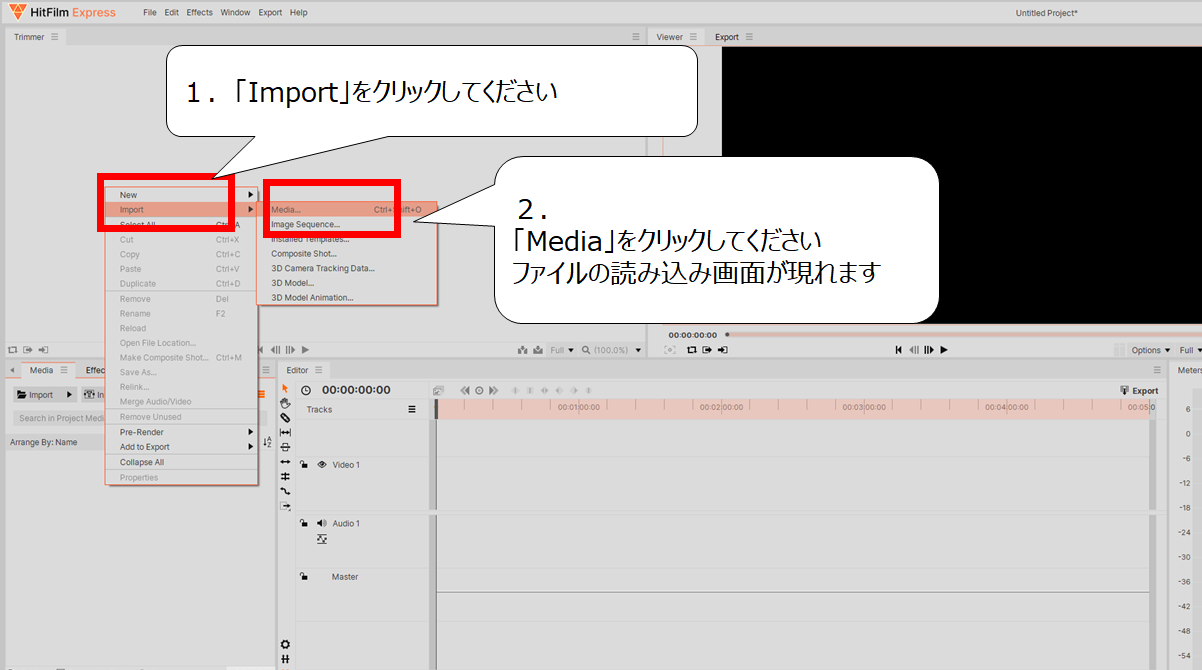
ファイルの読み込み画面を表示させます
1.「Import」をクリックしてください
2.「Media」をクリックしてください、ファイルの読み込み画面が現れます
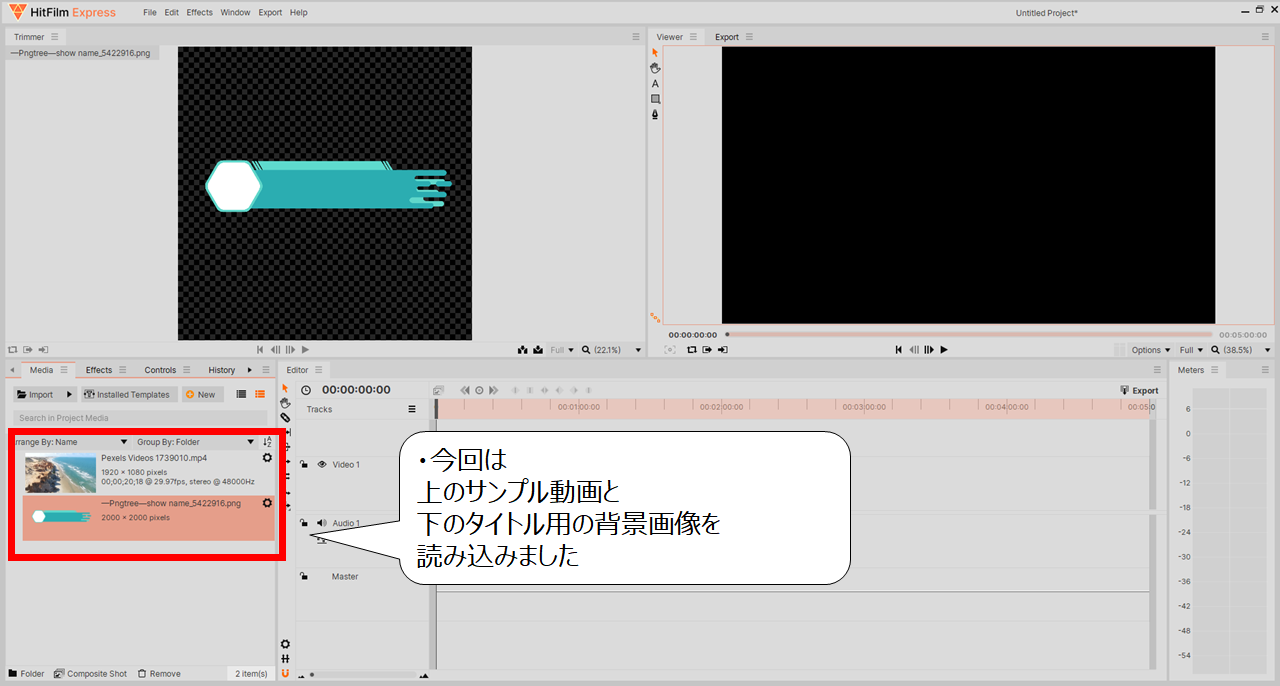
動画と画像を使ったサイトを紹介します
・今回は上のサンプル動画と、下のタイトル用の背景画像を読み込みました
サンプル動画のダウンロードサイトです
https://www.pexels.com/ja-jp/videos/
テロップ背景の画像素材のサイトです
https://pngtree.com/
(※ 「text box」で検索すると同じような画像が、たくさん表示されます)
・背景画像とテロップ・字幕を合わせよう
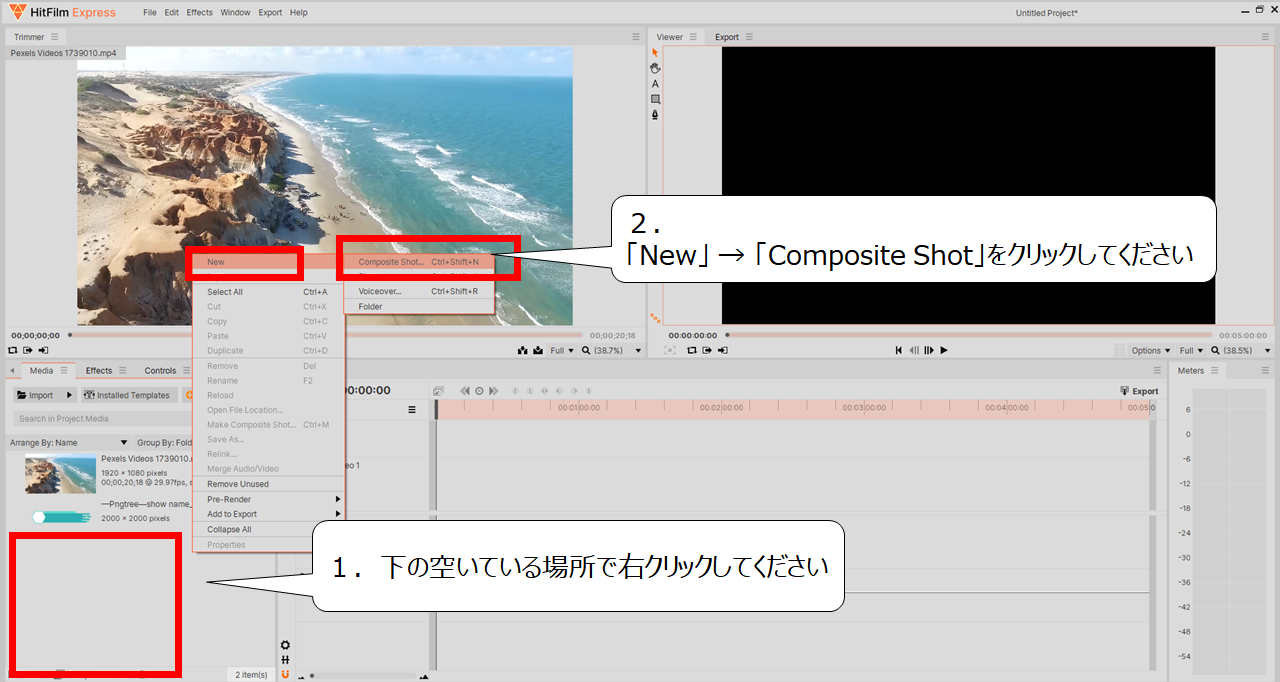
字幕・テロップを、一つにまとめる準備をします
1.下の空いている場所で右クリックしてください
2.「New」 → 「Composite Shot」をクリックしてください
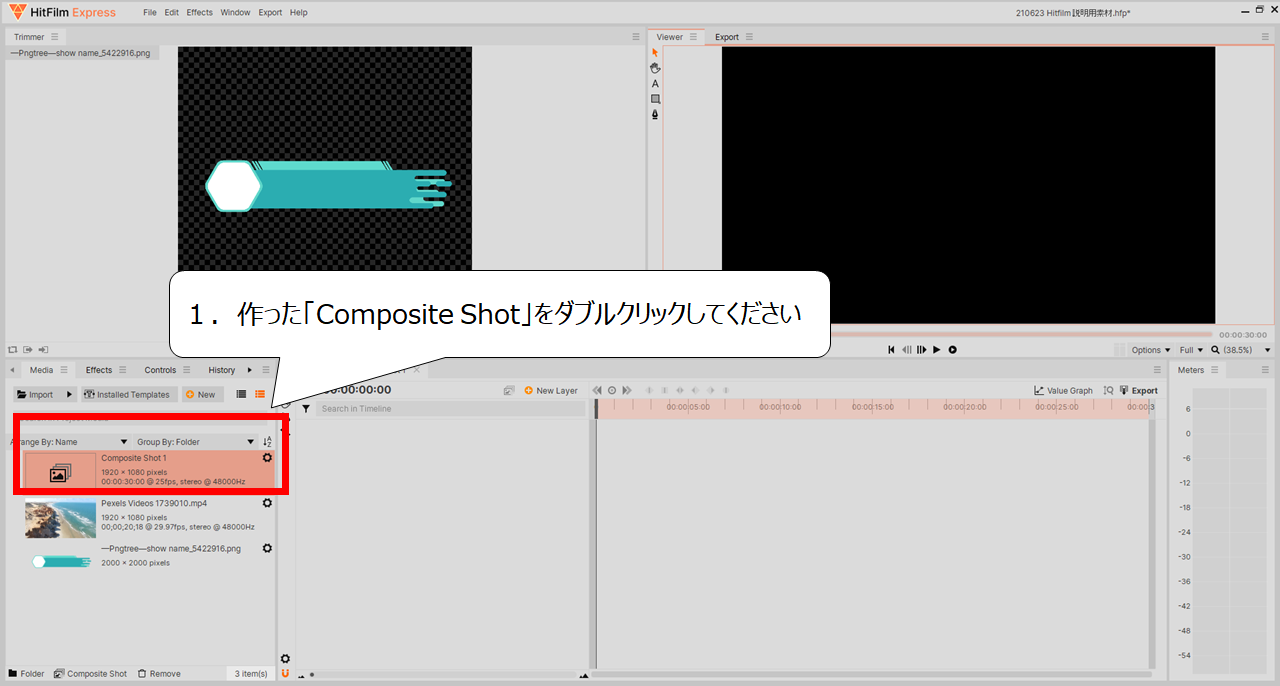
一まとめにする作業をします
1.作った「Composite Shot」をダブルクリックしてください
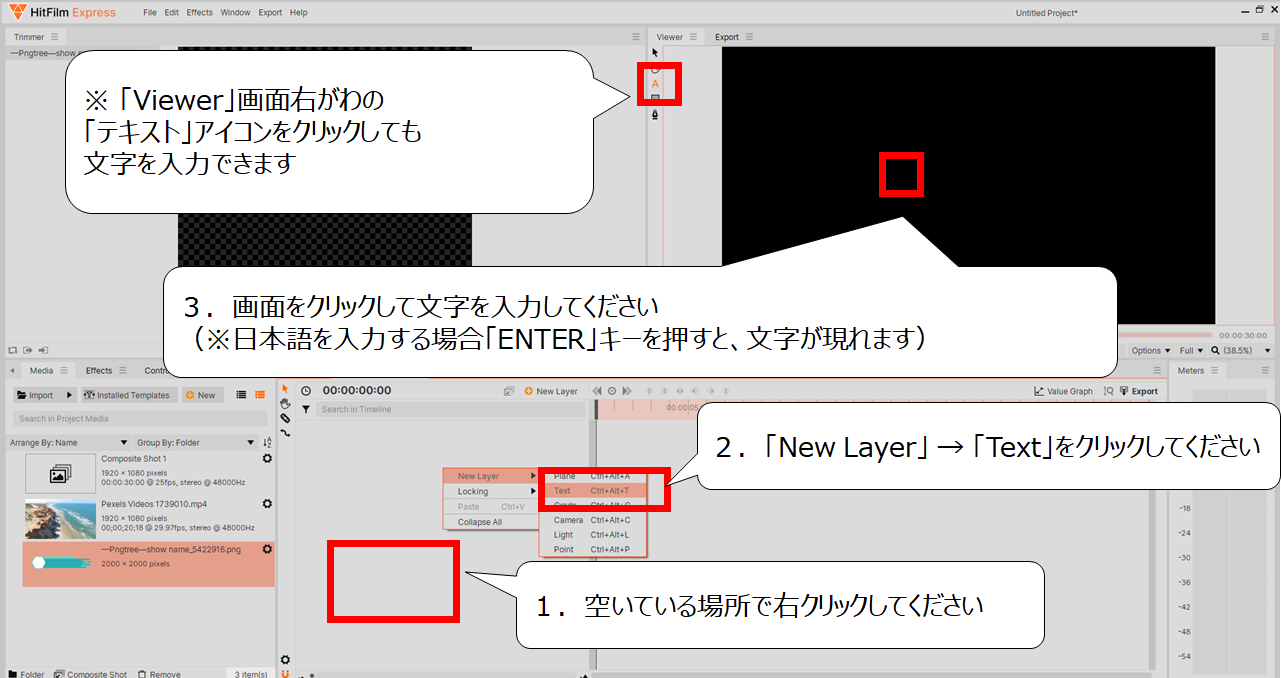
始めに文字を入力します
1.空いている場所で右クリックしてください
2.「New Layer」 → 「Text」をクリックしてください
3.画面をクリックして文字を入力してください
(※日本語を入力する場合「ENTER」キーを押すと、文字が現れます)
※ 「Viewer」画面右がわの「テキスト」アイコンをクリックしても文字を入力できます
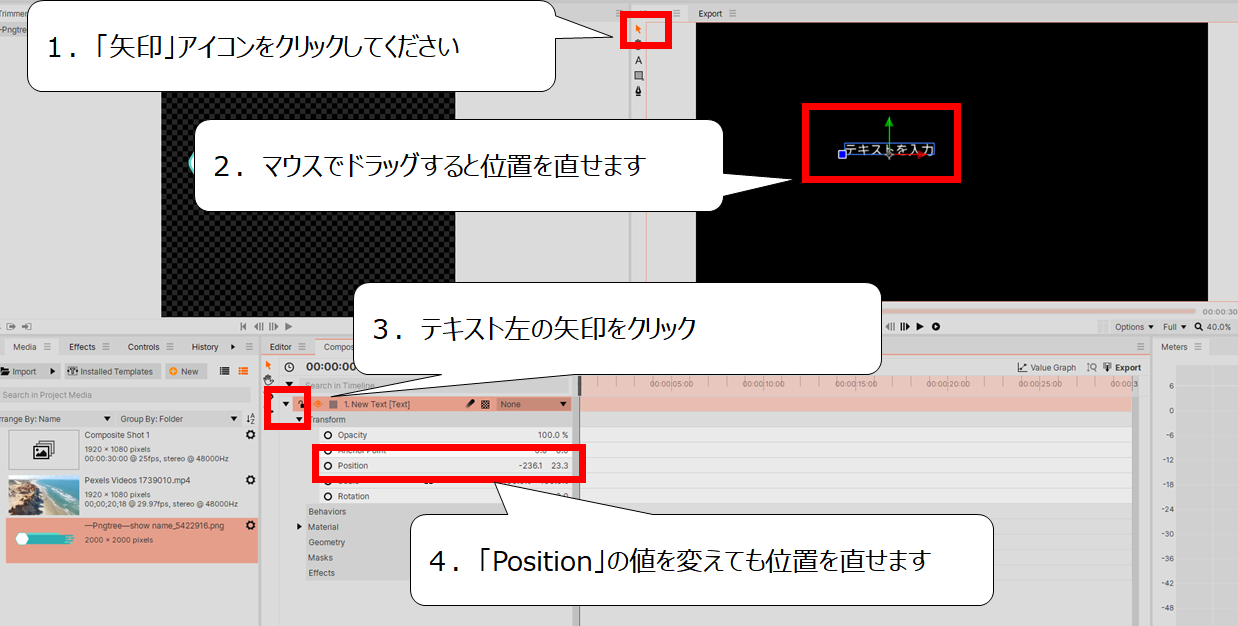
文字の位置を直してください
1.「矢印」アイコンをクリックしてください
2.マウスでドラッグすると位置を直せます
3.テキスト左の矢印をクリック
4.「Position」の値を変えても位置を直せます
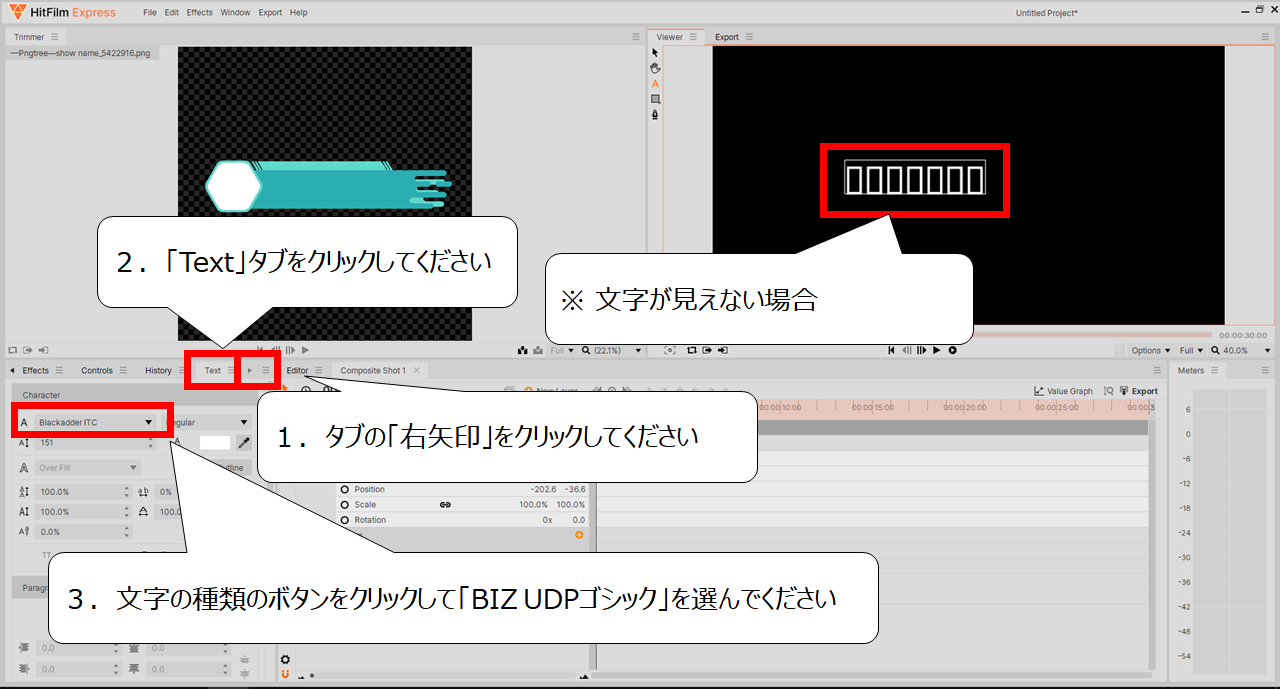
文字がうまく表示されない場合は、次の操作をしてください
(※ 読める文字が表れている場合、この作業はスキップしてください)
※ 文字が見えない場合
1.タブの「右矢印」をクリックしてください
2.「Text」タブをクリックしてください
3.文字の種類のボタンをクリックして「BIZ UDPゴシック」を選んでください
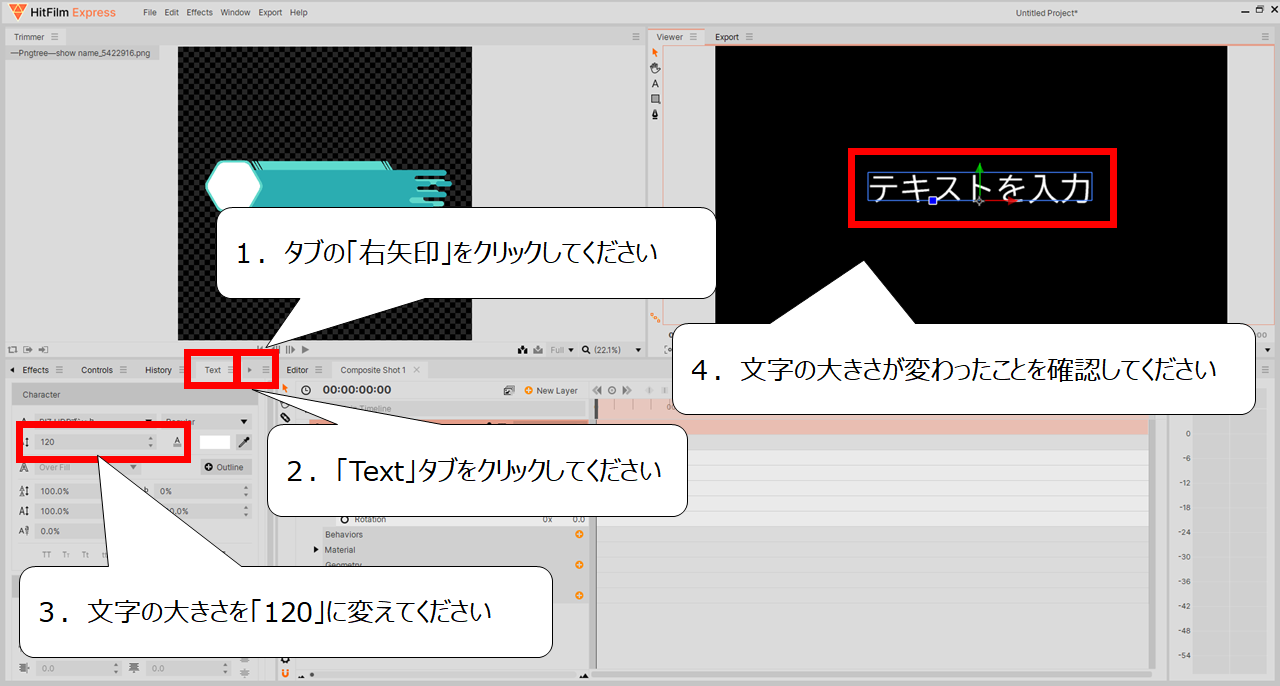
文字を大きくします
1.画面左下のタブの「右矢印」をクリックしてください
2.「Text」タブをクリックしてください
3.文字の大きさを「120」に変えてください
4.文字の大きさが変わったことを確認してください

「Text」タブが見つからない場合は、次の作業をしてください
(※「Text」タブが見つかった場合は、この作業をスキップしてください)
ー「Text」タブが見つからない場合ー
・「Windows」 → 「Work Spaces」 →「All Panels」をクリックしてください
・「Reset Work Space」をクリックすると元のパネルに戻ります
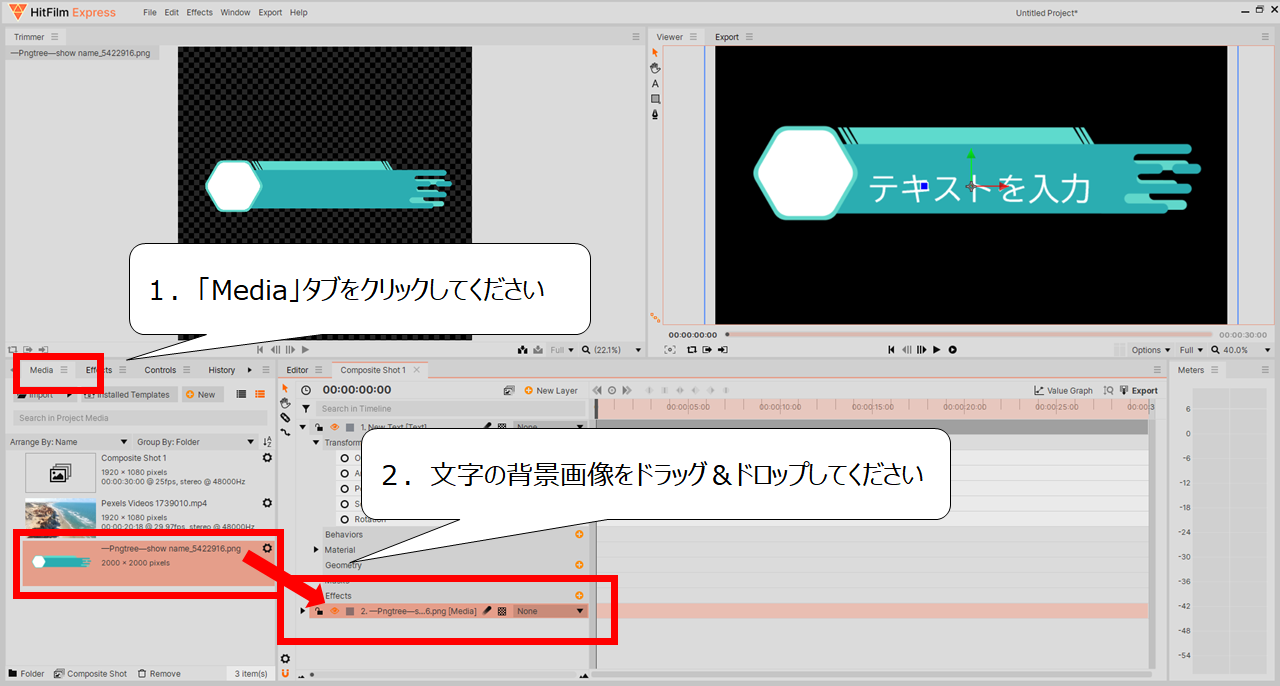
続いて、文字に背景画像を加えます
1.「Media」タブをクリックしてください
2.文字の背景画像をドラッグ&ドロップしてください
・字幕・テロップと動画を合わせよう
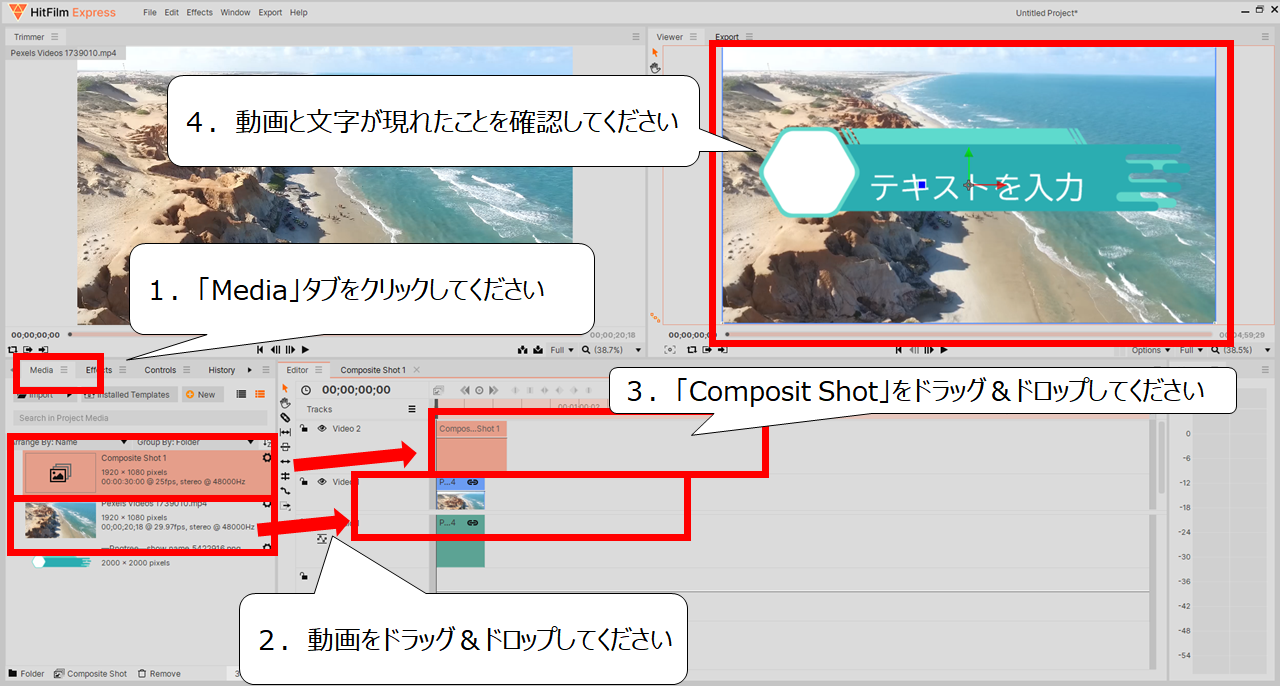
動画と文字を合わせます
1.「Media」タブをクリックしてください
2.動画をドラッグ&ドロップしてください
3.「Composit Shot」をドラッグ&ドロップしてください
4.動画と文字が現れたことを確認してください
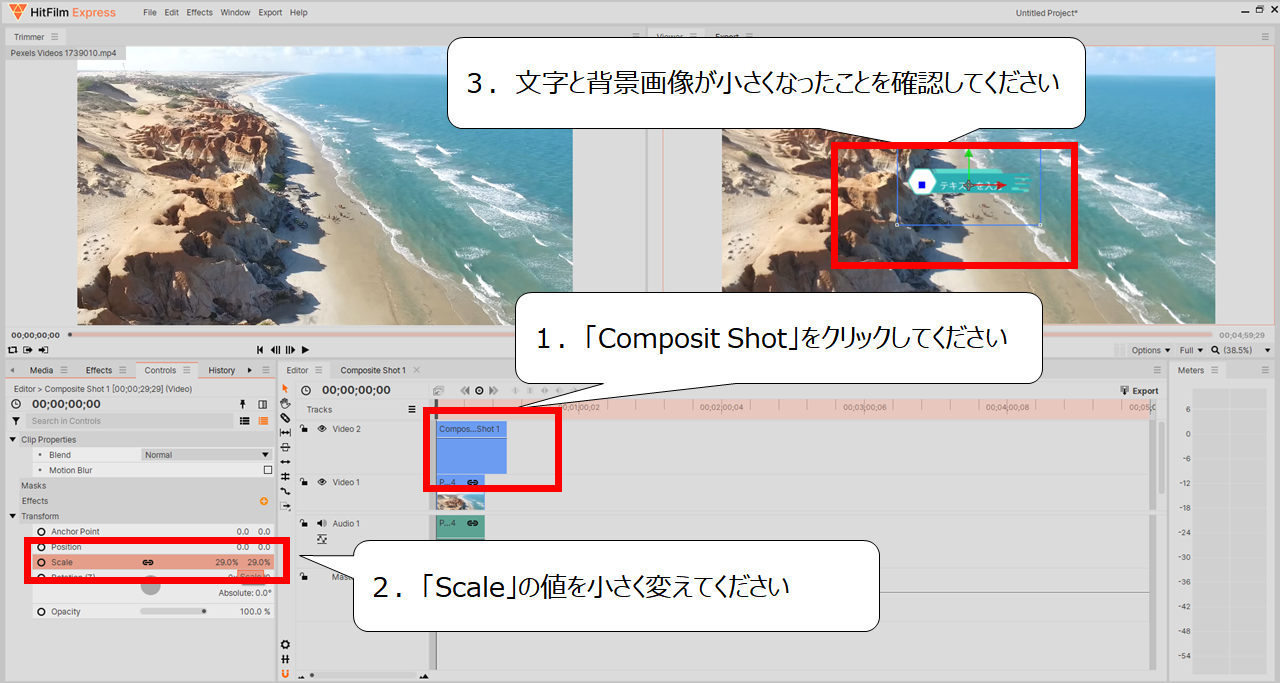
字幕・テロップの大きさを調整してください
1.「Composit Shot」をクリックしてください
2.「Scale」の値を小さく変えてください
3.文字と背景画像が小さくなったことを確認してください
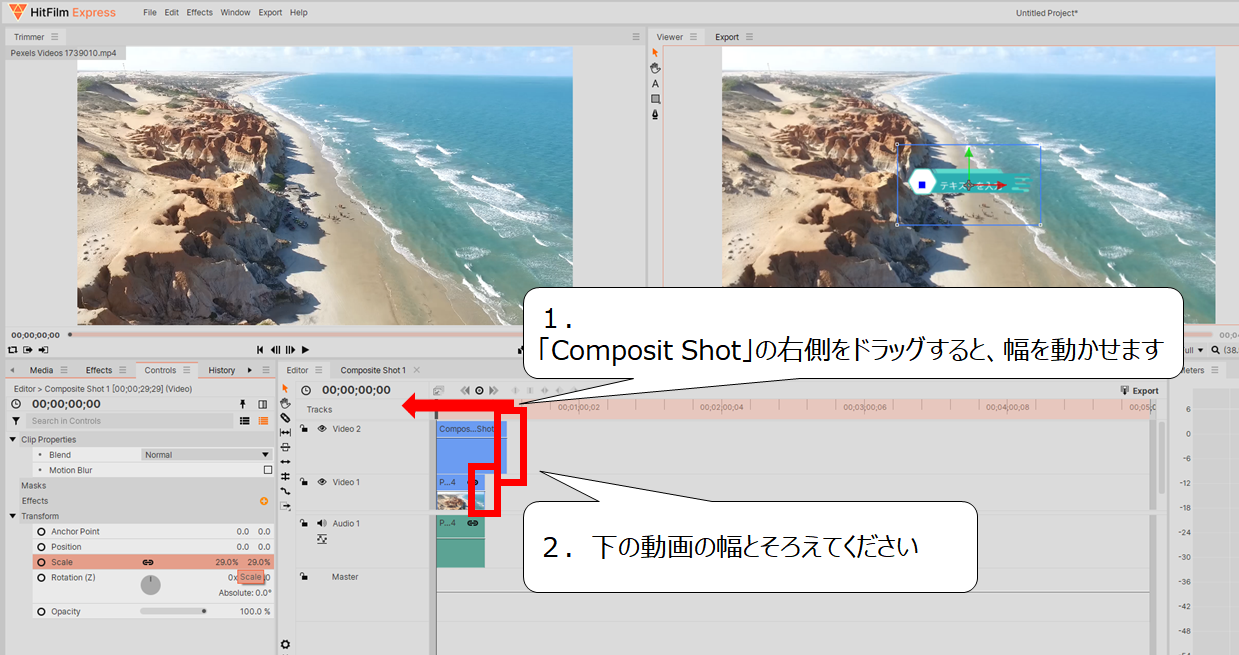
テロップの再生時間を、動画の長さに合わせます
1.「Composit Shot」の右側をドラッグすると、幅を動かせます
2.下の動画の幅とそろえてください
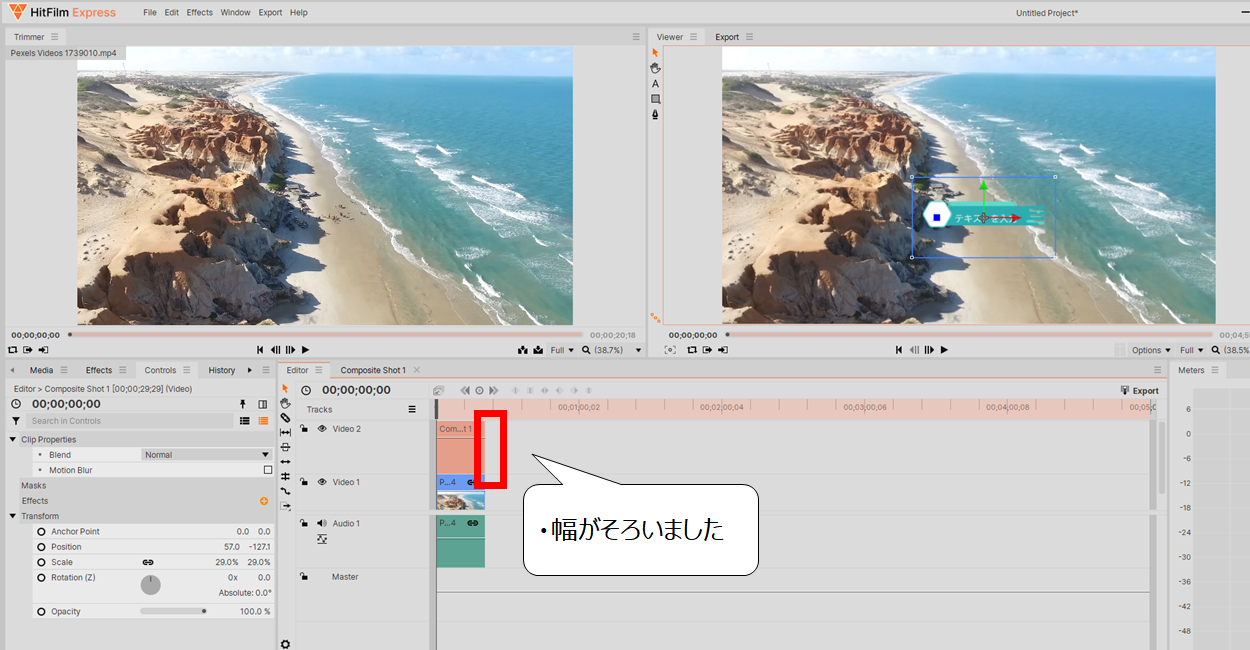
幅がそろった状態です
・幅がそろいました!
・字幕・テロップに動きを加えよう
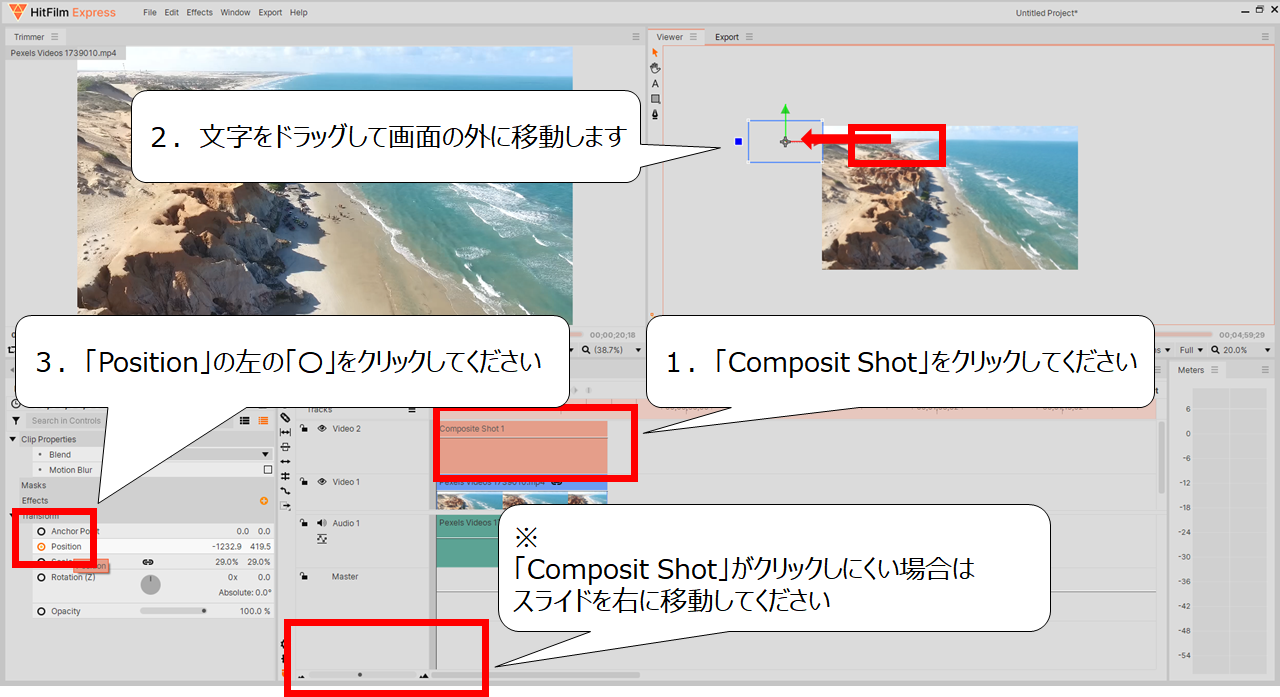
字幕・テロップに動きを加えます
今回は画面外の左から現れる動きにします
1.「Composit Shot」をクリックしてください
2.文字をドラッグして画面の外に移動します
3.「Position」の左の「〇」をクリックしてください
※「Composit Shot」がクリックしにくい場合は、スライドを右に移動してください
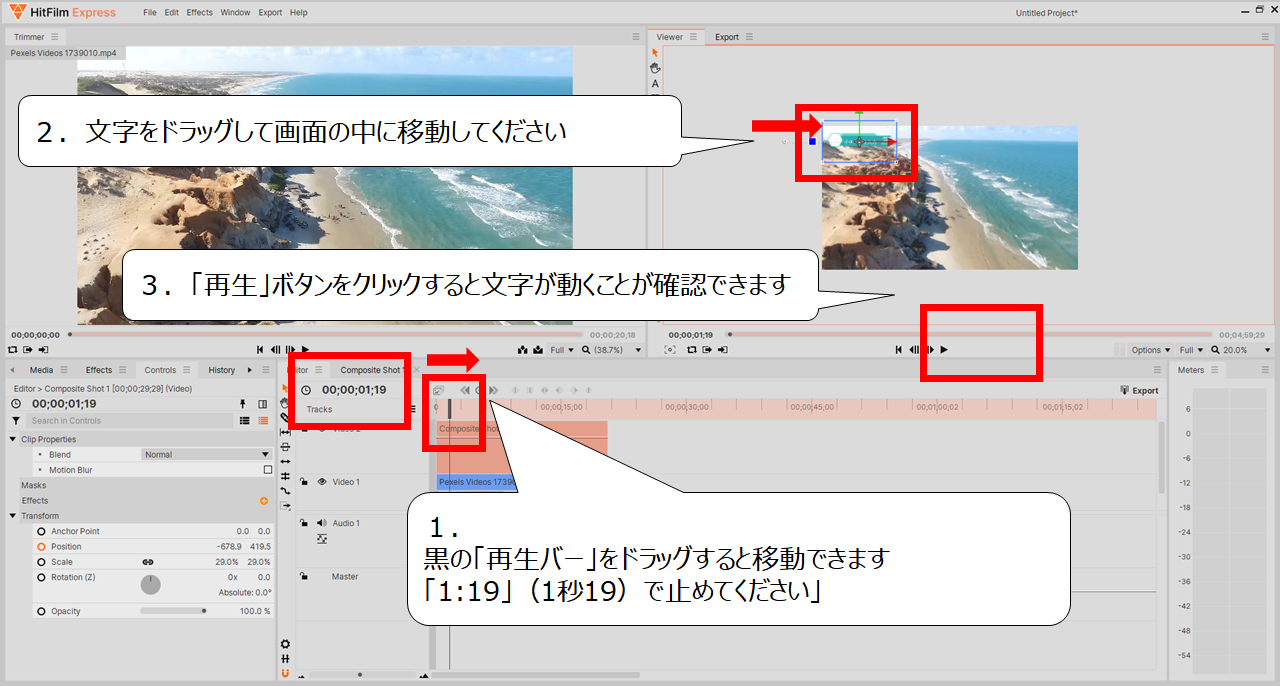
画面の中に入る動きを作り、再生ボタンをクリックしてください
1.黒の「再生バー」をドラッグすると移動できます
(※ このページでは「1:19」(1秒19)に移動しています)
2.文字をドラッグして画面の中に移動してください
3.「再生」ボタンをクリックすると文字が動くことが確認できます
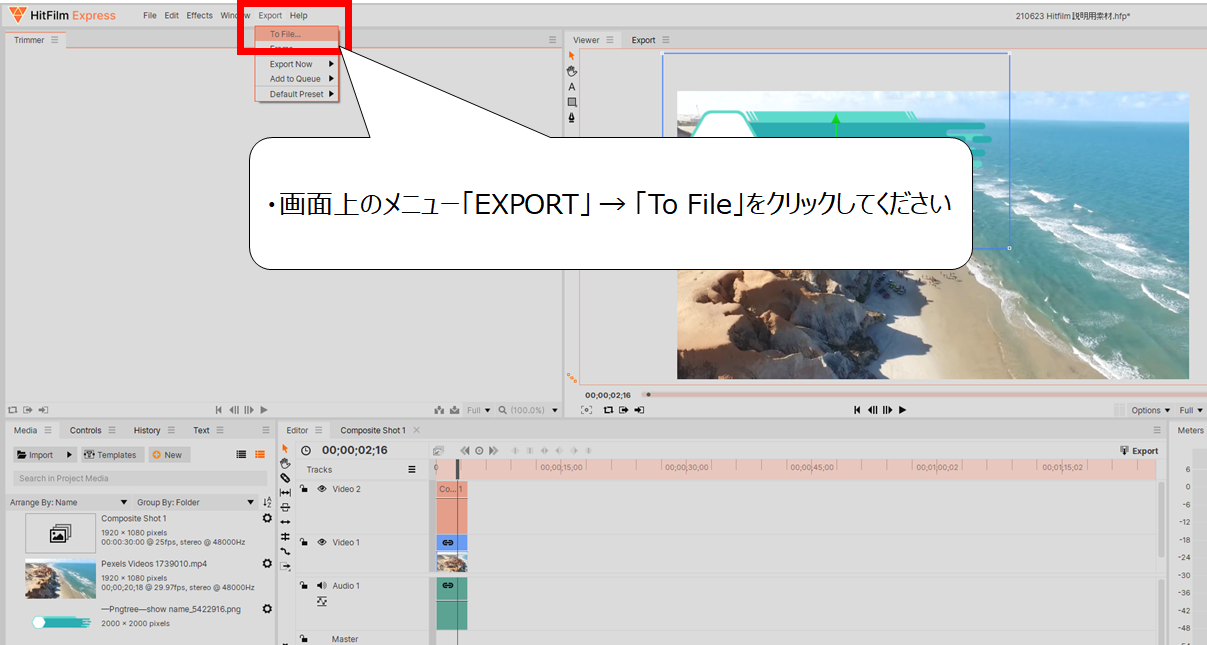
作り終わったら動画のファイルを作ります
・画面上のメニュー「EXPORT」 → 「To File」をクリックしてください

完成した動画です
上の映像は「GIF」に変えたので、カクカクしていますが
つくった動画はスムーズに動きます
・まとめ
HitFilm Expressは英語ですが、現在の無料ソフトの中ではトップレベルの高機能です
また、炎のエフェクトなどAfter Effectsでは苦労するエフェクトもあります
ぜひ、まだ体験されていない方は、チャレンジしてください
最後に他のHitFilm Expressのページを紹介します
ぜひ、合わせてご覧ください
・映像編集ソフトのHitFilmExpressのインストールと始め方
https://illust55.com/771/
・HitFilmExpressの音量とトランジション(切り替え効果)の使い方
https://illust55.com/907/
ここまで読んでいただき、ありがとうございました

コメント